Overview
Webhooks provide a mechanism where a server-side application (In this case Stripe) can notify a client-side application (in this case Payments) when a new event (like customer create, update, delete, charge capture, charge failed, etc) has occurred on the server.
Webhooks automatically send specified data to a destination (endpoint) from database events. Our Payments app utilizes webhooks for many of our features, such as updating your Salesforce org with credit card information and creating Dispute records.
Benefits
- Webhook allows us to stay up-to-date by updating the card on file with any recent changes in the credit card information by major credit card companies.
- Allow Payouts to be received in Salesforce.
- After capturing the transaction, webhooks allows disputes to be created in Salesforce.
- Notifies/updates of any deleted payment gateway customer record or payment method.
- Recognize any changes in Stripe Billing subscription/Invoices.
- Maintains consistency of all records from Stripe into Salesforce and so on.
Instructions
Create a Force.com Domain
- Go to Setup.
- In the Quick Find box, enter “Sites and Domains.”
- Click “Sites.”
- Enter a value for your Force.com domain.
- Click Check Availability.
- Review and accept the Site terms of use.
- Click Register My Force.com Domain.
Site Configuration
Go to Setup.
In the Quick Find box, enter “Sites and Domains.”
Click “Sites.”
Click New.
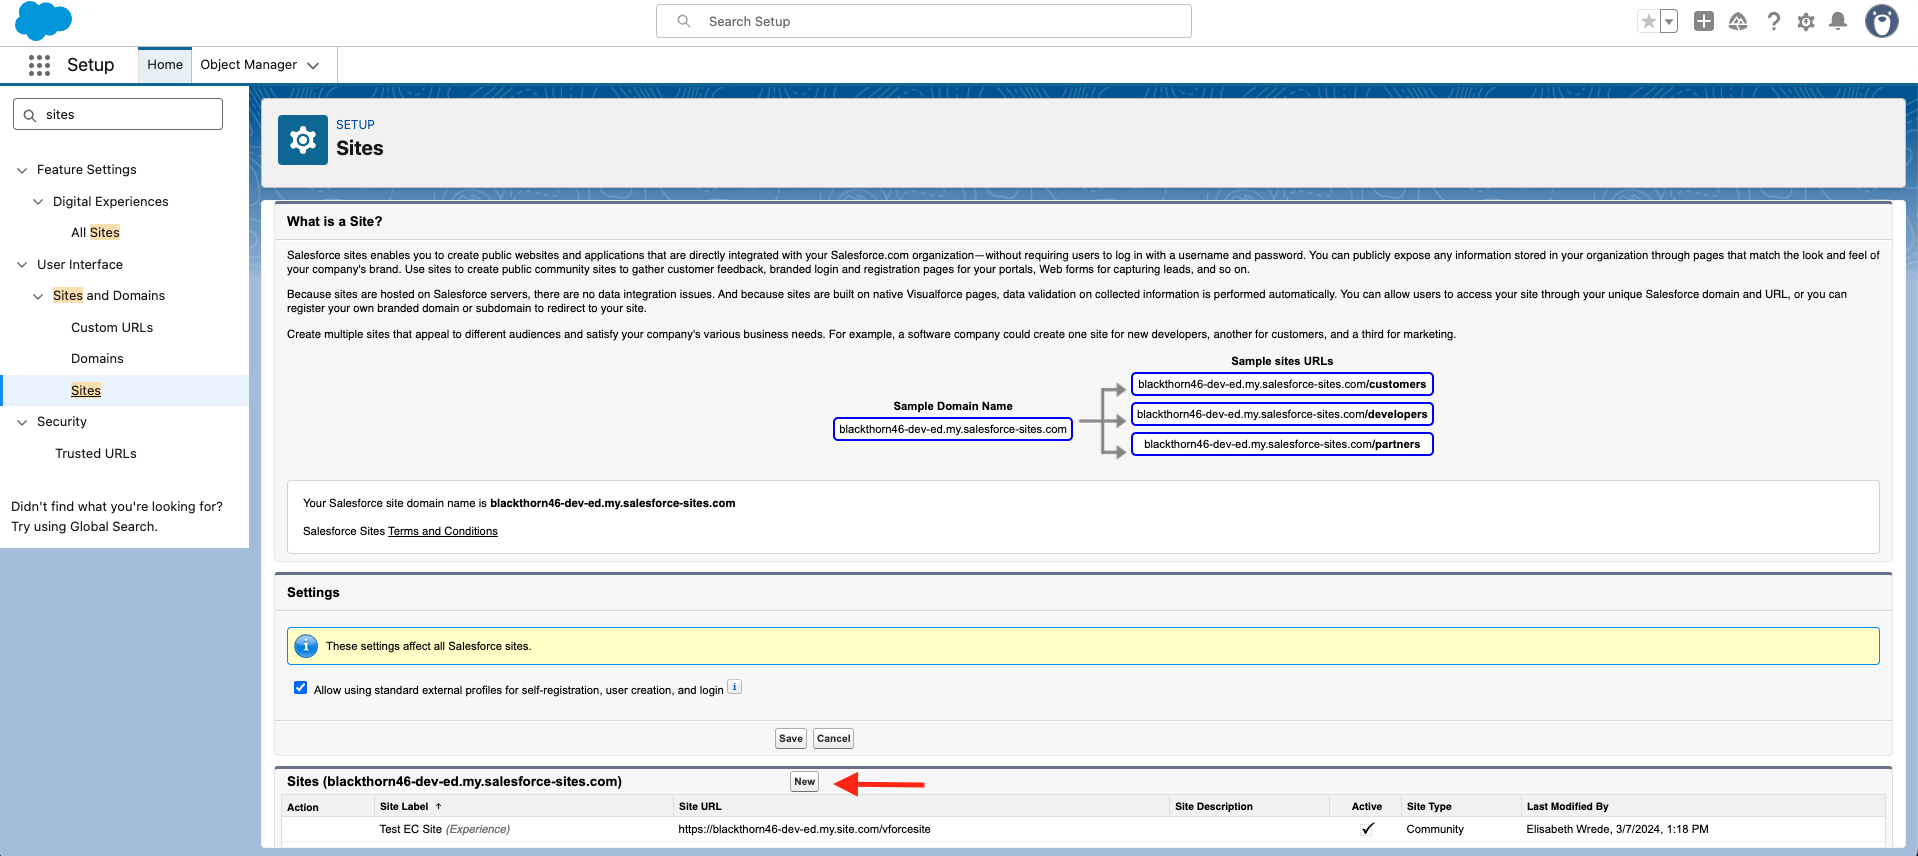
Enter a Site Label, Site Name, and a Default Web Address. (We suggest using "webhook" or "stripe" for the Site Label and Site Name.)
Set Active = "TRUE" (checked).
For the Active Site Home Page field, click the Lookup icon and select "InMaintenance". (The page is not visible. It's just a placeholder because a value is required).
Click Save.
Change the Default Record Owner for Webhook Events
- Go to Setup.
- in the Quick Find box, enter and click “Sites.”
- Click Edit next to your webhook site.
- Change the Default Record Owner to a user of your choice.
- Click Save.
Assign the Blackthorn | Payments (Site Guest User) permission set to the public user
For users looking to setup Webhooks with a Payments package older than v5.6 you will need to add the Blackthorn | Payments (Webhooks) permission set. Additionally, you will need to add a Sharing Rule to allow the Site Guest User to access the Payment Gateway object.
The Blackthorn | Payments (Site Guest User) permission set is now a dual purpose permission set with packages v5.6 and beyond. This permission set will be used for webhook setup and REST API setup.
- Navigate back to the Site you created.
- Click Public Access Settings.
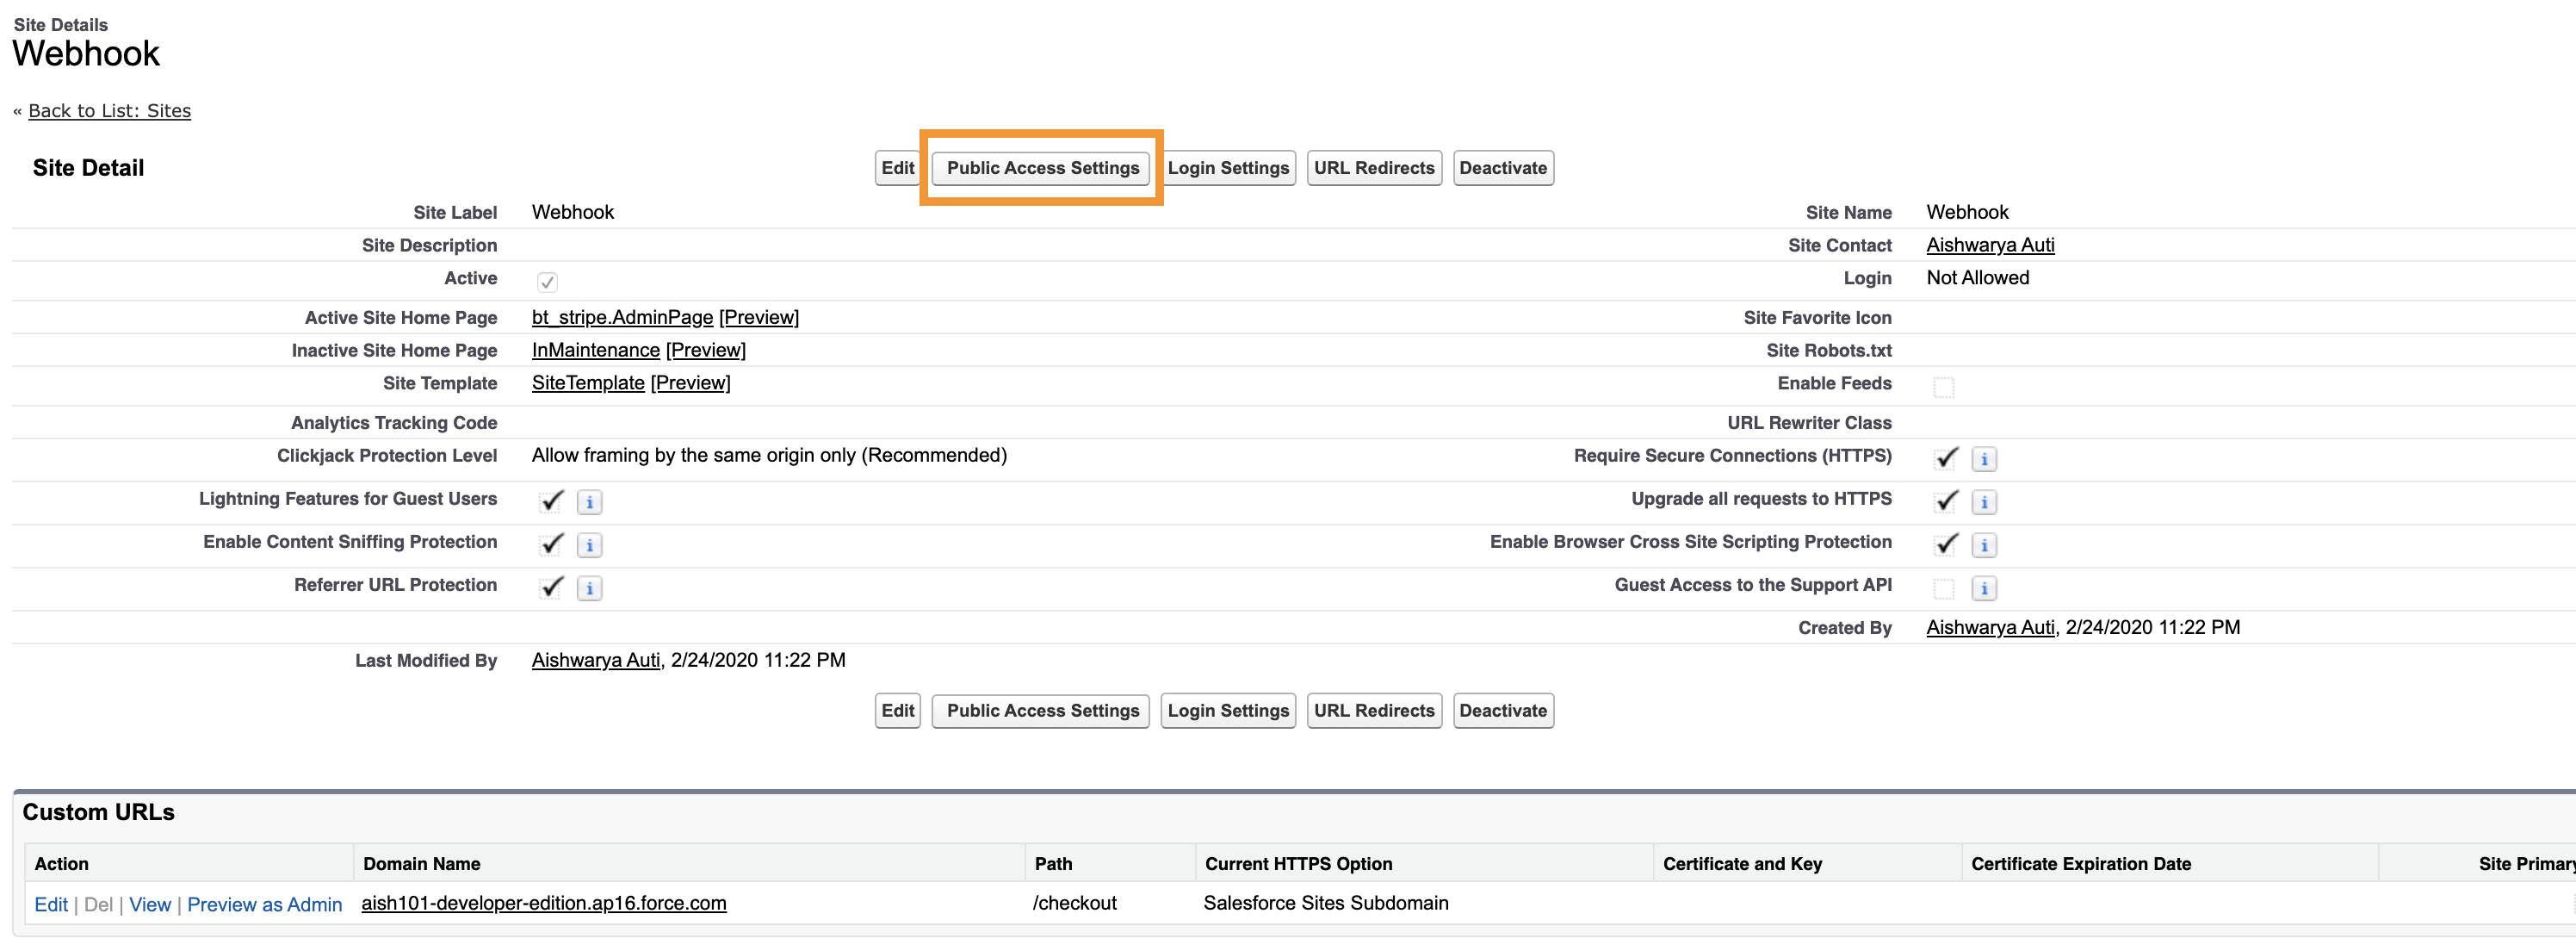
- Click the View Users or Assign Users button.
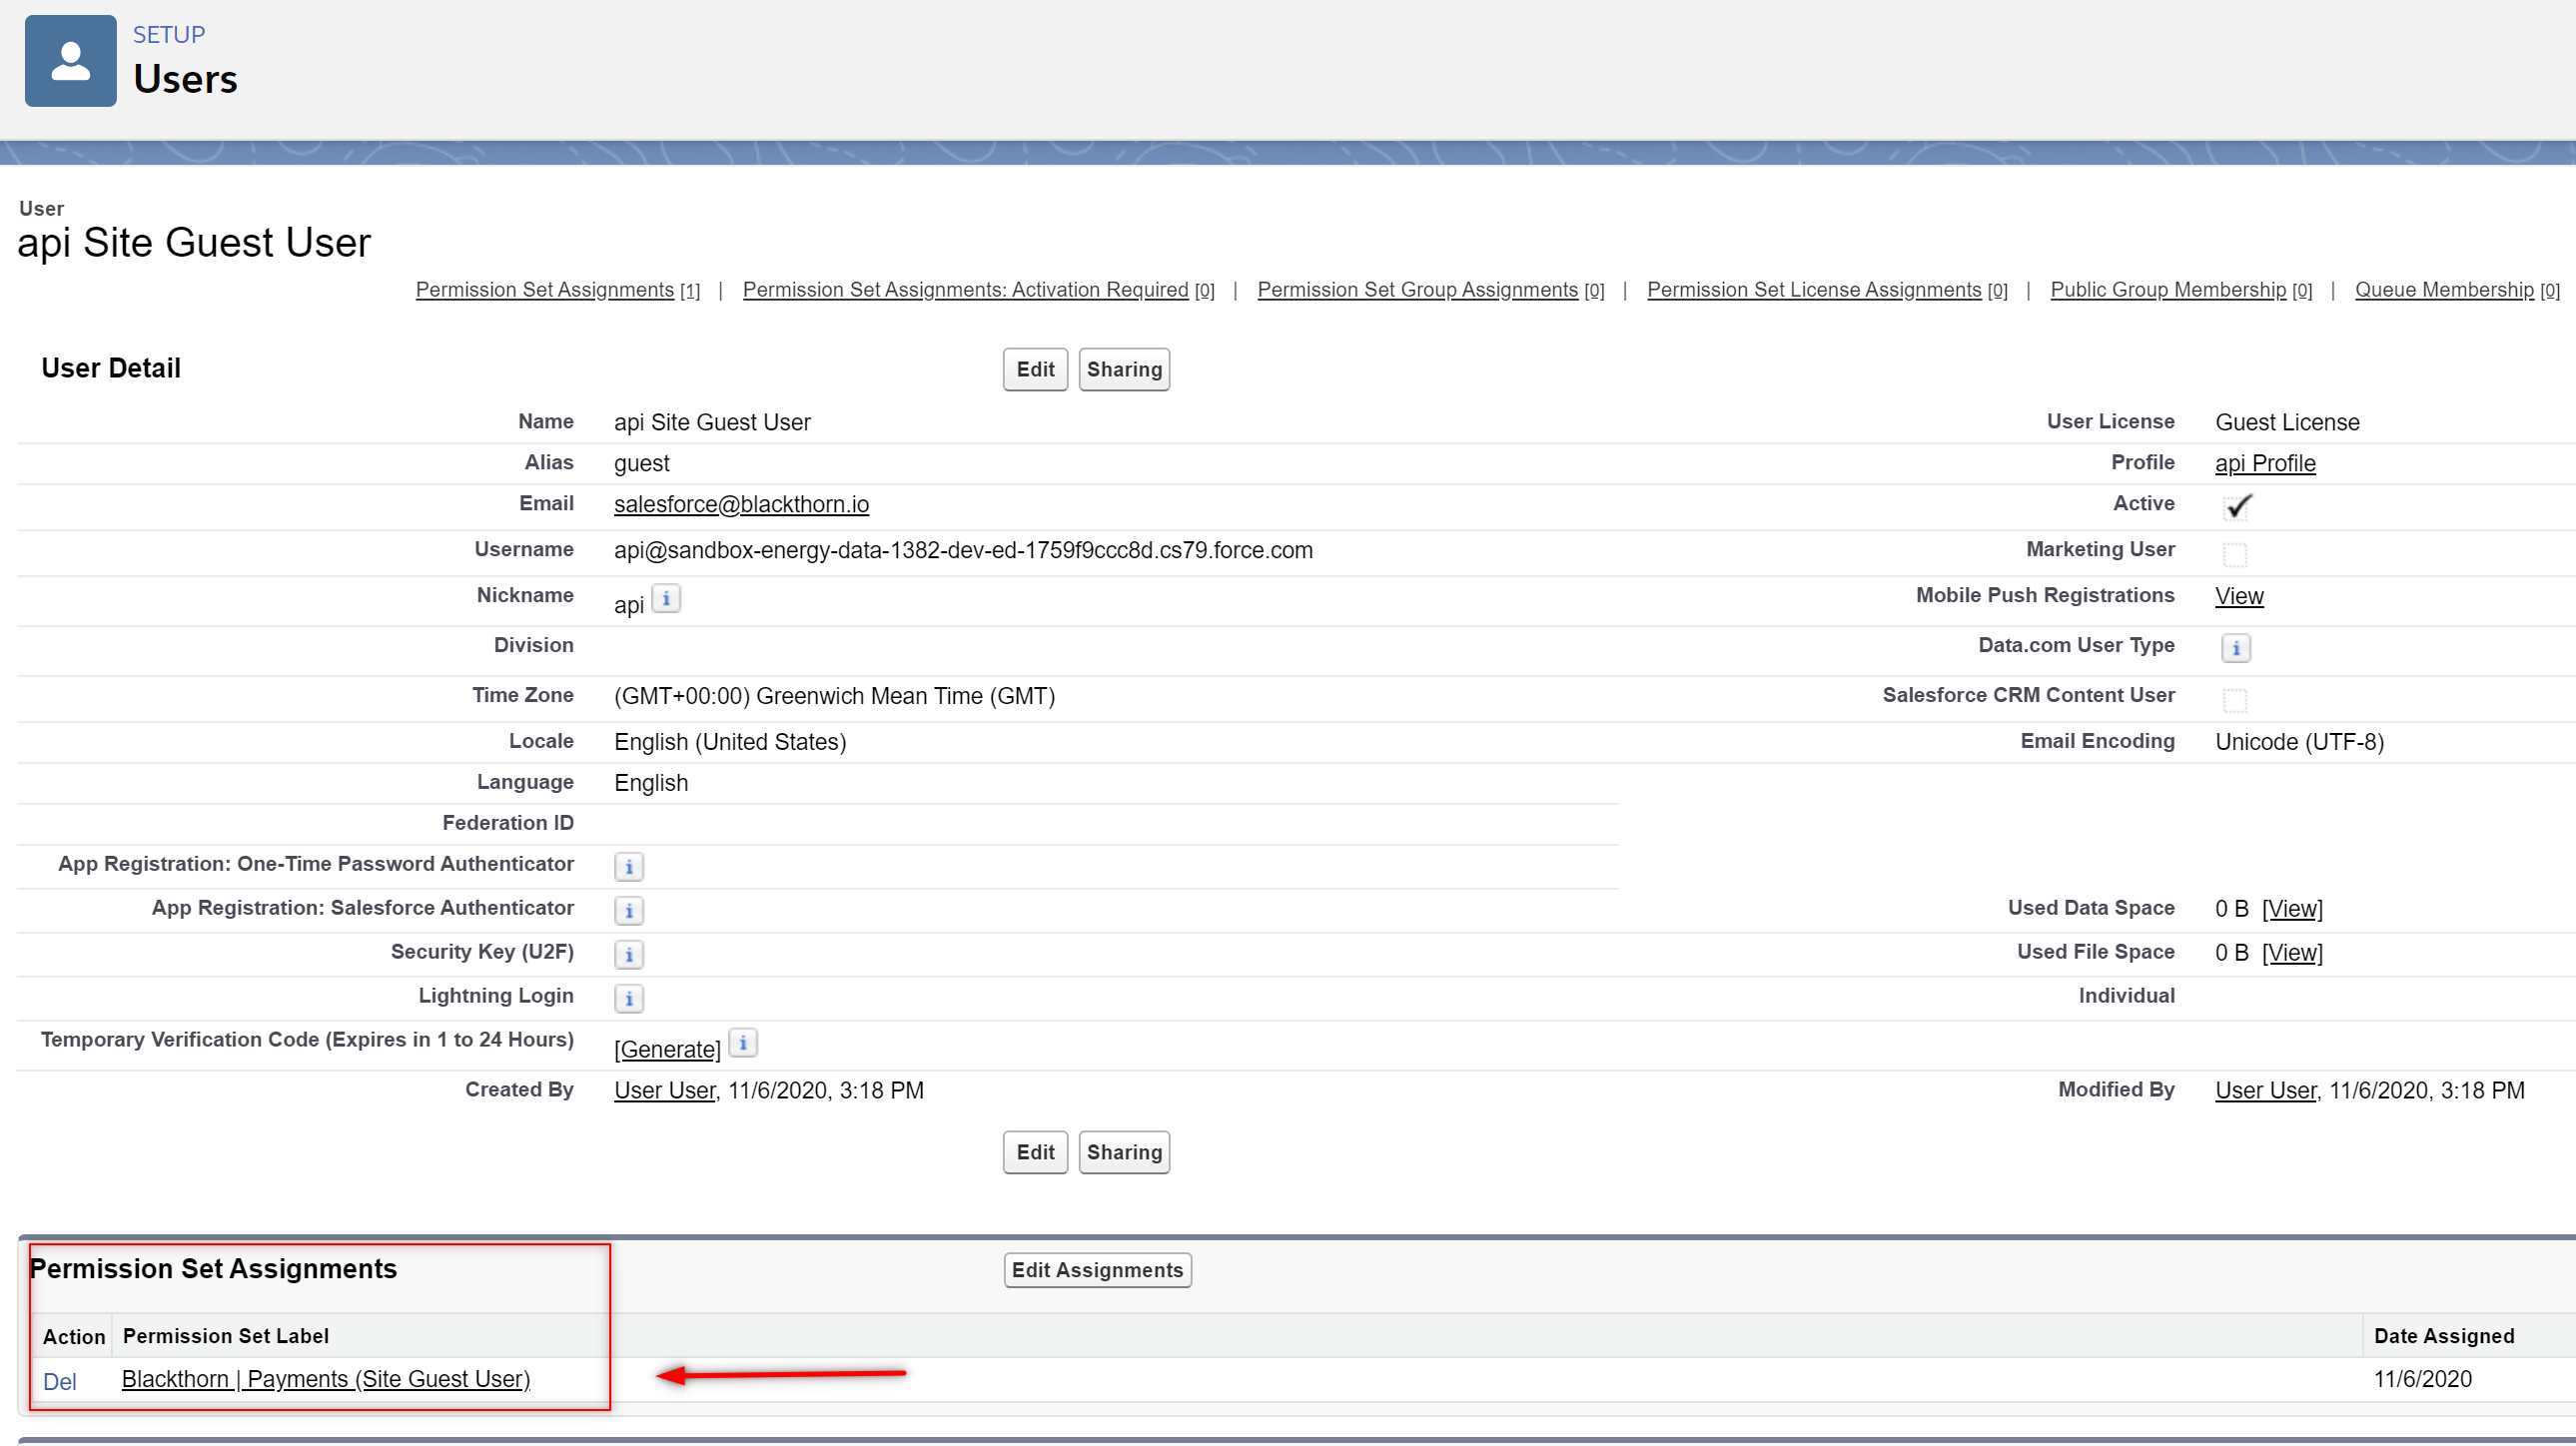
- Click the link for the site guest user.

- Add the Blackthorn | Payments (Site Guest User) permission set to this user's record.
- Click Save.
This permission set is only available in Payments packages 5.16 and later. Please upgrade to the latest version then try again.
Configure Webhooks and Add Webhook Events
We currently do not support webhook callbacks for Payment Gateways that are configured through Spreedly.
Configure Webhooks in Stripe
In this section, you will gather the different components that will make up the URL before adding it to Stripe.
The URL will have the following format: https://SITE_DOMAIN_NAME/SITE_PATH/services/apexrest/bt_stripe/webhook/WEBHOOK_LABEL
SITE_DOMAIN_NAME = The Salesforce Domain Name for the Site you set up
SITE_PATH = The Path for the Site
WEBHOOK_LABEL = The value in the Payment Gateway Webhook Label field
“services/apexrest/bt_stripe/webhook” remains the same
Create a Salesforce Webhook Site URL
Go to Setup.
In the Quick Find box, enter “Sites and Domains.”
Click “Sites.”
Locate the site you just created and click the URL.
Copy the URL.
Replace “SITE_DOMAIN_NAME/SITE_PATH” with the copied URL.
Leave “services/apexrest/bt_stripe/webhook” as is.
Open the related Payment Gateway record.
Copy the value in the Webhook Label field.
Replace “WEBHOOK_LABEL” with the copied value from the Webhook Label field.
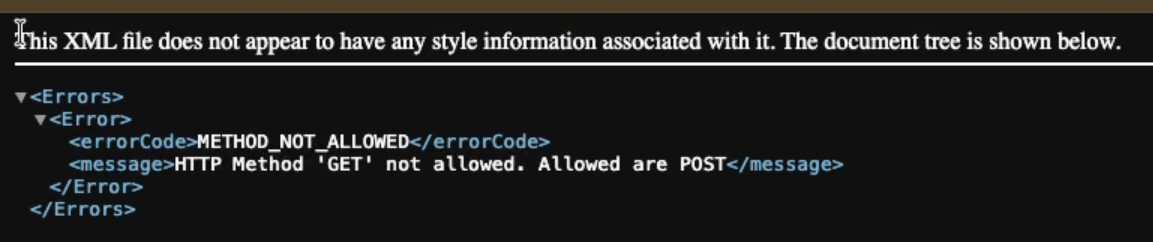
To verify that the new URL works, open a new browser tab and paste the URL. You will see the following message.
Configure the URL in Stripe
Go to your Stripe dashboard. When you create a Webhook URL for your Stripe account in test mode, ensure the "Viewing test data" switch is enabled.
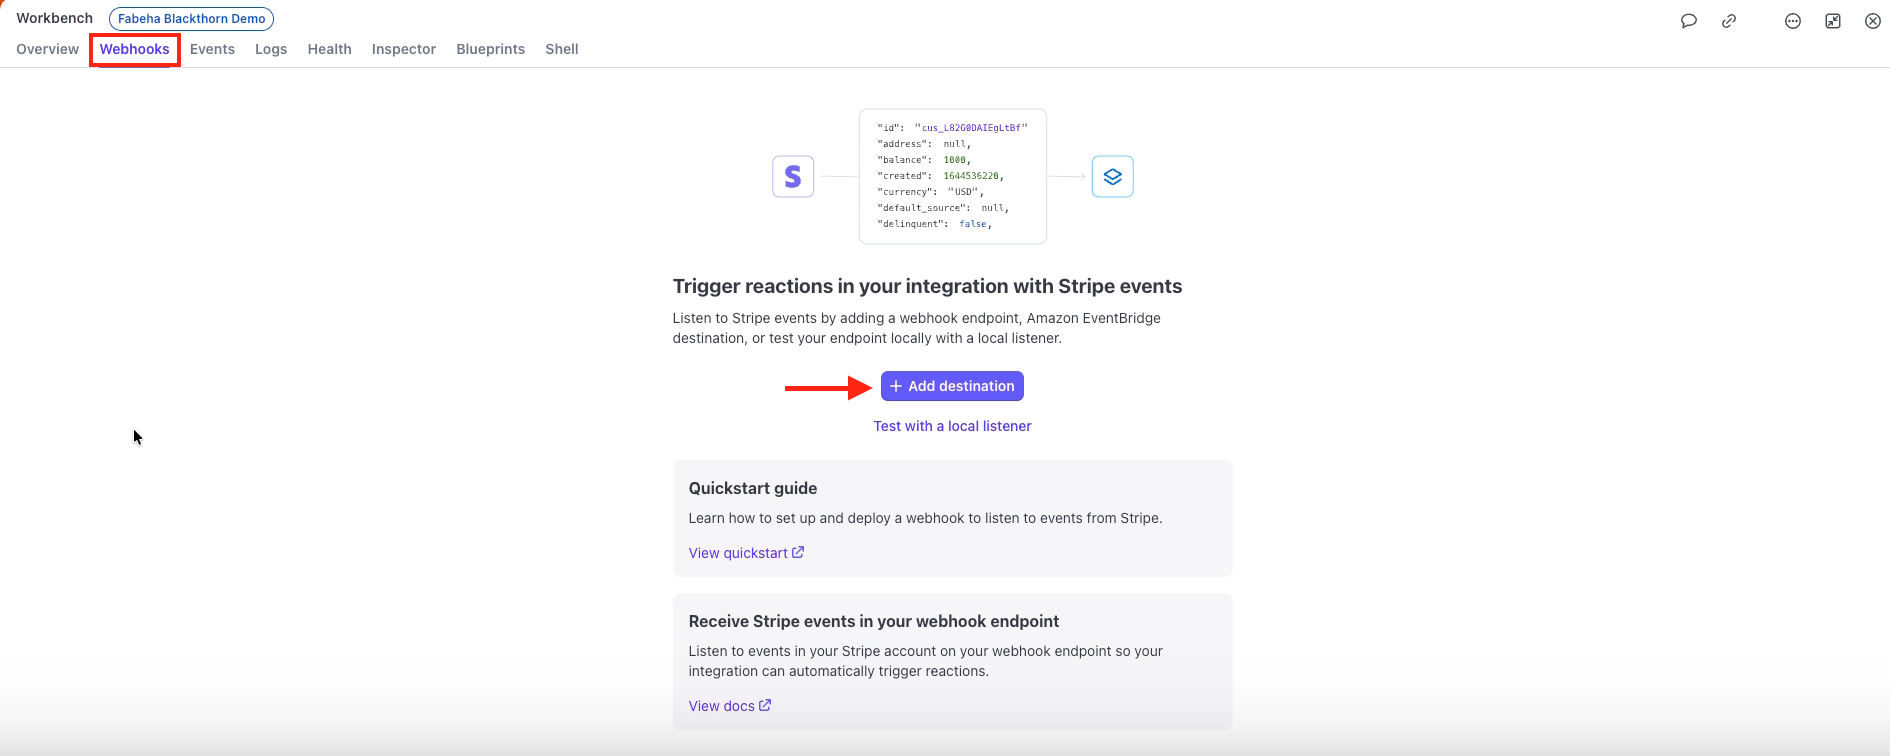
Click the Developers tab at the bottom-left side of the screen.
Click Webhooks.
Click + Add destination to add a destination.
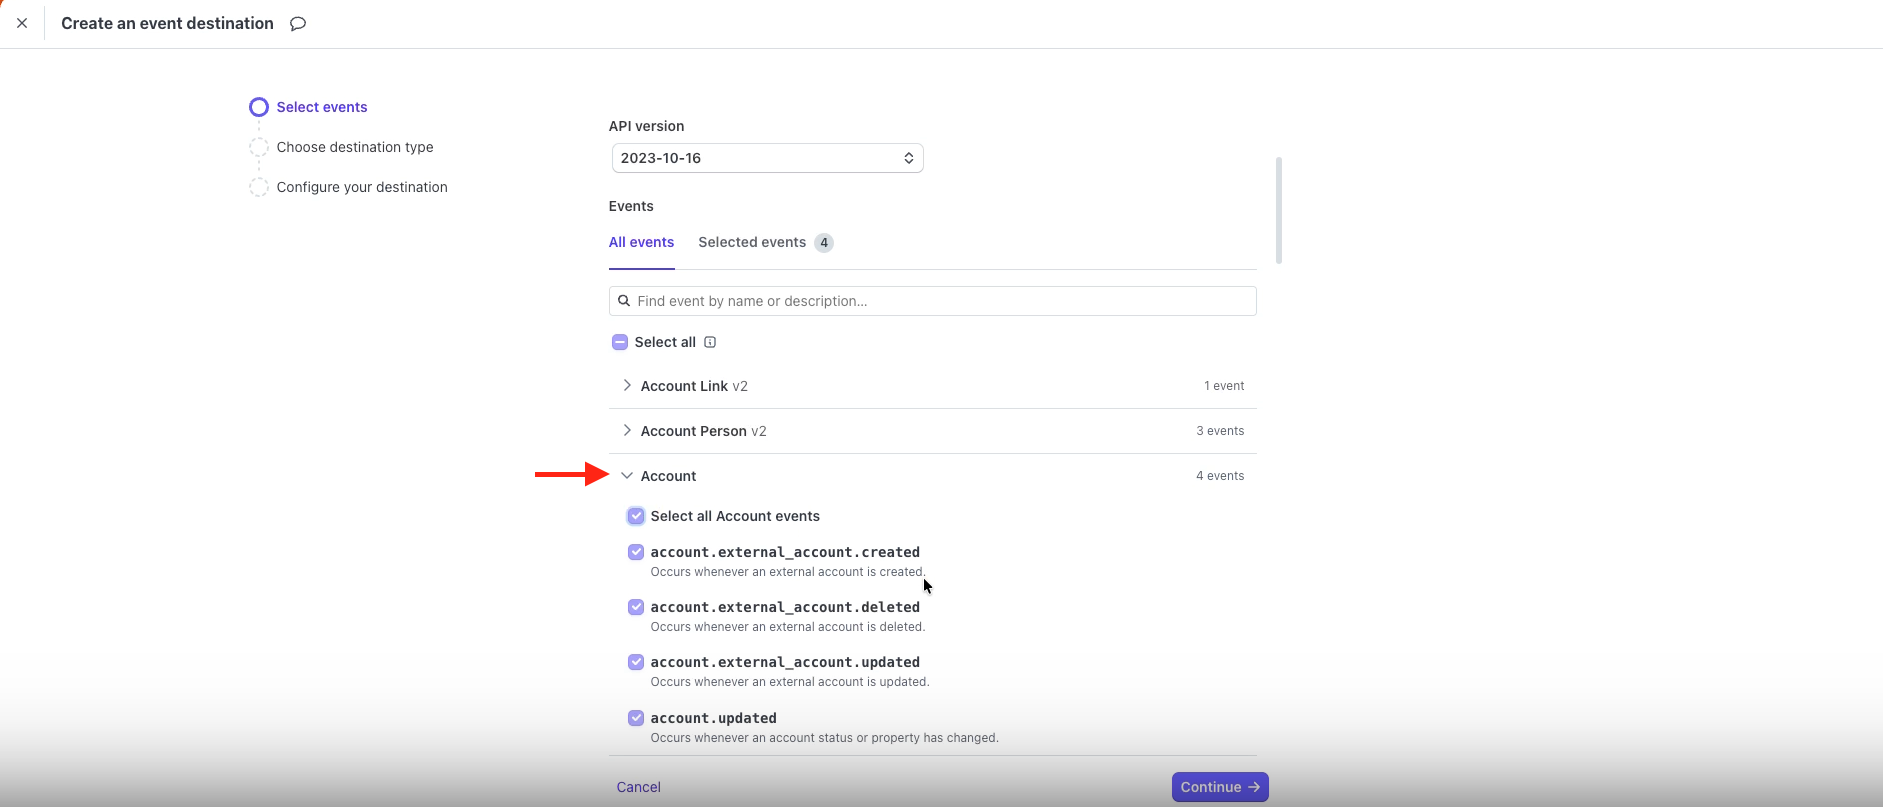
Click Your account.
Click into the Account section.
Check the Select all Account events option.
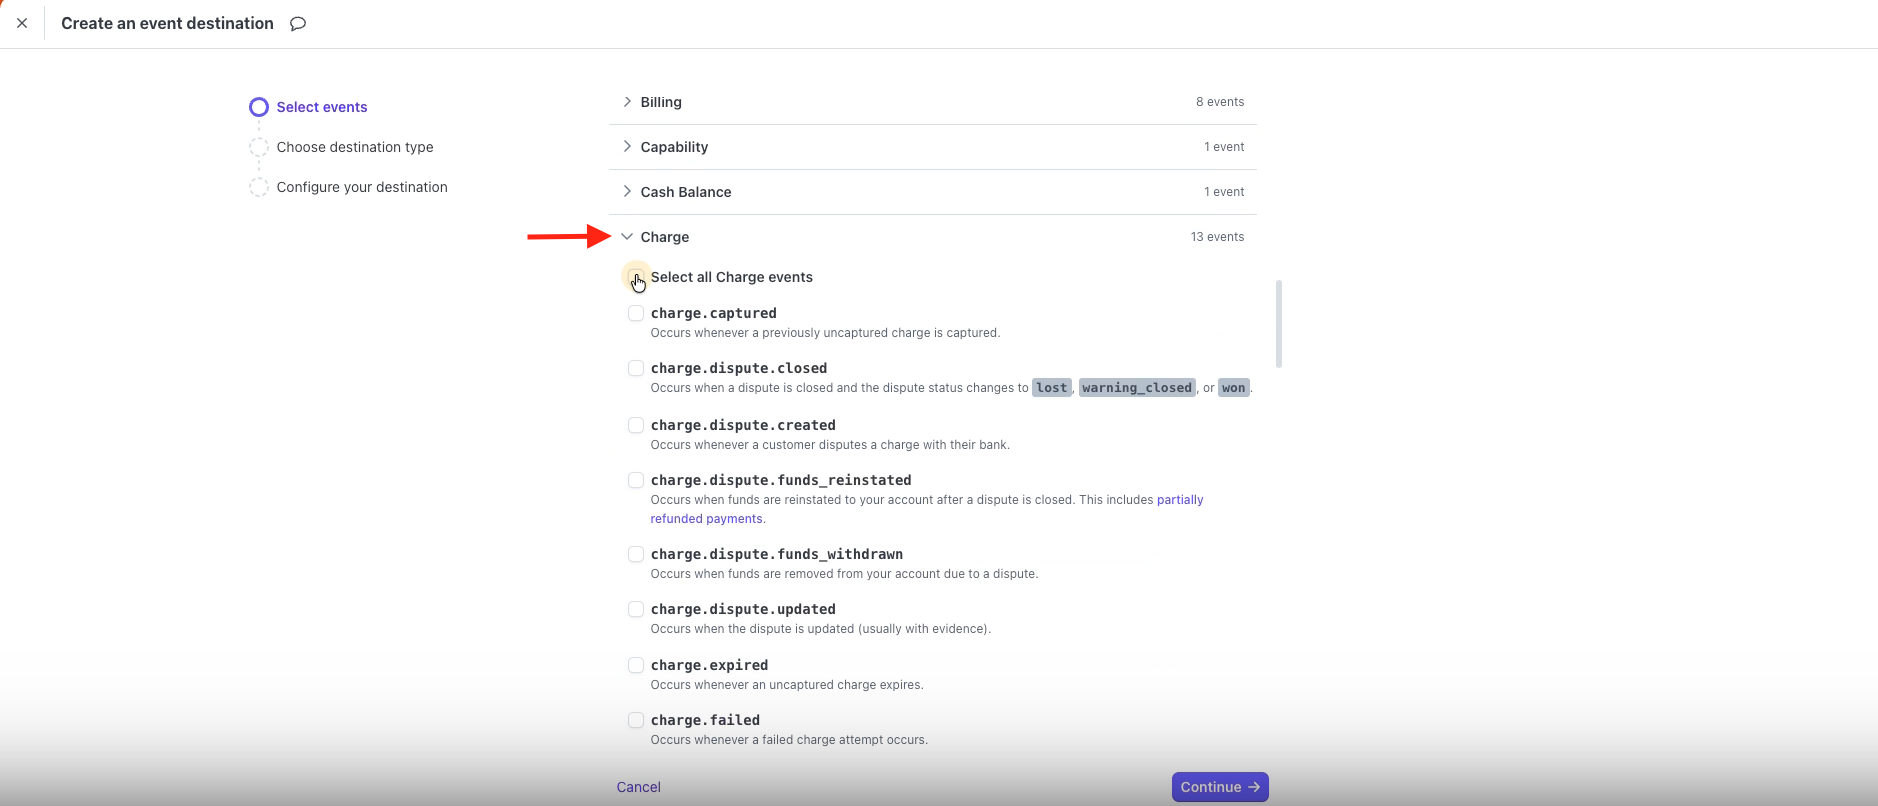
Scroll down to and click into the Charge section.
Click the Select all Charge events option.
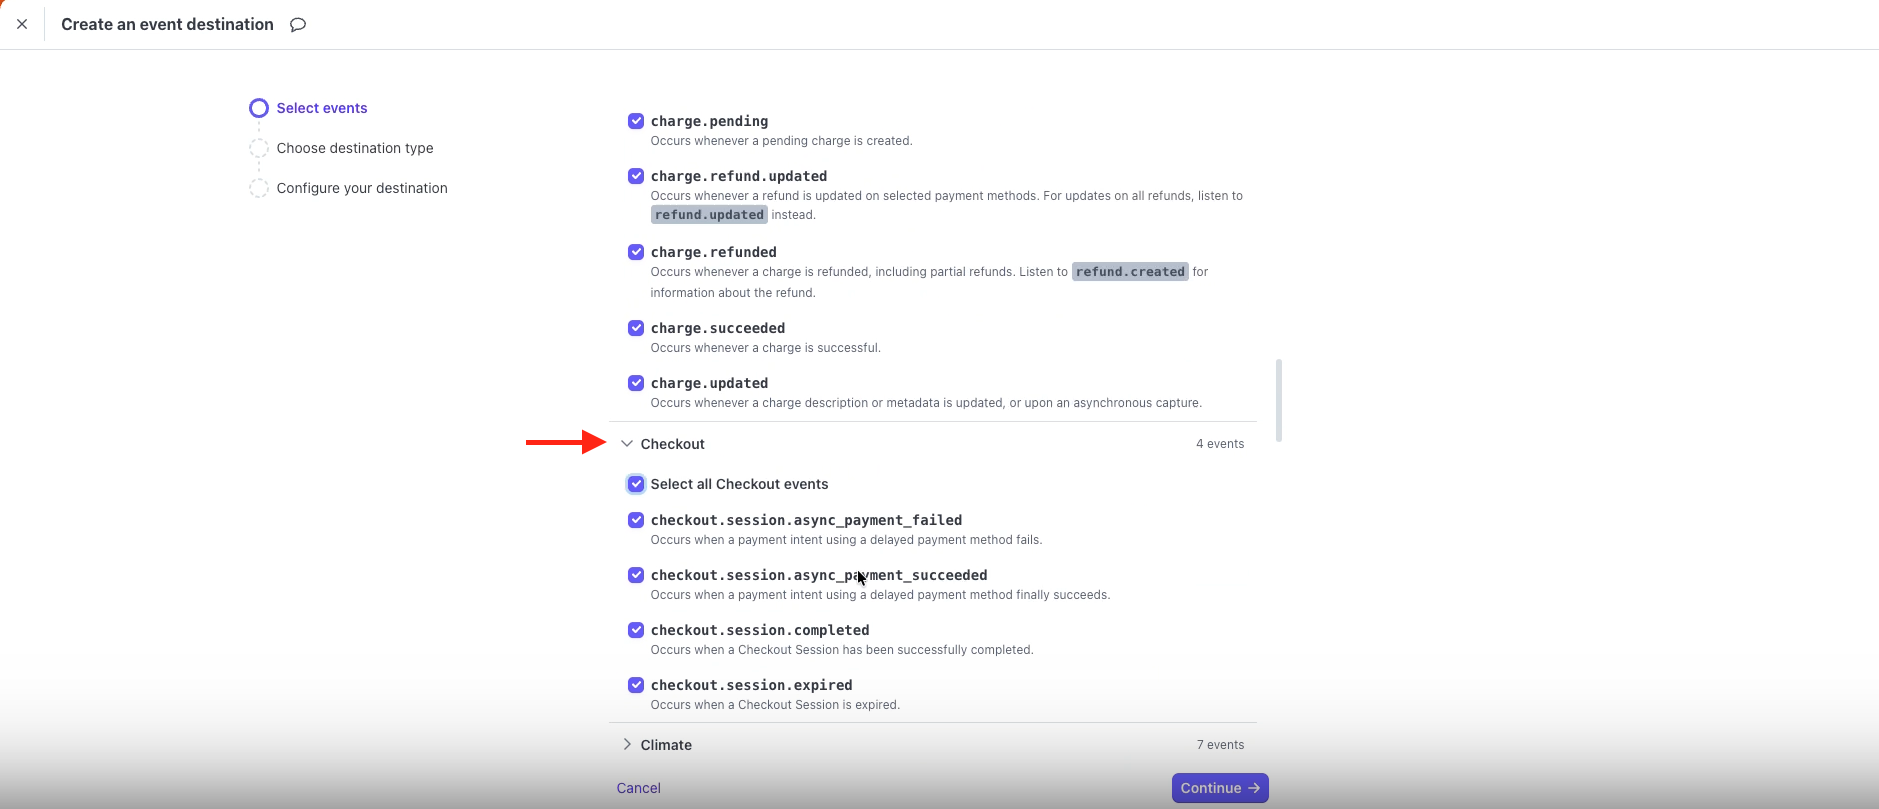
Click into the Checkout section.
Check the options that are relevant to your use case.
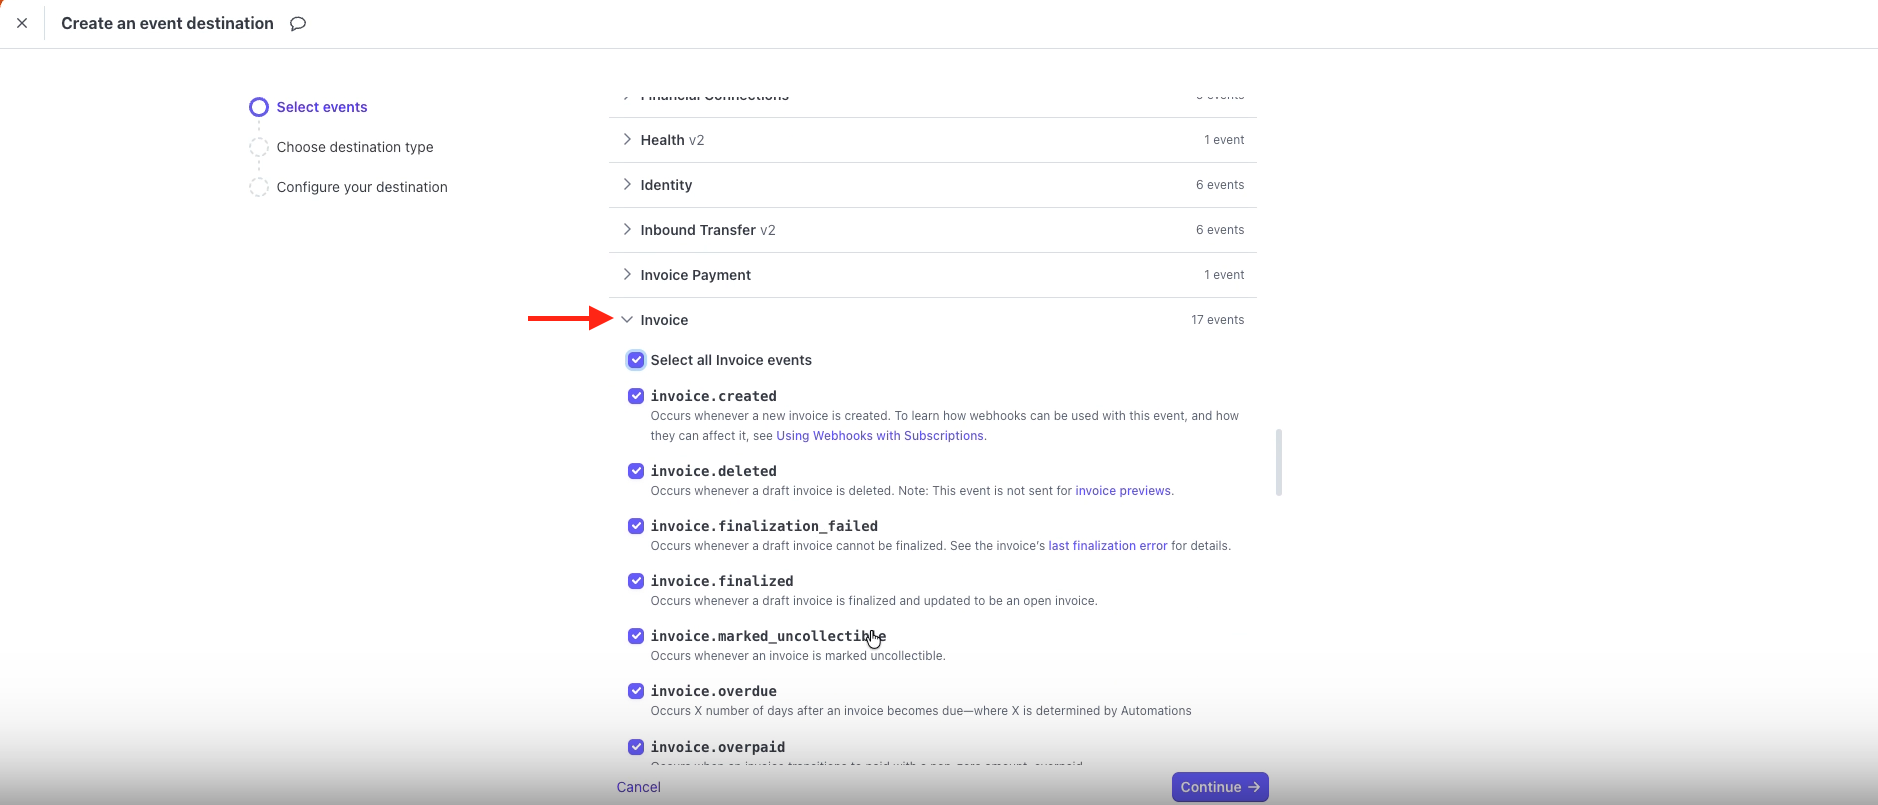
Scroll down to the Invoice section.
Check the Select all Invoice events option.
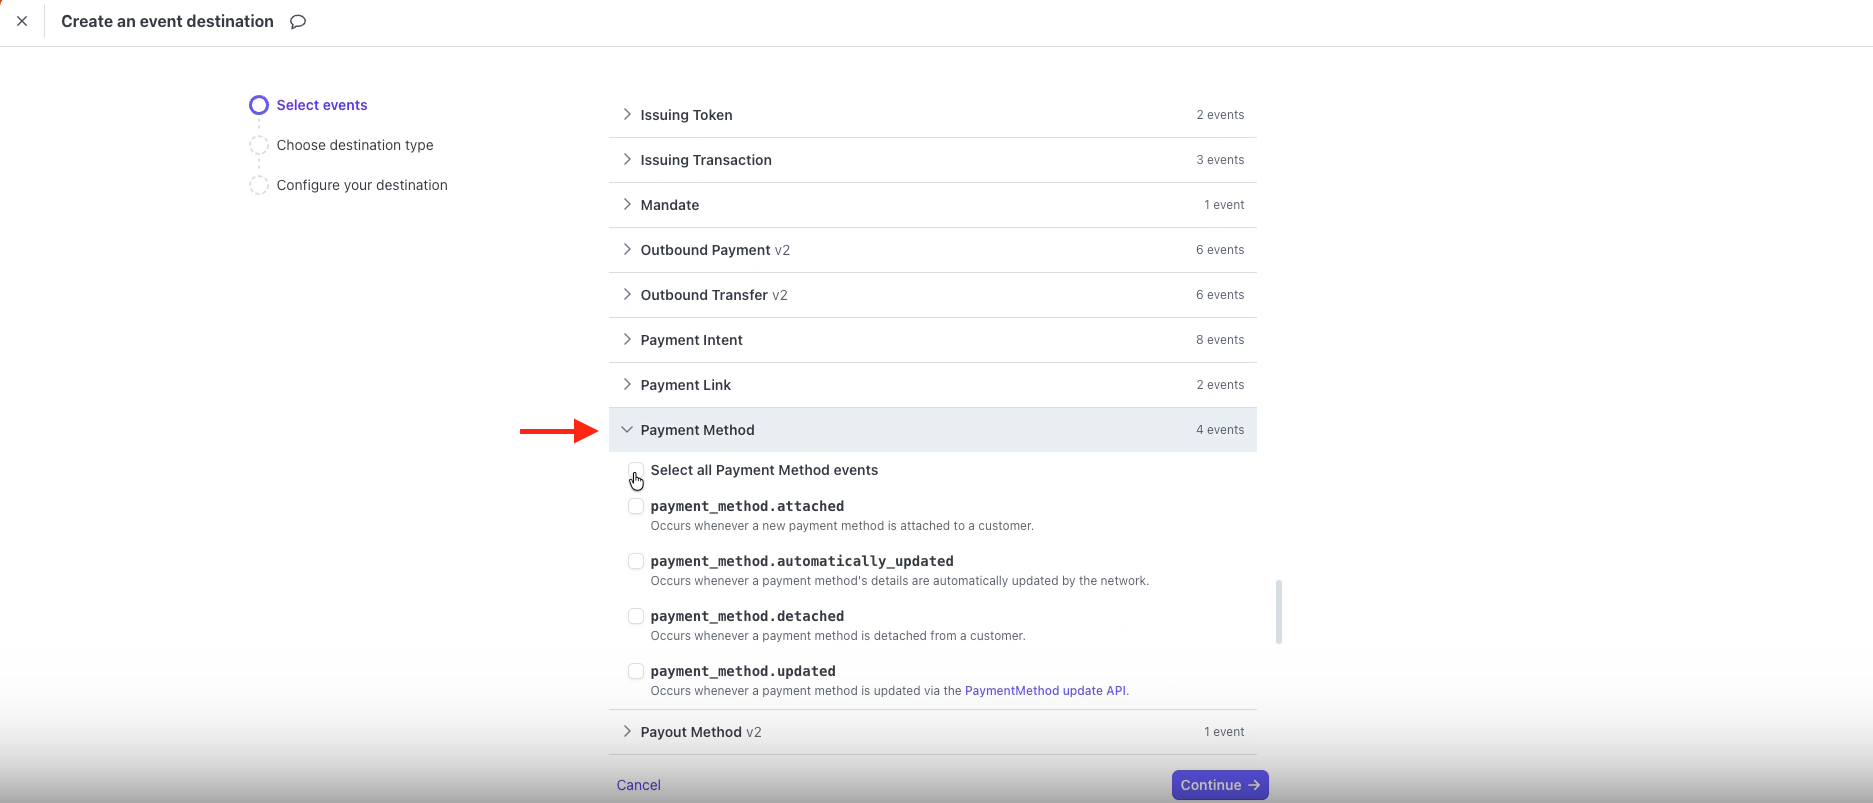
Scroll down to the Payment Method section.
Check the Select all Payment Method events option.
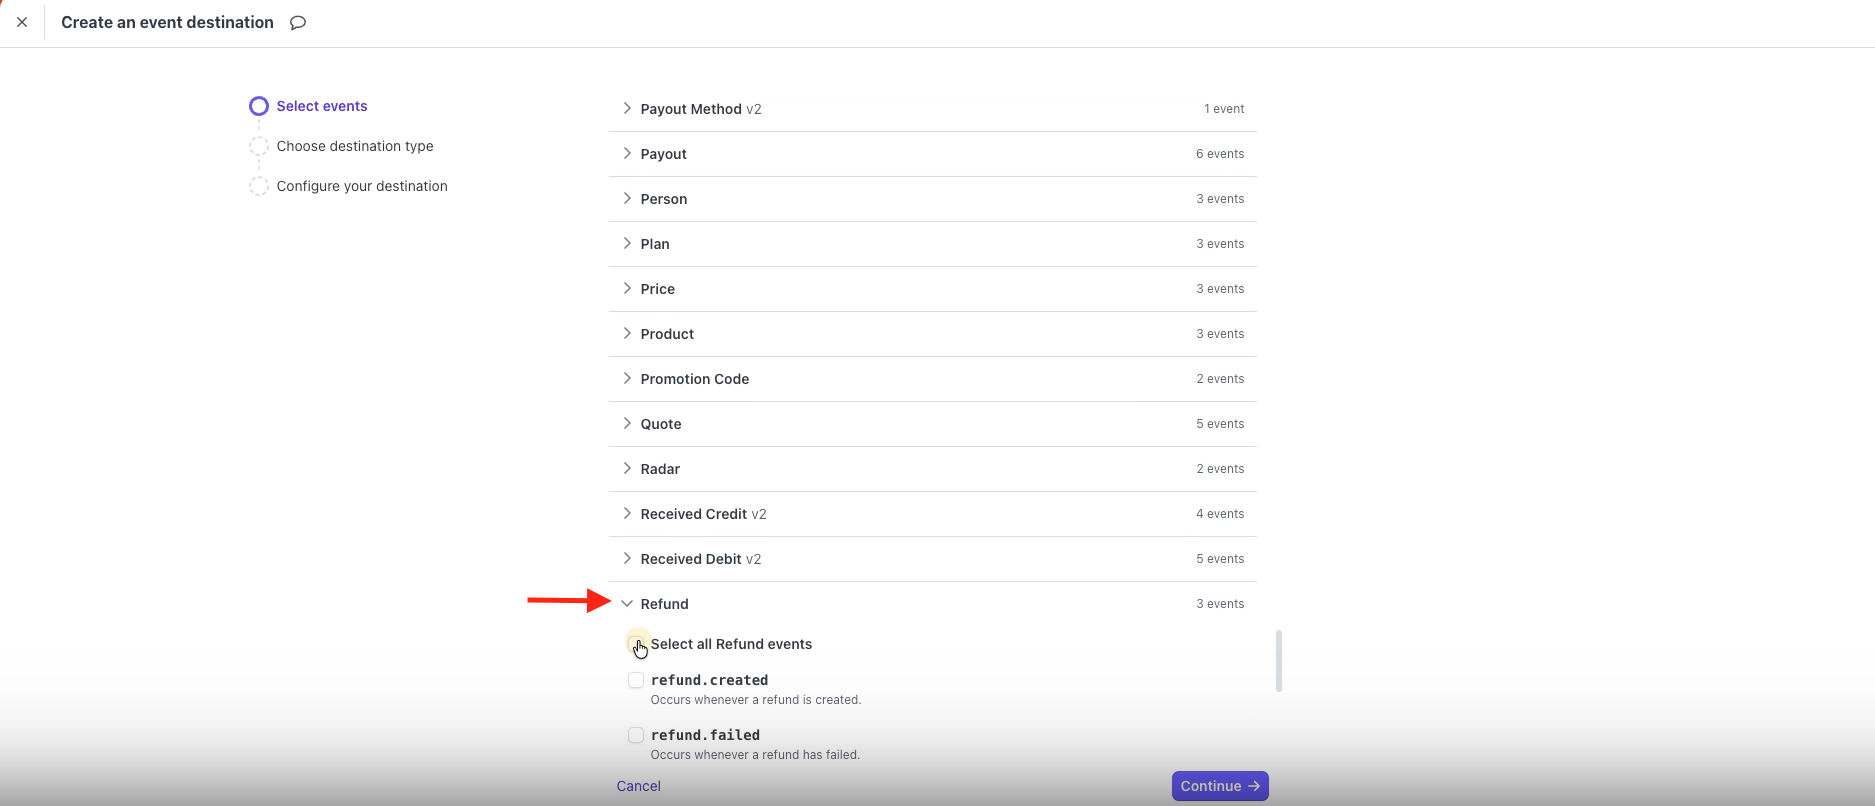
Scroll down to the Refund section.
Check the Select all Refund events option.
Click Continue.
Select “Webhook endpoint.”
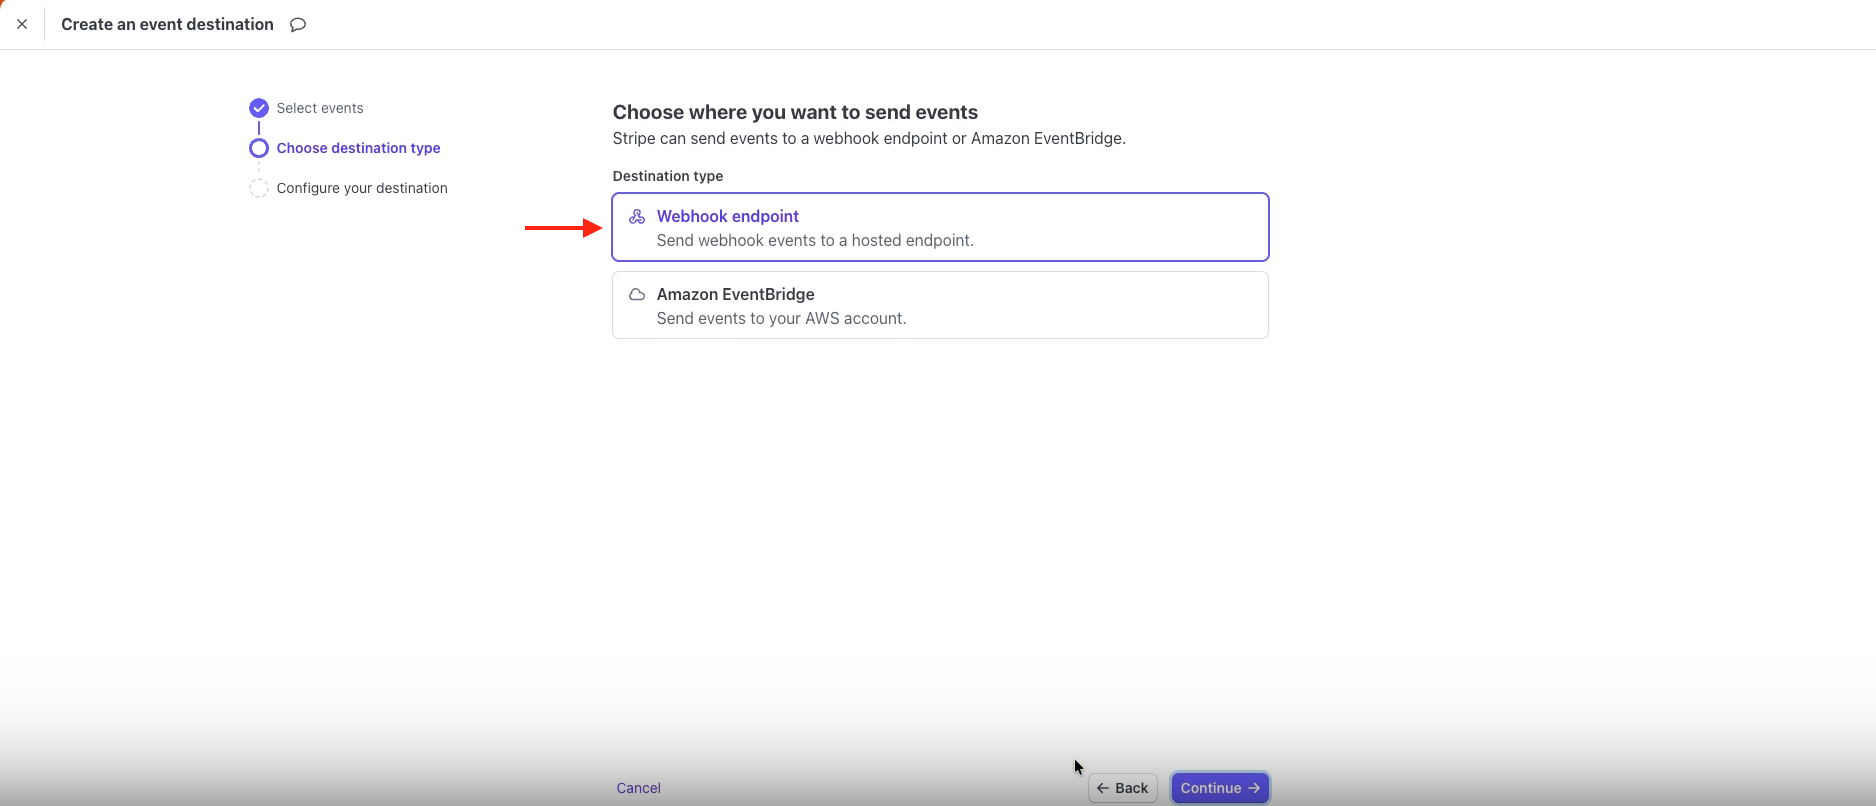
Click Continue.
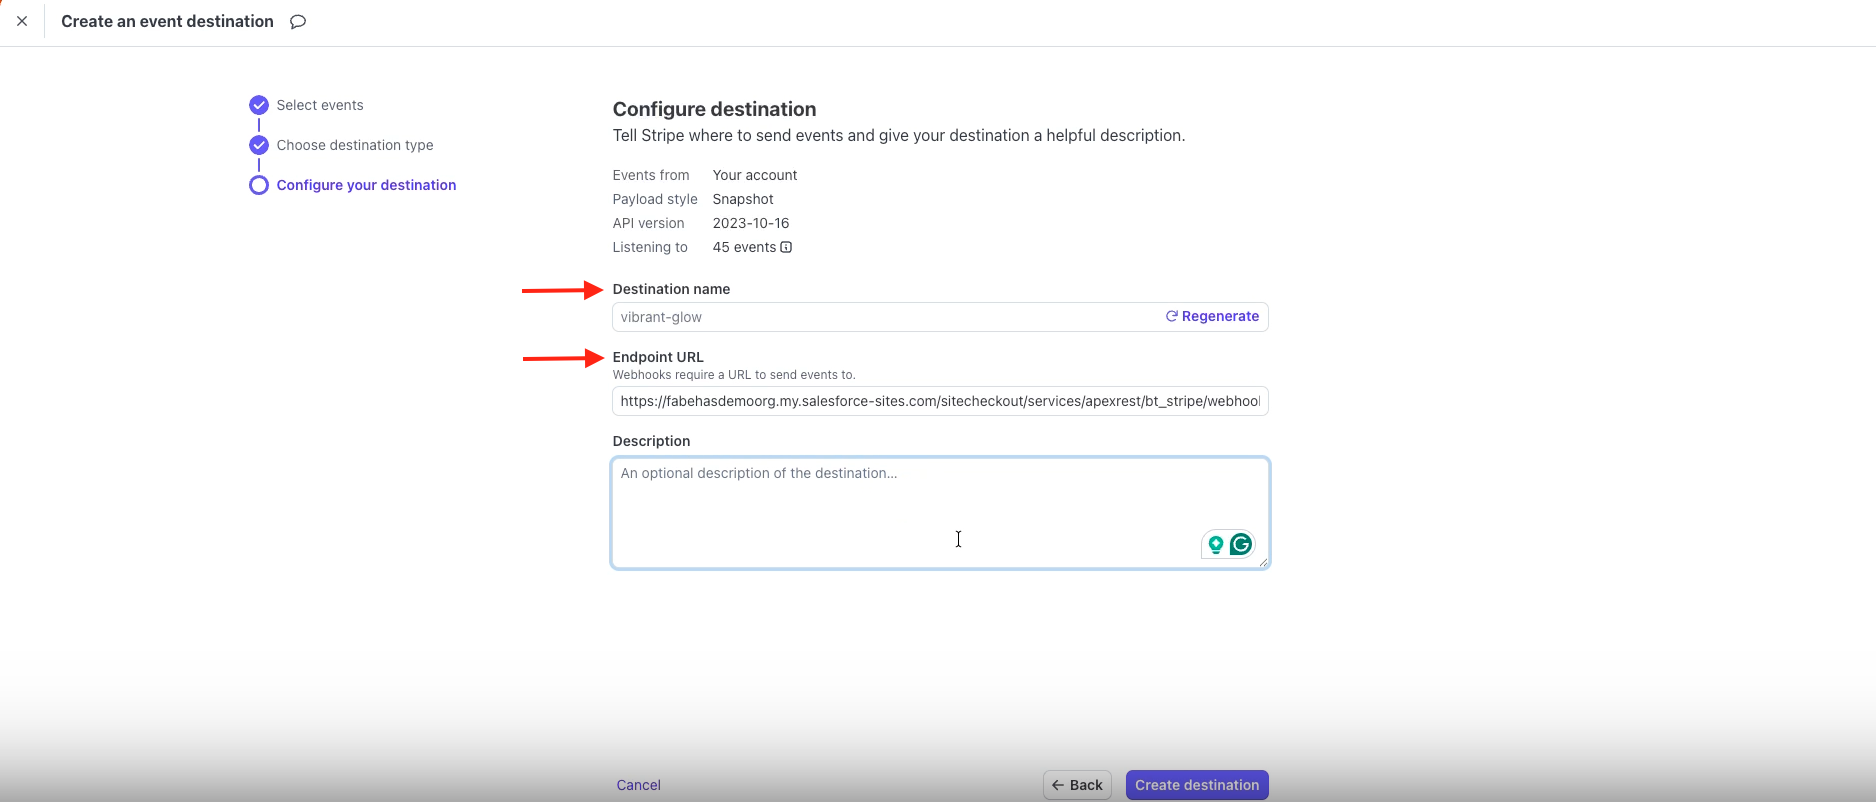
Enter a Destination name.
Enter the URL you created in the Endpoint URL field.
Click Create destination.
To test the new Webhook Event, create a new charge Transaction, capture it, and charge it. A new Webhook Event will be created for the Transaction.
In Stripe, click the Events tab to see the newly created charge. The new Stripe Event ID will match the Webhook Event Event ID.
The only solution is to manually resend the webhooks. See Stripe’s documentation for more information.
Configure Webhooks in Authorize.net
In this section, you will gather the different components that will make up the URL before adding it to Authorize.net.
The URL will have the following format: https://SITE_DOMAIN_NAME/SITE_PATH/services/apexrest/bt_stripe/webhook/WEBHOOK_LABEL
SITE_DOMAIN_NAME = The Salesforce Domain Name for the Site you set up
SITE_PATH = The Path for the Site
WEBHOOK_LABEL = The value in the Payment Gateway Webhook Label field
“services/apexrest/bt_stripe/webhook” remains the same
Create a Salesforce Webhook Site URL
Go to Setup.
In the Quick Find box, enter “Sites and Domains.”
Click “Sites.”
Locate the site you just created and click the URL.
Copy the URL.
Replace “SITE_DOMAIN_NAME/SITE_PATH” with the copied URL.
Leave “services/apexrest/bt_stripe/webhook” as is.
Open the related Payment Gateway record.
Copy the value in the Webhook Label field.
Replace “WEBHOOK_LABEL” with the copied value from the Webhook Label field.
To verify that the new URL works, open a new browser tab and paste the URL. You will see the following message.
Configure the URL in Authorize.net
Go to your connected Authorize.net account dashboard.
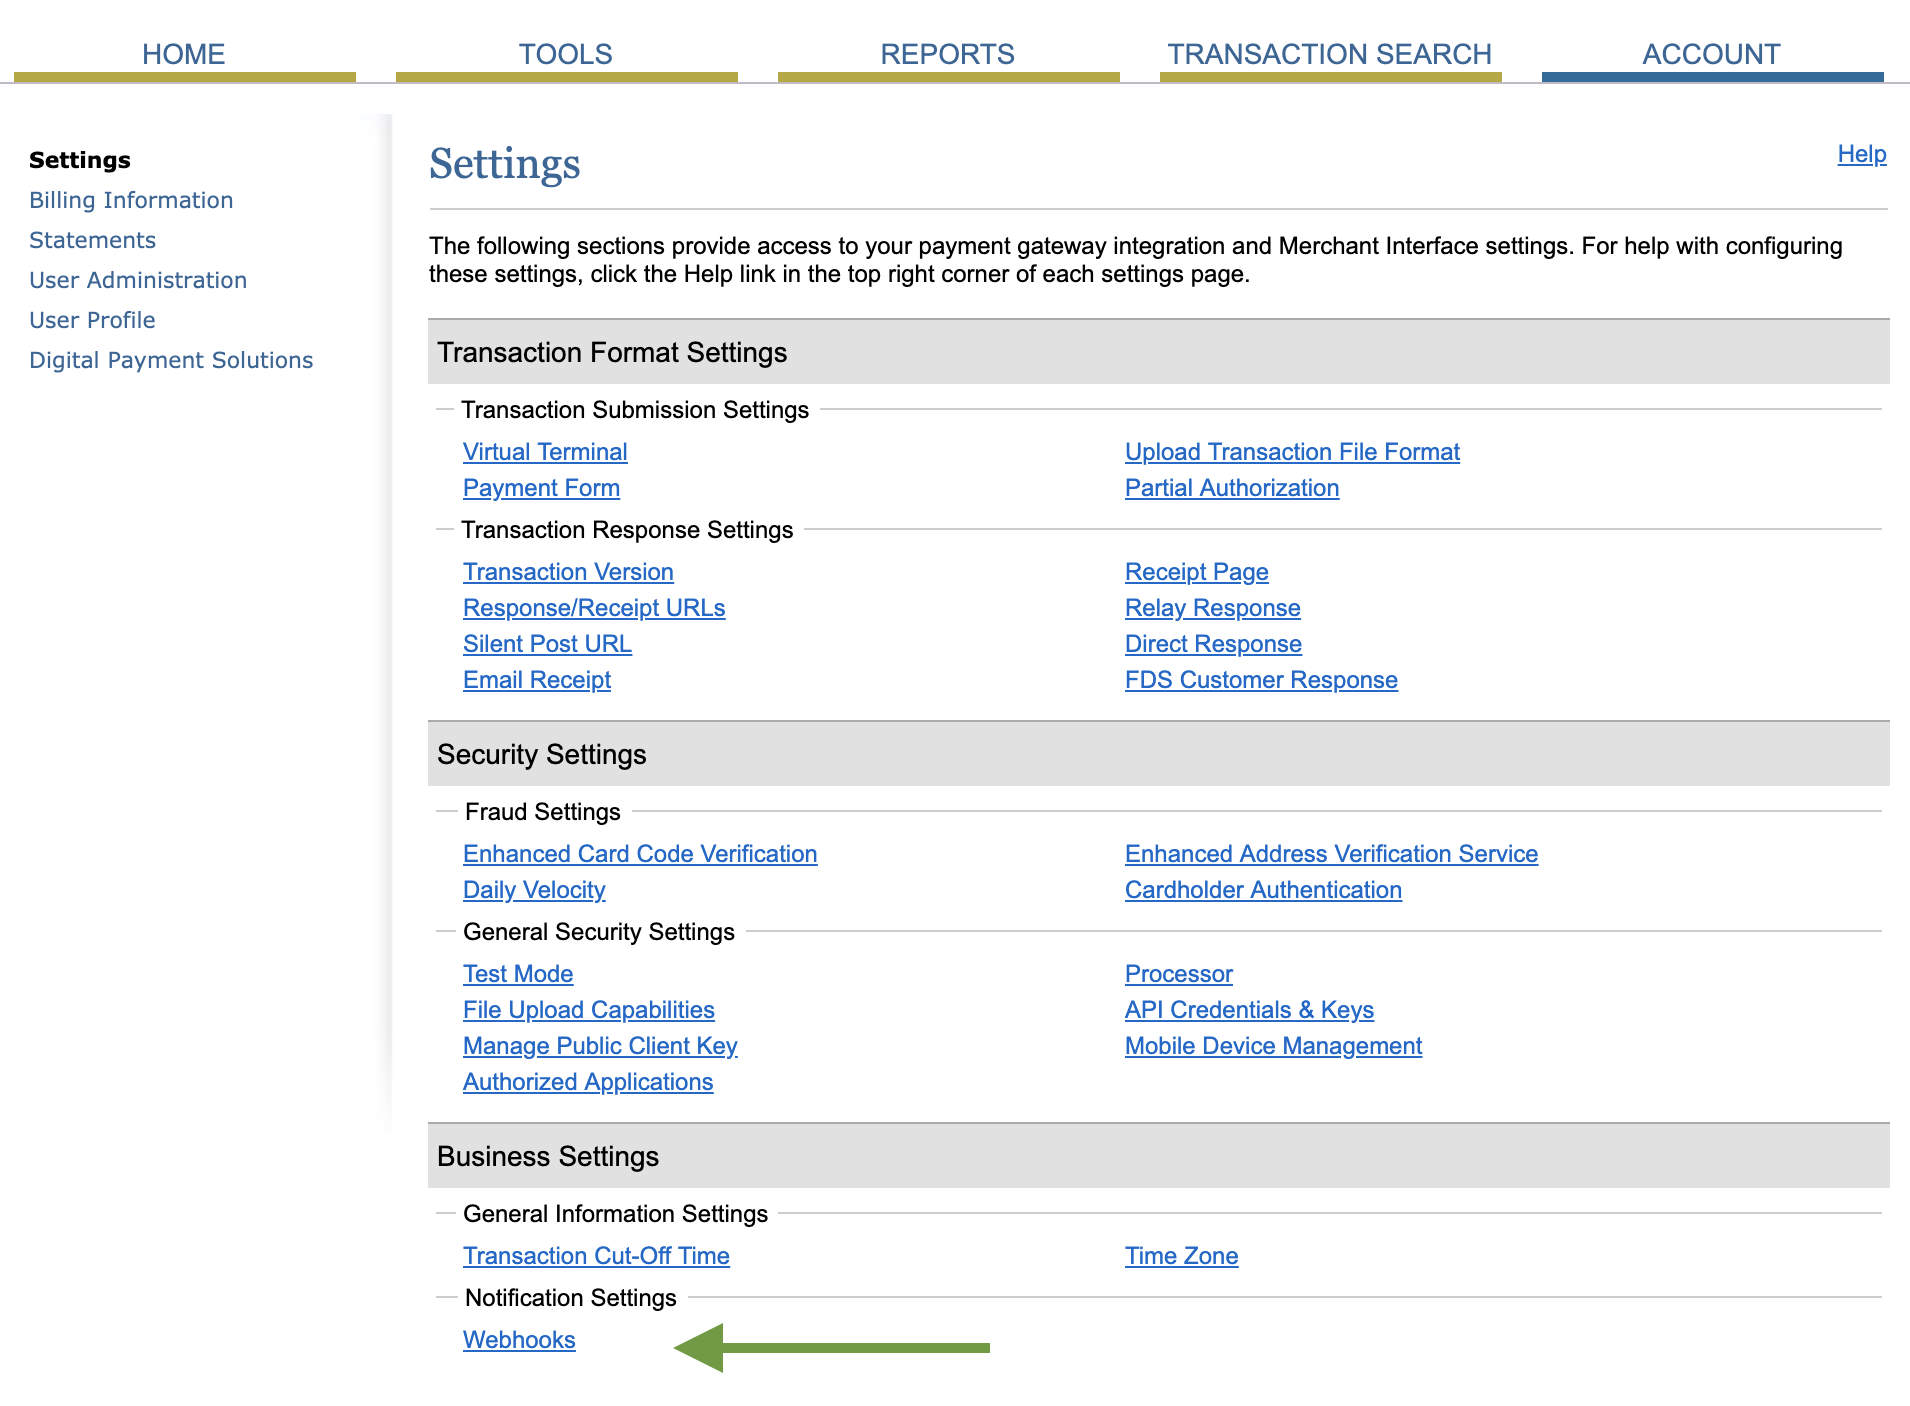
Click the Account tab.
Click Settings.
Click Webhooks.
Click Add endpoint.
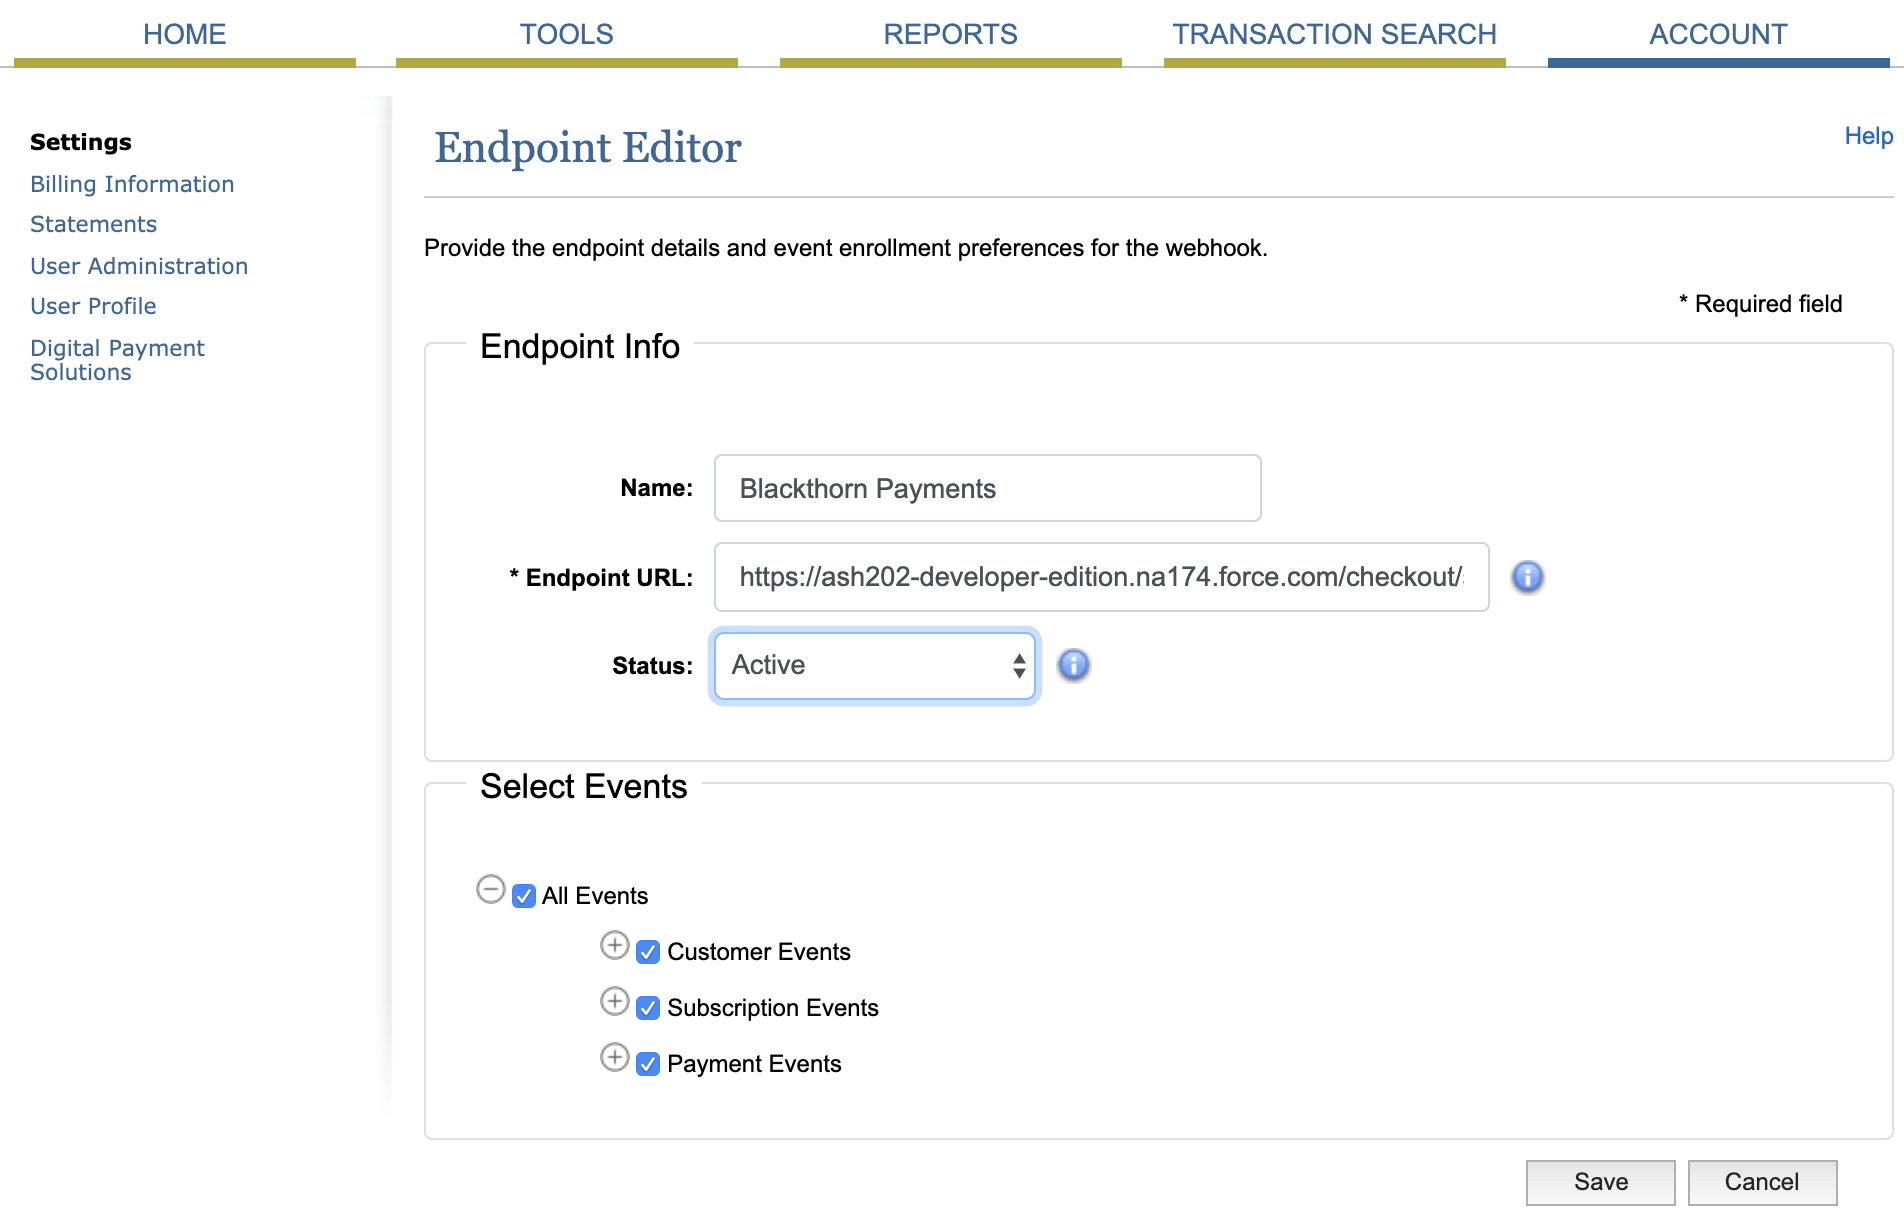
Define a Name.
In the Endpoint URL field, enter the Salesforce webhook Site URL you created.
Set Status = "Active".
Under Select Events, check "All Events."
Click Save.
If you have multiple Authorize.net accounts connected to your Salesforce org and want to create a Webhook Endpoint for each in Authorize.net, you can use the same Salesforce Site. Change the WEBHOOK_LABEL part of the URL to the Webhook Label value on the Payment Gateway record you want to use.
If you have multiple Authorize.net accounts connected to your Salesforce org and want to create a webhook endpoint for each in Authorize.net, you can use the same Salesforce Site. It's as easy as changing the WEBHOOK_LABEL part of the URL to the Webhook Label value from the Payment Gateway record you want to use.
Test Webhook Connection
Test webhook connection in Stripe
Verifying in Test Mode:
- Select the Webhook tab on the left-hand side.
- Click your URL.
- In the top right, click Send test webhook.

- Set Event type = "customer.created".
- Click Send test webhook.
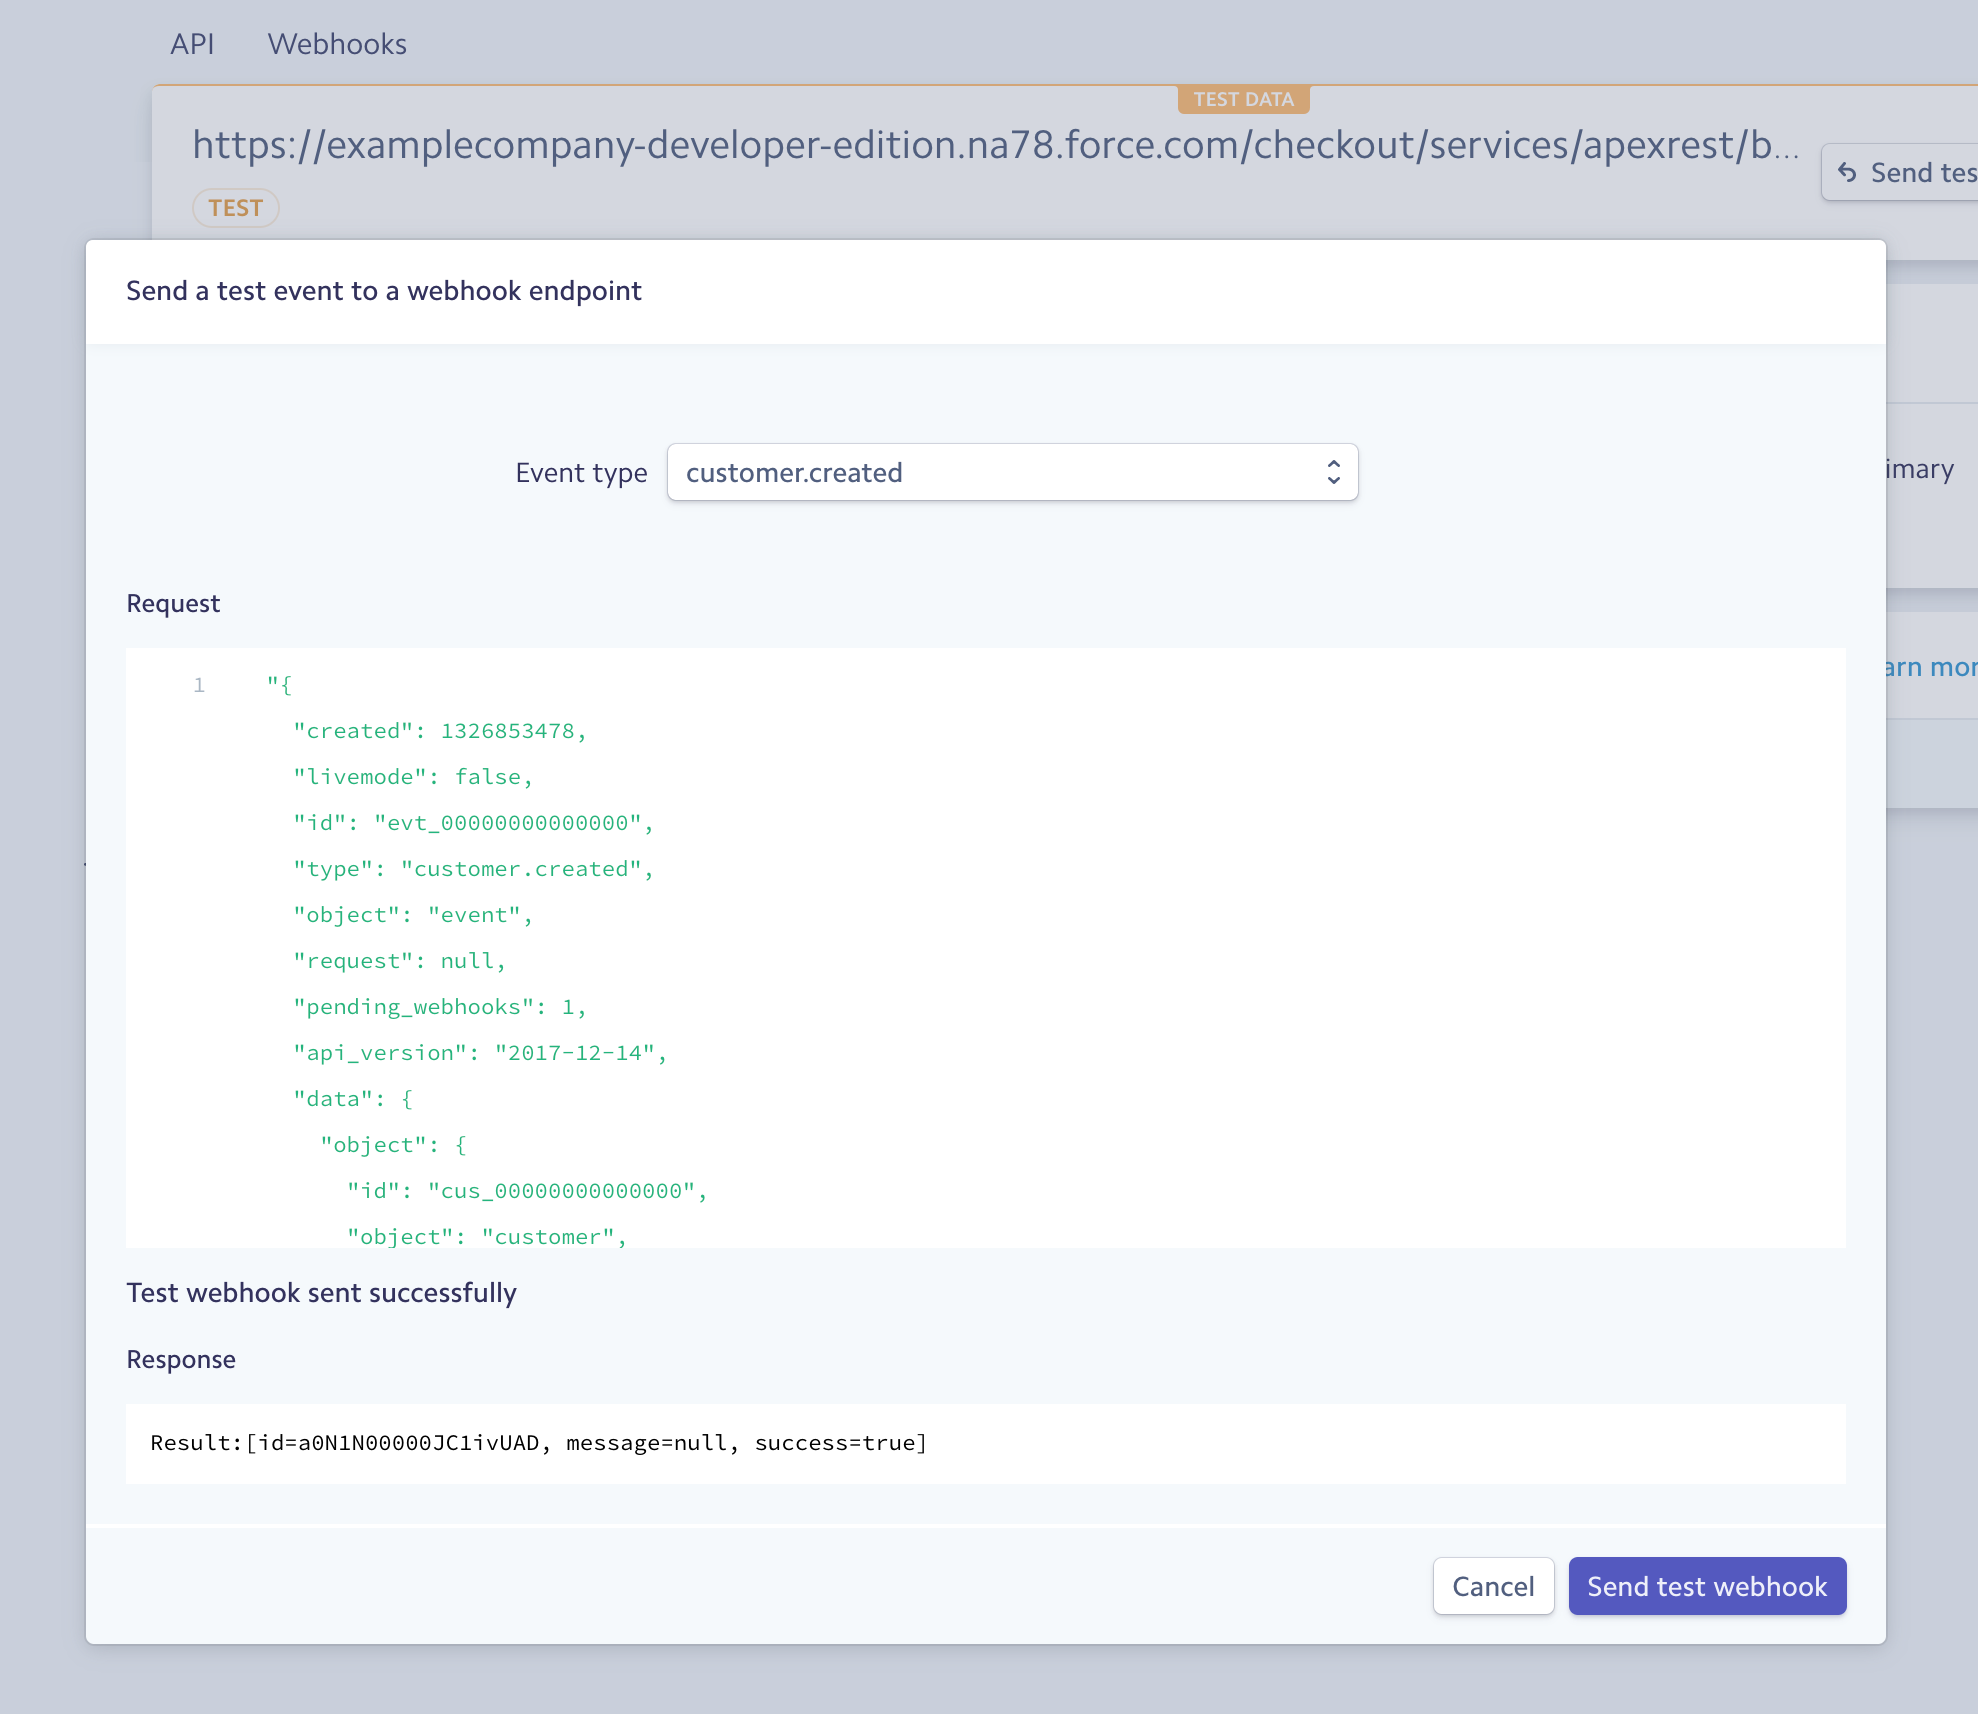
If you received a "Test webhook sent successfully" message, then Webhooks are set up correctly!
Test webhook connection in Authorize.net
- Click on Account tab > Settings > Webhooks.
- Edit the Endpoint and set the Status to "Inactive."
- Click Save.
You will see a Test Webhook button as shown in the below screenshot.

If you received a "Ping successful" message at the top, then webhooks are set up correctly!
Verifying in Live Mode
In live mode, don’t forget to create a new URL. You can copy your Test Webhook URL, and update the Webhook Label from your live Payment Gateway record.
- Create a new Customer in Stripe.
- Click on the newly created customer record, scroll down to Events, and select the Event record.
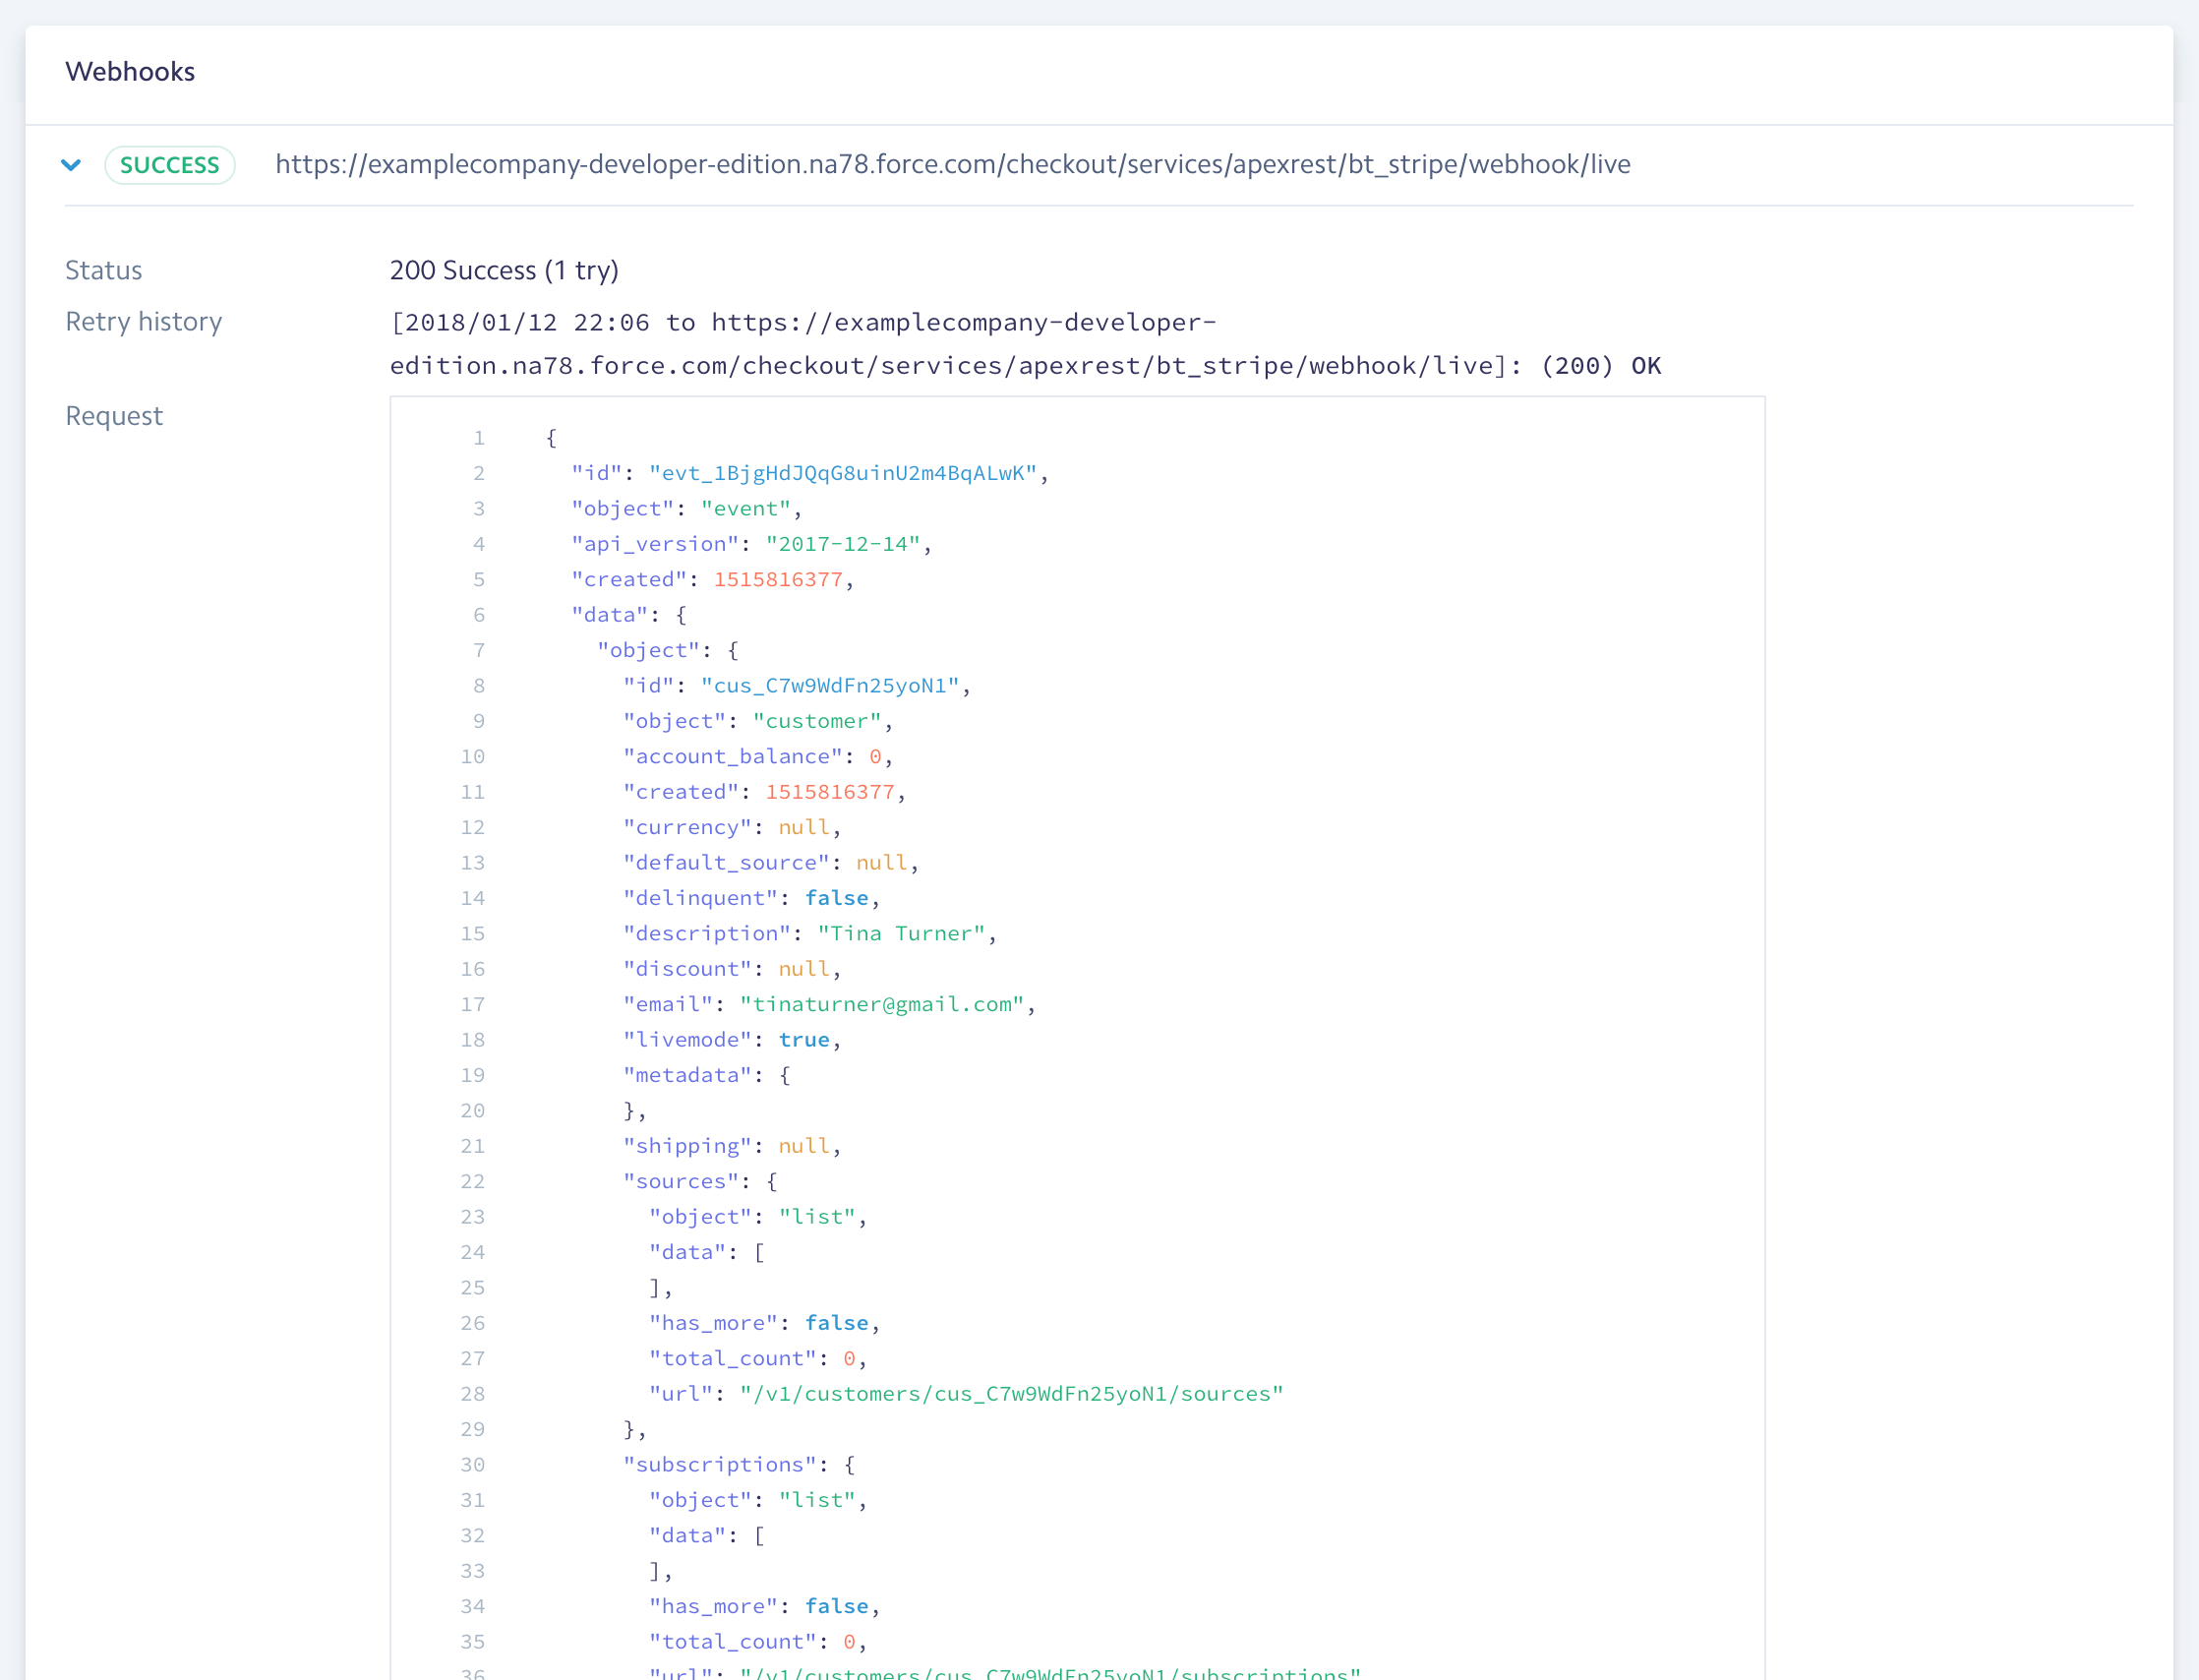
- Scroll down to Webhooks.
If the Webhook record says "Success", then Webhooks are set up correctly in Production.
Adding Webhook signatures in Stripe (optional)
Webhook signatures is an additional layer of security. When setting them up, the system makes sure that the webhook event messages are not corrupted in Salesforce.
-
Go to Stripe Dashboard | Webhooks.
-
Select the webhook.
-
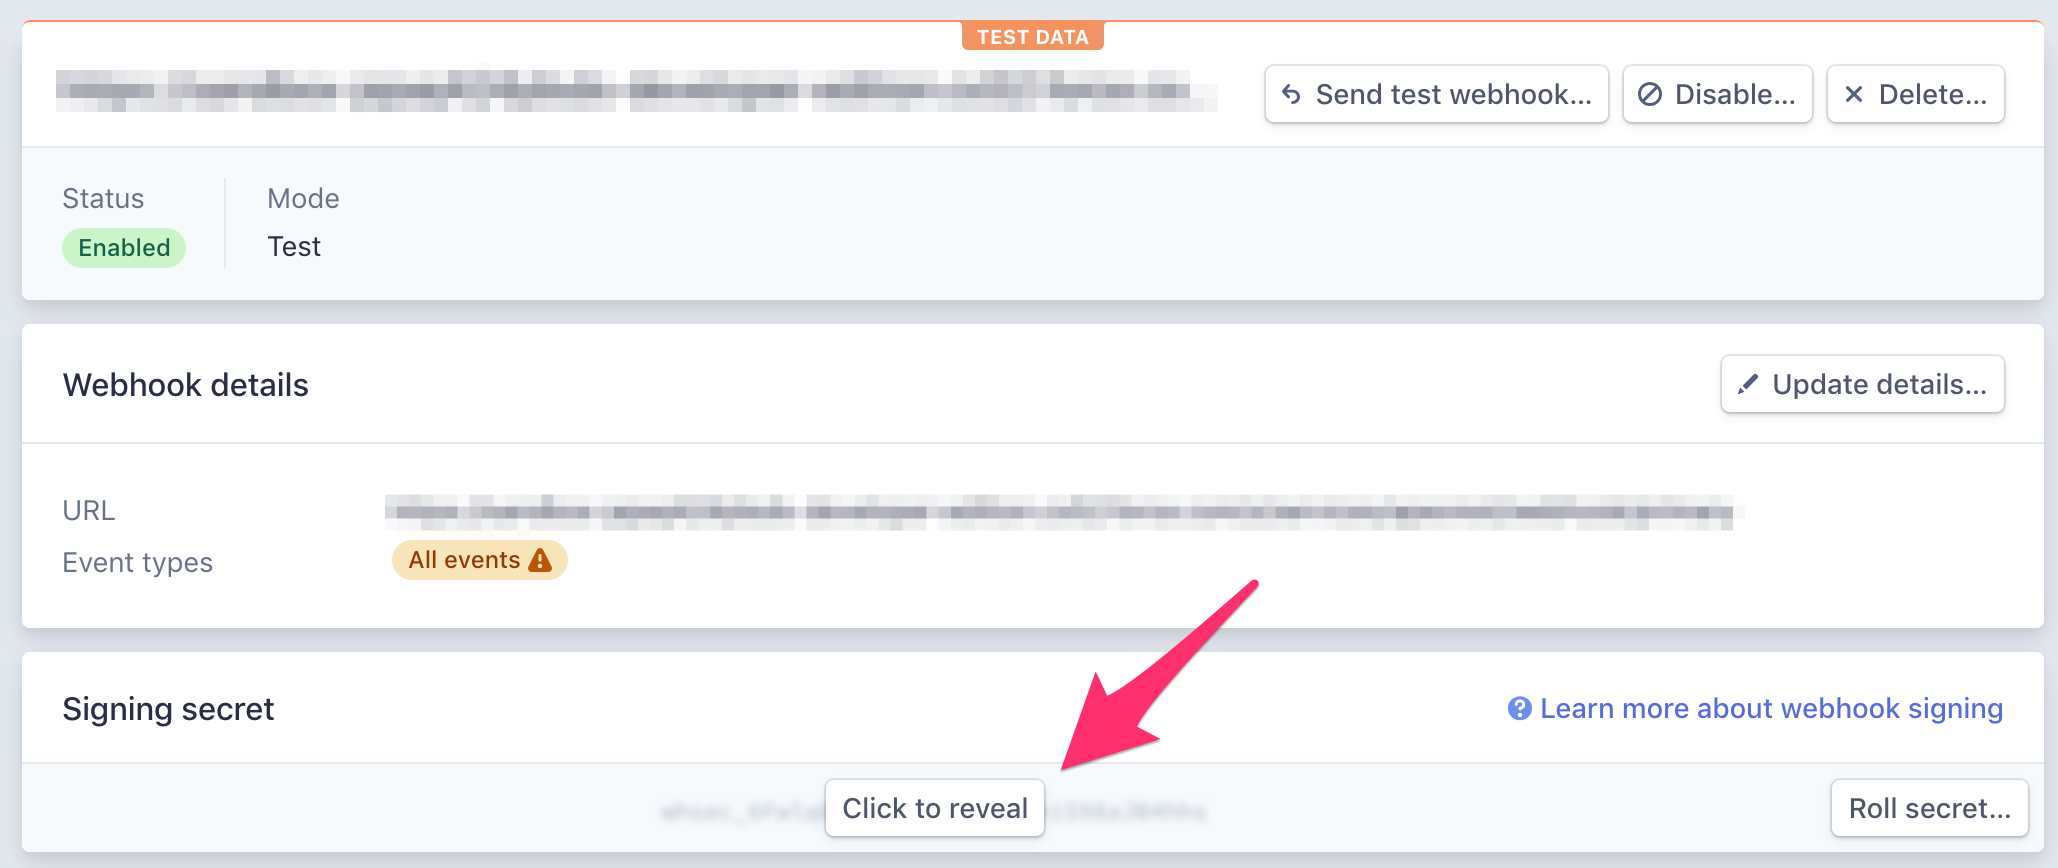
On the Signing Secret section click
Click to Reveal.
-
Navigate in your Salesforce Org to Setup | Custom Metadata Settings.
-
Click Webhook Secret | Manage Records
-
Click
New. -
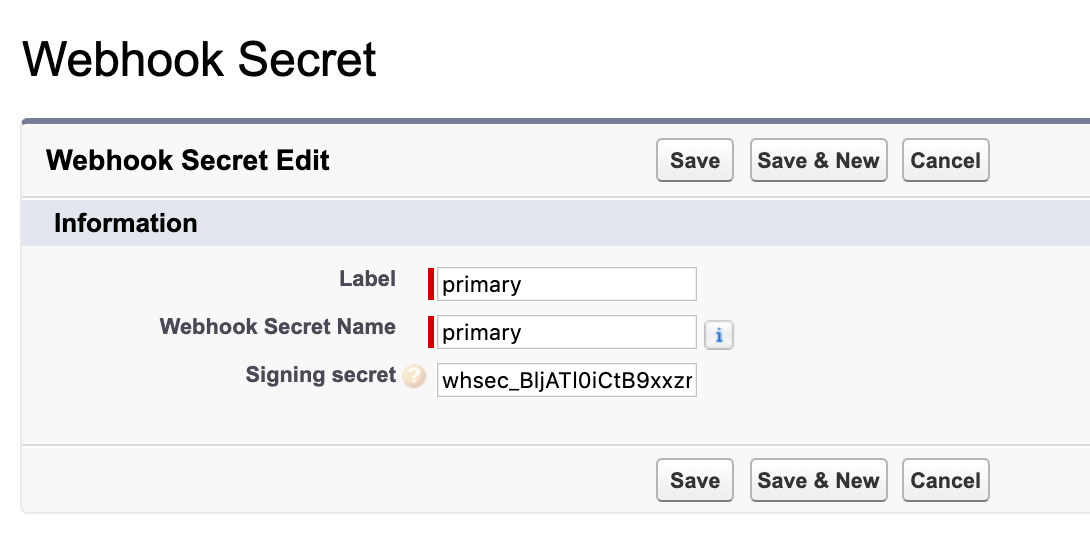
Enter values for
Label,Webhook Secret Name, andSigning Secret. -
Click
Save.
Process Stripe Billing Webhook Types Asynchronously
A global method that allows customers to process certain Stripe Billing webhook types asynchronously instead of via the Blackthorn batch jobs was added. If the Process Async checkbox = “True”, the existing web processing batch jobs will skip those webhooks.
Blackthorn customers are responsible for adding the logic that 1) sets the records they want as Process Async and 2) calls the async method to process them. The following example code creates a before trigger to check the Process Async box and an after trigger to call the async method.
Before proceeding, two updates must be made to the Site Guest User/public user.
Step 1: To avoid permission errors, give the Blackthorn | Payments (Site Guest User) permission set Read access to the Product (Product2) object.
- Click the Gear icon in the upper right-hand corner.
- Click Setup.
- In the Quick Find box, enter and click “Permission Sets.”
- Create a new permission set.
- Click New.
- In the Label field, enter a descriptive name for the permission set, such as “Read Access to Product2.”
- Click Save.
- Configure object permissions.
- Click “Object Settings” or “Object Permissions” in the Apps section.
- Find and click the Product (Product2) object. If you don’t see it, use the search function to locate it.
- Click Edit next to the Products heading.
- In the Object Permissions section, set Read to “Enabled” (checked). Do not enable Edit, Create, and Delete unless they are needed.
- Click Save.
Step 2: Assign the newly created permission set to the public user.
- Navigate back to the site you created.
- Click Public Access Settings.
- Click the View Users or Assign Users button.
- Click the link for the site guest user.
- In the Permission Set Assignments section, click Edit Assignments.
- Move the newly created permission set from the Available Permission Sets column to the Enabled Permission Sets column.
- Click Save.
trigger customWebhookTrigger on Webhook_Event__c (before insert, after insert) {
    if (Trigger.isBefore) {
        for (bt_stripe__Webhook_Event__c webhook : Trigger.new) {
            if (webhook.bt_stripe__Type__c == 'invoice.created') {
                webhook.bt_stripe__Process_Async__c = true;
            }
        }
    }

    if (Trigger.isAfter) {
        List<Webhook_Event__c> webhooks = [SELECT Id, Name, Type__c, Process_Async__c, Processed__c, Payment_Gateway__c, Data__c FROM Webhook_Event__c WHERE Id IN :trigger.new];
        for (Webhook_Event__c webhook : webhooks) {
            if (webhook.bt_stripe__Process_Async__c && webhook.bt_stripe__Type__c == 'invoice.created') {
                // Call without sharing class here to process the webhook
            }
        }
    }
}
NOTE: Replace 'invoice.created' or add additional webhook types as needed.
Next Steps
- Insert the Virtual Terminal onto your parent object(s) Page Layouts.
- Use Payment Schedules to create future looking Transactions in minutes.
- Learn about our supported Payment Methods.
Troubleshooting
If you have received an error in the Setup Wizard, with Webhooks or have a question, please view our Troubleshooting or FAQ page.