Introduction
The Transaction object is used to authorize, capture, and refund charges, as well as serve other functions (see below). There are four record types on the Transaction object:
"Charge" (formerly called "Stripe"): Charging a Payment Method, refunding a charge, or logging a "Non-Gateway" Transaction (monies that transferred outside of Stripe but you want to keep track of in Salesforce, such as a wire transfer).
"Payouts": Auto-created by Stripe webhooks for stand-alone accounts (ordinary/common accounts). These can be manually created and processed if you're using Stripe Connect to initiate the "paying out" of funds from a Stripe account to an External Account (bank account or debit card).
"Transfer" (Stripe Connect only): Moves funds between Stripe accounts.
"Adjustment": This Transaction type is used by Stripe to send money to your account or debit your account (such as with a dispute's fee).
Transactions can relate to any object defined in the Blackthorn Payments Setup Wizard. A lookup relationship is automatically created between the Transaction object and the parent object(s) you select.
Transactions can also process in any currency that Stripe supports. Each currency has a record in Custom Metadata for the Transaction to reference based on the value from the Currency ISO field.
Process Flow
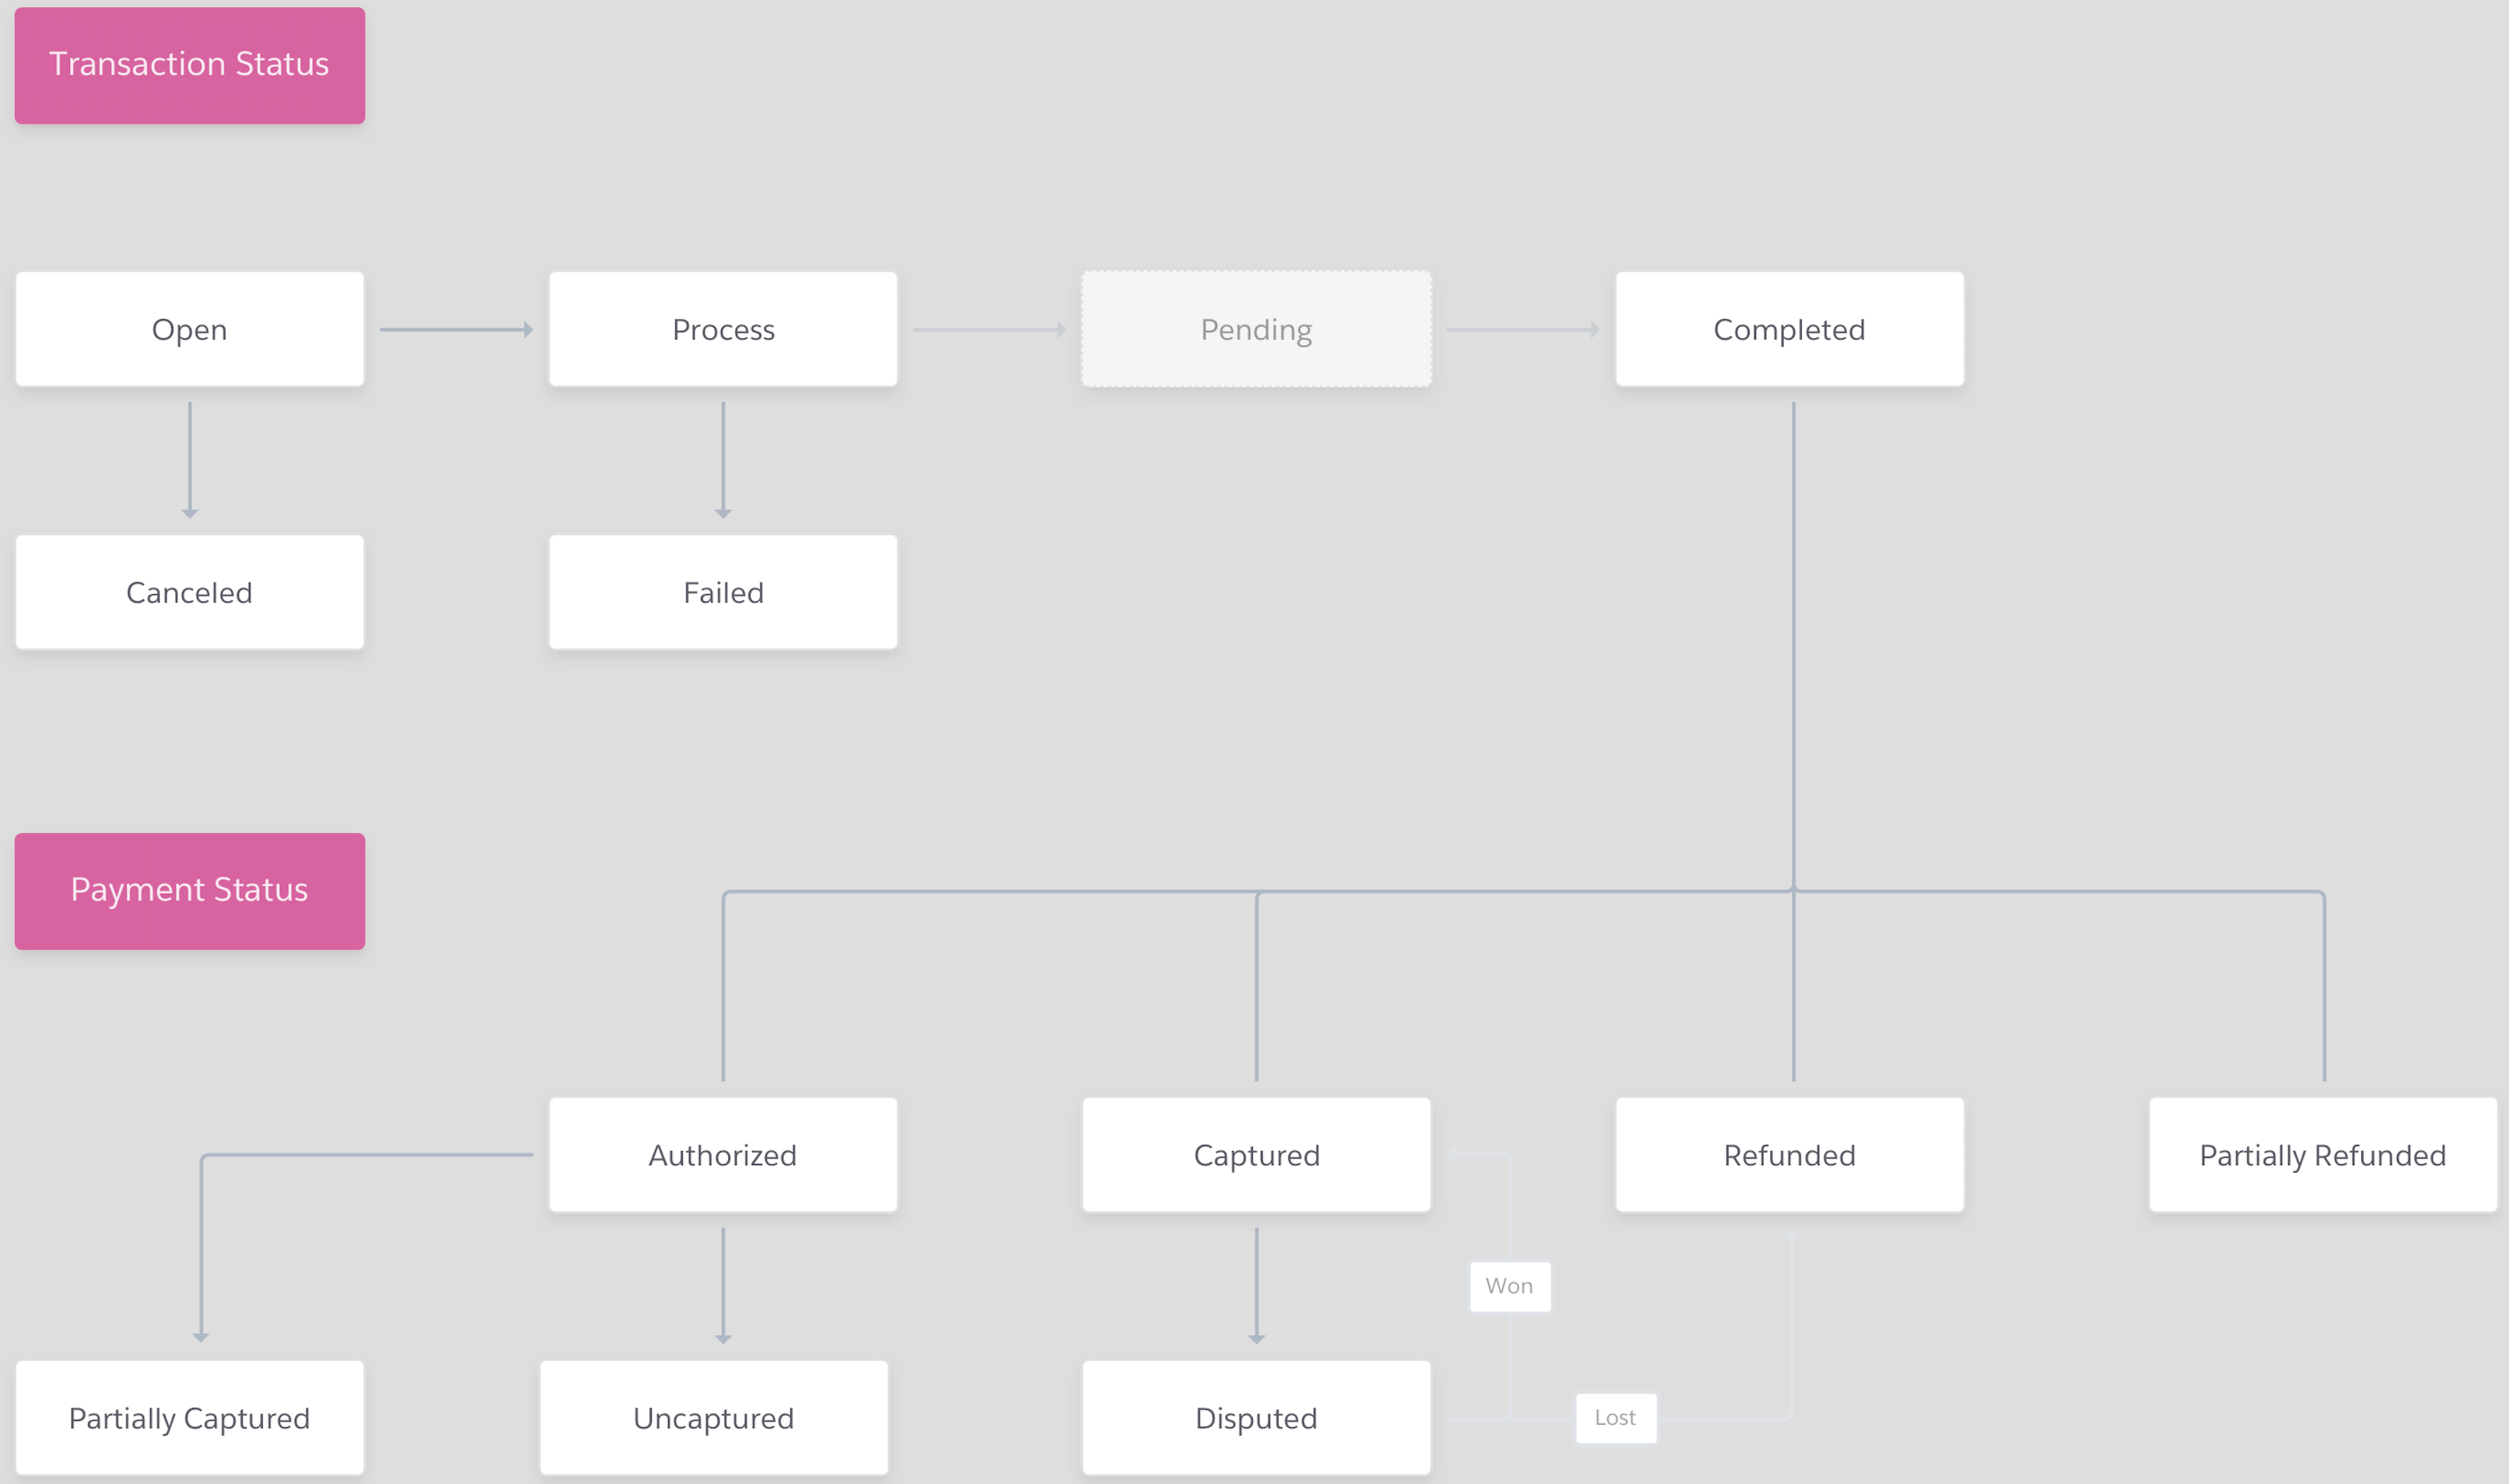
With all four record types, the most important part of Transactions is understanding the process flow. There are two fields on this object that provide the most information, Transaction Status and Payment Status. These fields have picklist options (the majority of them are set automatically) that provide insight into what your Transactions have done.
| Transaction Status | Payment Status | Meaning |
|---|---|---|
| "Open" | "null" | A Transaction is created in Salesforce but is not processed to any gateways yet. |
| "Completed" | "Authorized" | The Transaction is authorized. |
| "Completed" | "Captured" | The payment is successfully captured. |
| "Completed" | "Uncaptured" | An authorized Transaction is released. |
| "Completed" | "Refunded" | The charged Transaction is refunded. |
| "Completed" | "Partially Refunded" | The charged Transaction is partially refunded. |
| "Failed" | "null" | The Transaction failed to capture. The Error Code and Error Message will be captured. |
| "Pending" | "null" | The Transaction has a related ACH Payment Method in a waiting period for 3-4 days. Or if your platform's account/connected account balance is sufficiently negative, then the refund Transaction is set to "Pending" status. |
| "Needs Review" | "null" | The Transaction is invalid for some reason; the Error Message will display the issue and the To Fix field will display the possible solution. |
| "Canceled" | "null" | Mainly used in Payment Schedules, when a schedule is canceled and the underlying unprocessed/pending Transactions are also canceled. |
Transaction Status
"Open" (set automatically): A Transaction that has not yet been processed or authorized.
"Process" (set automatically): This is a technical field that you will only see after capturing or authorizing a Transaction. Once you refresh your page, it will automatically change to the next status.
"Pending" (set automatically): This status is only shown when a Transaction has a related ACH Payment Method and is within the 3-4 day waiting period, or if your platform's account/connected account balance is sufficiently negative. Then the refund Transaction is set to a status of "Pending". ACH Transactions can take up to four days before reaching a "Completed" or "Failed" status.
"Pending Payment Intent": This status my indicate that you need to enable Strong Customer Authentication or SCA. Review the Transaction in Stripe to confirm the specific issue.
"Completed" (set automatically): When the Transaction is fully completed. Reference the Payment Status as the result of the completed Transaction.
"On-Hold" (set manually): A Transaction that's set to auto-process but is currently on hold. This will remove the Transaction from the daily auto capture job. Change the status back to "Open" when it should automatically process. Manually add the picklist value to the Transaction Status field in the "Charge" Record Type.
"Canceled" (set manually): If the Transaction was created by mistake or needs to be canceled for any reason while still in the "Open" status, it can be manually switched to "Canceled". Transactions with a status other than "Open" cannot be switched to "Canceled" unless you disable the Transaction validations in Custom Settings.
"Needs Review" (set automatically): This status is shown when an error within Salesforce impacted the Transaction from completing successfully. View the Error Message field or Blackthorn Logs for additional information. The Transaction may need to be set back to "Open" and recaptured if it was not sent to Stripe.
"Failed" (set automatically): The Transaction tried to complete but failed. The reason why it failed to complete may be located in the To Fix field or a Stripe error message populated.
Payment Status
The Payment Status field is automatically populated when the Transaction Status = "Completed".
"Authorized": This status means the amount of the Transaction has been guaranteed by the card issuer and the amount is held for up to 7 days unless it's released early.
"Captured": The full Amount was captured and the funds were taken out from the associated Payment Method.
"Partially Captured": The original Amount was authorized, but then a lesser amount was captured.
"Refunded": The original Amount was fully refunded back to the associated Payment Method.
"Partially Refunded": Part of the original Amount was refunded back to the associated Payment Method.
"Disputed": The Transaction was captured but is now disputed by your customer. It will remain in this status until the Dispute has been won or lost. See more about Disputes. The Transaction will automatically update to this status if webhooks are enabled.
"Uncaptured": If an authorized Transaction has not been captured in 7 days or refunded, the Transaction will automatically update to this status if webhooks are enabled.
Charge Transaction Record Type
When creating a charge Transaction record, there are several fields that automatically update:
Retained Amount: When a Transaction has been successfully completed, this field's amount is the same as the Transaction Amount. If any refunds are made against this Transaction, the Retained Amount will show the remaining amount.
Transaction Type: "Normal" is the default value, but if there is a full refund or a negative balance, this type will automatically update to "Refund".
PayLink: If you purchased this paid add-on, this is the link you can send out to customers for capturing the payment. For additional information, click here.
To Fix: This field automatically displays a message about the Transaction if it was not captured correctly. See the table below for more information.
| Criteria | To Fix (Output) |
|---|---|
| Auto-Process is checked and Due Date and Date To Process is blank | If Auto-Process is checked, a Due Date or Date To Process is needed to automatically capture this Transaction. |
| Invalid Payment Method is checked | The related Payment Method is not valid to capture this Transaction. |
| Auto-Process is checked and Payment Method is blank and Record Type = "Charge" | If Auto-Process is checked, a Payment Method is needed to automatically capture this Transaction. |
| Auto-Process is checked and Connected Account is blank and Record Type = "Transfer" | If Auto-Process is checked, a Connected Account is needed to automatically process this Transaction. |
| Auto-Process is checked and Connected Account is blank and Payout Method is blank and Record Type = "Payout" | If Auto-Process is checked, a Connected Account / Payment Method is needed to automatically process this Transaction. |
Payment Gateway: This field is set automatically under a few scenarios.
If the field is blank and a Payment Method is related, the Payment Gateway will automatically set to the value of the Payment Method's Payment Gateway after the Transaction processes.
If the field is blank and a PayLink is sent to your customer, the Payment Gateway will automatically be set to your org's default Payment Gateway after the Transaction's Transaction Status is set to "Completed." Alternatively, you can set the value of the Payment Gateway prior to processing (if there is no related Payment Method) to 'tell' PayLink which Payment Gateway to process through.
Contact and Account: If both of these fields are null and the related Payment Method's Account and Contact have a value, the Transaction's Account and Contact will be updated with those values.
Payment Method Billing Email: Will be set automatically from the related Payment Method's Email when a Payment Method is added to the record and saved.
The “Send Blackthorn | Payment Receipt” flow launches the Payments Receipt Email from the flow in the Payments package. The email receipt will be sent when the Transaction is completed/captured and will contain the Transaction’s Description in a merge field.
Use the steps below to test the flow.
- Process a Transaction with the following values:
- Amount
- Transaction Type = “Normal”
- Transaction Status = “Completed”
- Payment Status = “Capture”
- Payment Method Billing Email = the email address where you would like to receive the test
- The email will be sent, and the email receipt will contain the Transaction's Description.
Original Transaction (If Refund): If this is a refund type Transaction, this field will automatically populate a lookup to the original Transaction.
Original Transaction (If Reattempt): If this is the reattempted Transaction, this field will automatically populate a lookup to the original "Failed" Transaction.
Available On: This field provides the date that this amount is available in your Stripe account.
Balance Status: This field lets you know if the amount is part of your Pending or Available balance in Stripe.
Processing Transactions
Below are instructions for processing each type of Transaction.
In some cases like ACH processing you may need to enable webhooks so statuses can be asynchronously updated. Use our webhook documentation to complete the setup.
Authorized Transaction
- Navigate to the Transaction object.
- Lightning: Click on the App Launcher > Under "All Items" > Click Transactions.*
- Classic: Click on "All Tabs" ("+" icon in the top right) > Click Transactions.*
- Click New.
- Select Record Type = "Charge".
- Click Next.
- Fill in the following required fields:
- Amount: The Transaction amount.
- Currency ISO: The currency to process this Transaction in.
- Payment Method: The Payment Method used to process this Transaction.The Payment Method must be valid to authorize a Transaction.
- Click Save.
- Click Authorize.
- Lightning: Click the down arrow (top right corner) > Click Authorize.
- Classic: Click the Authorize button at the top.
If the Transaction was successful, the Transaction Status will update to "Completed" and Payment Status will update to "Authorized".
If the Transaction is not captured within 7 days, the Payment Status will update to "Uncaptured" when webhooks are enabled.The Transaction can no longer be captured and you will need to clone this Transaction or create a new one.
If you'd like to capture or partially capture the Amount of the authorized Transaction, click the Capture button to charge the full Amount or update the Amount to a lesser amount then click Capture (see below for more information).
Captured Transaction
- Navigate to the Transaction object.
- Lightning: Click on the App Launcher > Under "All Items" > Click Transactions.
- Classic: Click on "All Tabs" ("+" icon in the top right) > Click Transactions.
- Click New.
- Select Record Type = "Charge".
- Click Next.
- Fill in the following required fields:
- Amount: The Transaction amount.
- Currency ISO: The currency to process this Transaction in.
- Payment Method: The Payment Method used to process this Transaction.The Payment Method must be valid to capture a Transaction.
- Click Save.
- Click Capture.
- Lightning: Click the down arrow (top right corner) > Click Capture.
- Classic: Click Capture at the top.
If the Transaction was successful, the Transaction Status will update to "Completed" and Payment Status will update to "Captured".
Partially Captured Transaction
Once a Transaction has successfully authorized, and you decide to capture less than the original amount, the Payment Status updates to "Partially Captured."
- Navigate to the Transaction object.
- Lightning: Click the App Launcher > Under "All Items" > Click Transactions.
- Classic: Click on "All Tabs" ("+" icon in the top right) > Click Transactions.
- Select an existing Transaction with Payment Status = "Authorized.
- Update the Amount field to a lesser amount.
- Fill in the following required fields:
- Currency ISO: The currency to process this Transaction in.
- Payment Method: The Payment Method used to process this Transaction.The Payment Method must be valid to capture a Transaction.
- Click Save.
- Click Capture.
- Lightning: Click the down arrow (top right corner) > Click Capture.
- Classic: Click Capture at the top.
If the Transaction was successful, the Transaction Status will update to "Completed" and Payment Status will update to "Partially Captured".
Releasing Authorized Transactions
The Uncaptured Method field shows if an authorized Transaction was released (refunded) before the 7 days.
- "Manual": This means the authorized Transaction was manually released from the user.
- "Automatic": This means the authorized Transaction was automatically released by Stripe after 7 days.
When you need to release an authorized Transaction before 7 days.
- Navigate to the authorized Transaction
- Click Refund.
The authorized Transaction has been released in Stripe and the Payment Status updates to "Refunded." This will not create a new Transaction, it will update the existing Transaction.
Follow the process above to release a Transaction from Stripe.
When you release an authorized transaction by clicking the Refund button, there are no refund transaction created and the Payment Status updates to "Uncaptured".
Non-Gateway Transaction
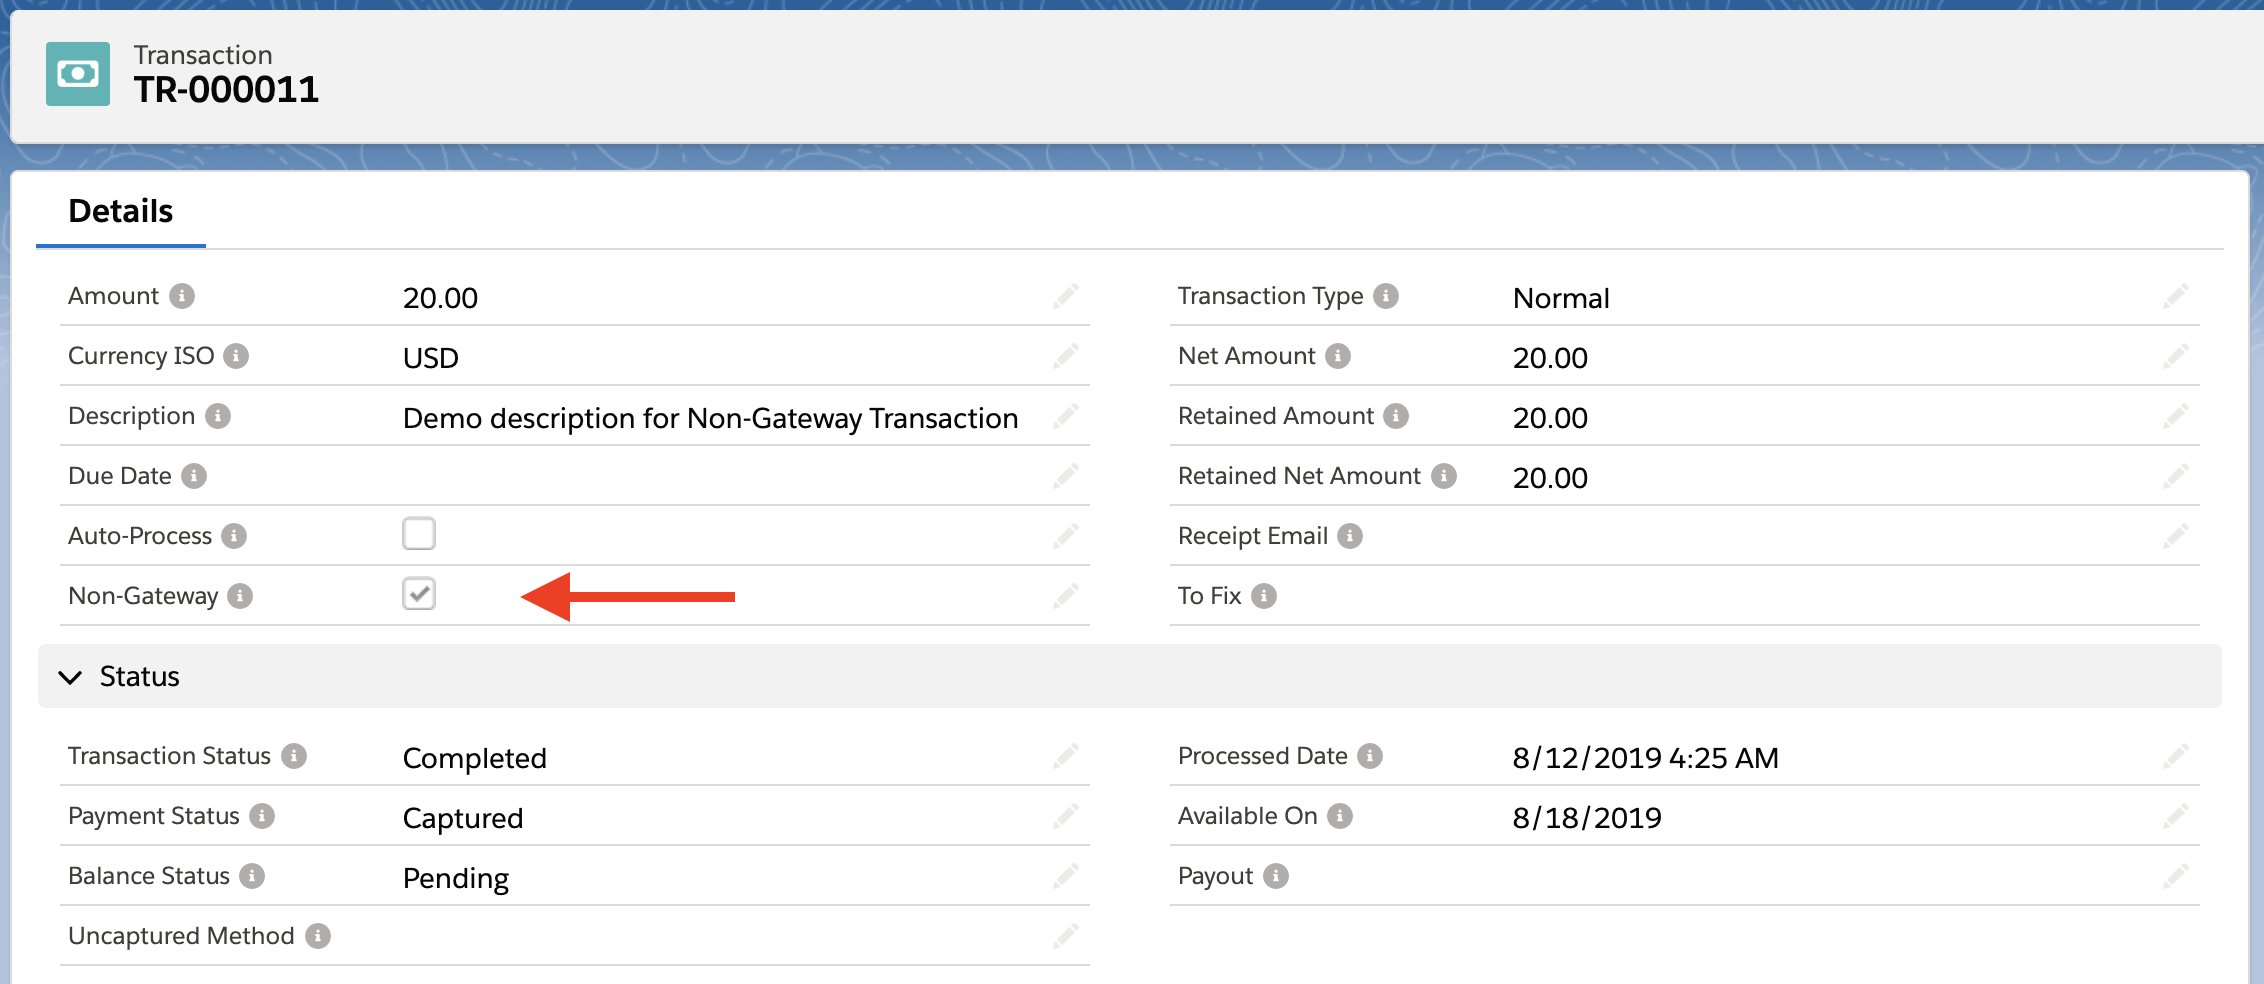
Recording a Non-Gateway Transaction is similar to creating a charge Transaction with the exception that a Non-Gateway Transaction is not subject to the validations and processes that a charge Transaction is subject to.
However, you can refund and partially refund Non-Gateway Transactions; you can use the Refund / Partial Refund buttons and checkboxes the same way you'd use it with normal Transactions.
- Navigate to the Transaction object.
- Lightning: Click the App Launcher > Under "All Items" > Click Transactions.
- Classic: Click on "All Tabs" ("+" icon in the top right) > Click Transactions.
- Select Record Type = "Charge".
- Click Next.
- Fill in the following required fields:
- Amount: The Transaction amount.
- Currency ISO: The currency of this Transaction.
- Non-Gateway: Checking this field indicates the Transaction is a "Non-Gateway Transaction" and you can manually set any of the fields. IE Transaction for cash or a mailed-in check.Non-Gateway Transactions are not processed or captured like charge Transactions.
- Click Save.
Failed Transactions
Transactions that fail to process, such as for card declines, cannot be retried. The Transaction must be cloned then reattempted. The app is built this way because Stripe maintains IDs, even for failed Transactions.
Spreedly
If a Spreedly Transaction fails, the Transaction will contain the following information describing the reason for the failure.
- If the response includes an error code, it will be stored in the Transaction’s Error Code field.
- The Transaction’s token will be stored in the Transaction’s Spreedly Transaction Token field.
- The date the Transaction was processed will be stored in the Processed Date field.
Stripe
When a Transaction with an ACH Payment Method using a Stripe gateway fails, a new Transaction is created. Its Record Type is set to “Refund,” Transaction Status is set to “Failed,” Payment Status field is blank, and the Stripe Fee related to the failure is recorded.
Deleting Transactions
By default, once a Transaction has any Stripe fields populated (such as the Error Message or Transaction ID), you will not be able to delete it. If you do need to delete a Transaction, you can disable the Transaction validations in custom settings. This is done because Blackthorn Payments is built to be a mirror of your Stripe database.
Refund Transactions
There are 2 paths to create a refund Transaction.
- Refund / Partial Refund buttons on a Transaction record
Creates a refund Transaction for either the exact amount or an amount selected by the user. - Process Scheduled Refund Transactions Now button on Blackthorn | Payments Admin – Batch Jobs tab runs the job at the exact moment the button is pushed. It will only process Transactions that meet the specific criteria for manual refunds.
Refunded/Partially Refunded Transaction
The Source field is not included on the Charge Transaction Layout page layout by default. To add the Source field, go to Setup > Object Manager > Transaction > Page Layout > Charge Transaction Layout.
To refund a Transaction in full, click the Refund button. To partially refund a Transaction, click on the Partial Refund button, enter the amount to be partially refunded and click Refund.
Both refunds and partial refunds will create Transactions related to the original, parent Transaction. The Retained Amount field captures the amount of the Transaction left after all refund(s).
Ex. If the original Transaction Amount = "100" and two partial refunds of 35 each (70 total) were processed, the Retained Amount field will be "30".
NOTE: The Source field of a refund Transaction is set on record creation. For example, if the refund Transaction is created from a Webhook Event, the Source will specify “Webhook.” Or if the refund is processed from Salesforce, the Source field will specify “Salesforce UI.”
You can also fully refund or partially refund Non-Gateway Transactions (see: Non-Gateway Transactions).
- Navigate to the Transaction object.
- Lightning: Click the App Launcher > Under "All Items" > Click Transactions.
- Classic: Click on "All Tabs" ("+" icon in the top right) | Click on Transactions.
- Select an existing "Captured", "Partially Captured" or "Partially Refunded" Transaction.
- Click Refund or Partial Refund.
- If performing a partial refund, enter the Amount.
- Click Refund.
If the Transaction was a full refund, the Transaction Status will update to "Completed" and Payment Status will update to "Refunded". If it was a partial refund, Transaction Status will update to "Completed" and Payment Status will update to "Partial Refund".
Scheduled Refund Transactions Now
To use the Process Scheduled Refund Transactions Now button to process a refund Transaction, complete the following steps.
- Create a new Transaction.
- Set Record Type = "Charge".
- Click Next.
- Enter the Amount as “-x.xx”.
- Set Transaction Type = "Refund".
- Set Due Date = a date that is less than or equal to today.
- Set Auto-Process = “True”.
- Set Transaction Status = "Open".
- Set Original Transaction (If Refund) = the original Transaction.
- Set Payment Method = Payment Method used for the original Transaction.
- Click Save.
- Go to the Blackthorn | Payments Admin tab.
- On the Batch Jobs tab, click Process Scheduled Refund Transactions Now.
- Go back to the Transaction that was just created. Once the job is complete, the Transaction Status field will say “Completed”.
Write-Off Transactions
The new picklist value “Write Off” for the Transaction Type field is designed to deduct amounts from an Invoice while maintaining accurate records for financial reconciliation purposes. Users can define the process for creating write-off Transactions based on their unique requirements.
Admins can implement this using tools such as Screen flows, Approval Processes, or other custom workflows to generate write-off Transactions.
Complete the following steps to create a new write-off Transaction.
- From an Invoice record page, click New on the Transactions Related List.
- Set the Record Type to "Charge".
- Click Next.
- Add an amount to write off in the Amount field.
- Set Transaction Type = "Write Off".
- Check the Non-Gateway checkbox. This is required to create a write-off Transaction. An error message will be displayed if this field is left blank.
- Set Transaction Status = "Completed". (This triggers the recalculation of Invoice totals).
- Complete any other fields. (optional)
- Click Save.
The Invoice fields of Write Off Amount, Balance Paid, and Balance Due now reflect the new values.
Auto-Process/Scheduled Transactions
Blackthorn Payments has separate running scheduled batch jobs to process the daily charge Transactions, authorized Transactions, payouts, transfers and refund Transactions.
Find details for each scheduled job here.
Need to configure reattempt logic for your scheduled Transactions? If you would like a new Transaction automatically created and queued for auto-process when the original Transaction fails, click here.
Capture Multiple Transactions In List View
Transactions can be manually processed in batch, up to 200 at a time through a Salesforce list view.
To capture multiple Transactions at one time:
- Click the Transaction object tab.
- Click the "Scheduled for Auto-Process (Future)" packaged list view.
- Use the checkboxes to select which records to process.
- Click Capture. (If the Capture button is not available in your ListView, go to the Transaction object in Setup and add the button to your available List View buttons.)
- On the next screen, verify which Transactions to process.
- Click Capture.
Payout Transaction
Stripe makes deposits (payouts) from your available account balance into your bank account. This account balance is comprised of different types of transactions (e.g., payments, refunds, etc.).
Stripe Payouts will now automatically relate to the Charges and Transfers included within them. This helps reconcile which Charges are included in which bank transfers that you receive.
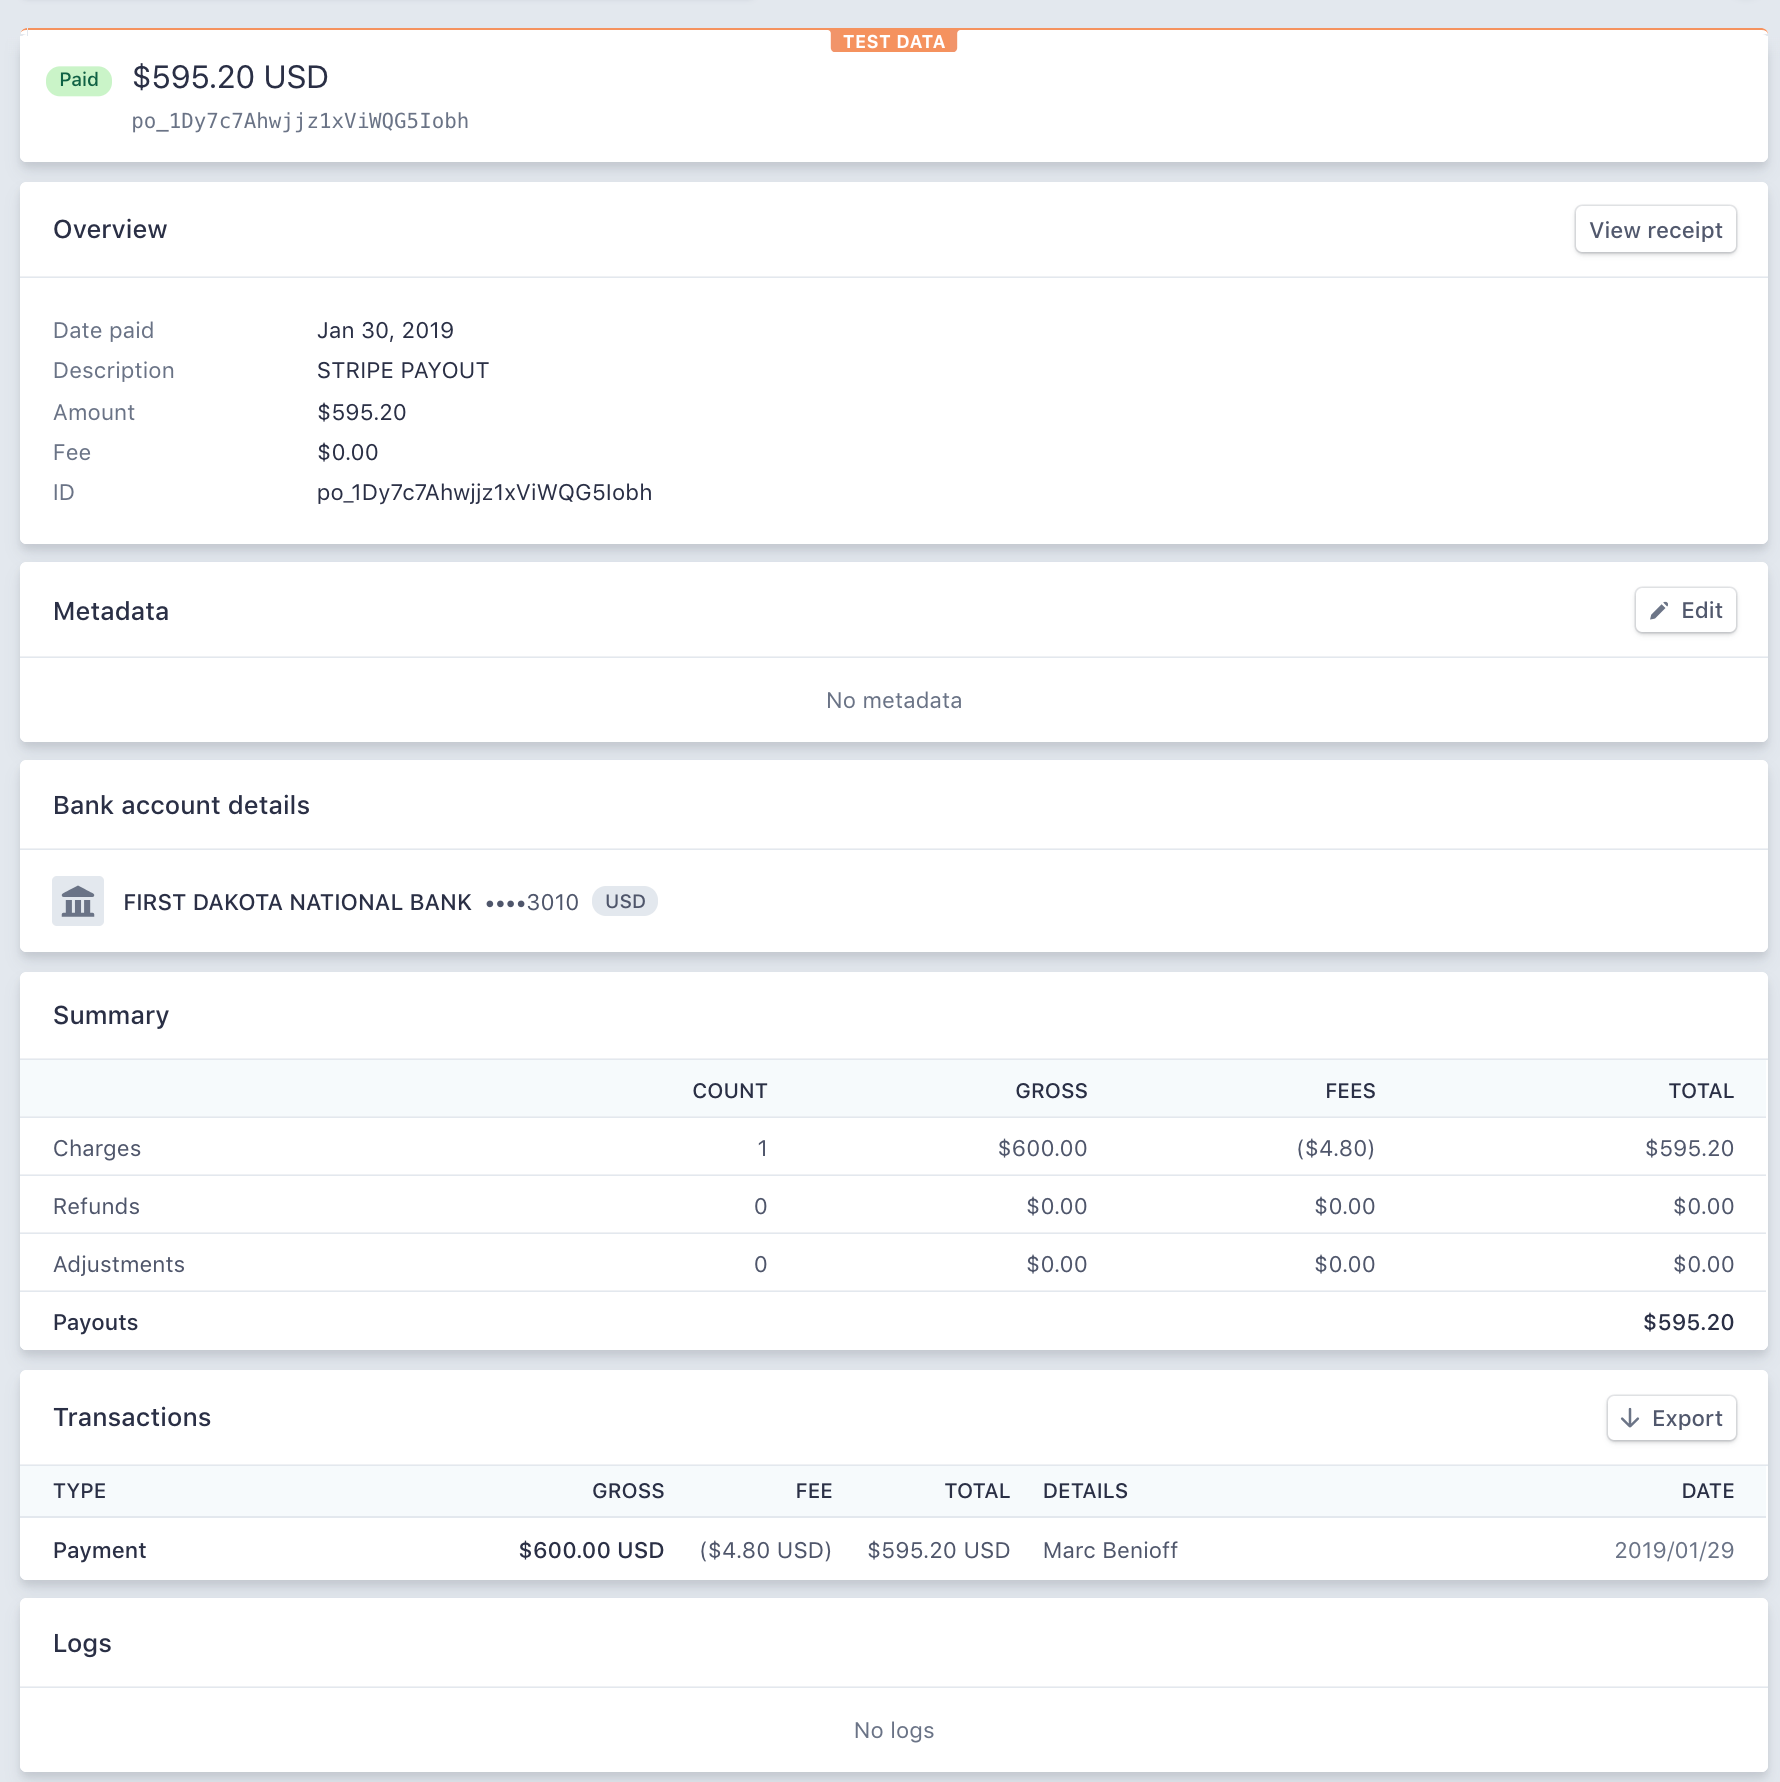
Payout Transactions are created in Salesforce via webhook by Stripe.
They cannot be manually created in Salesforce.
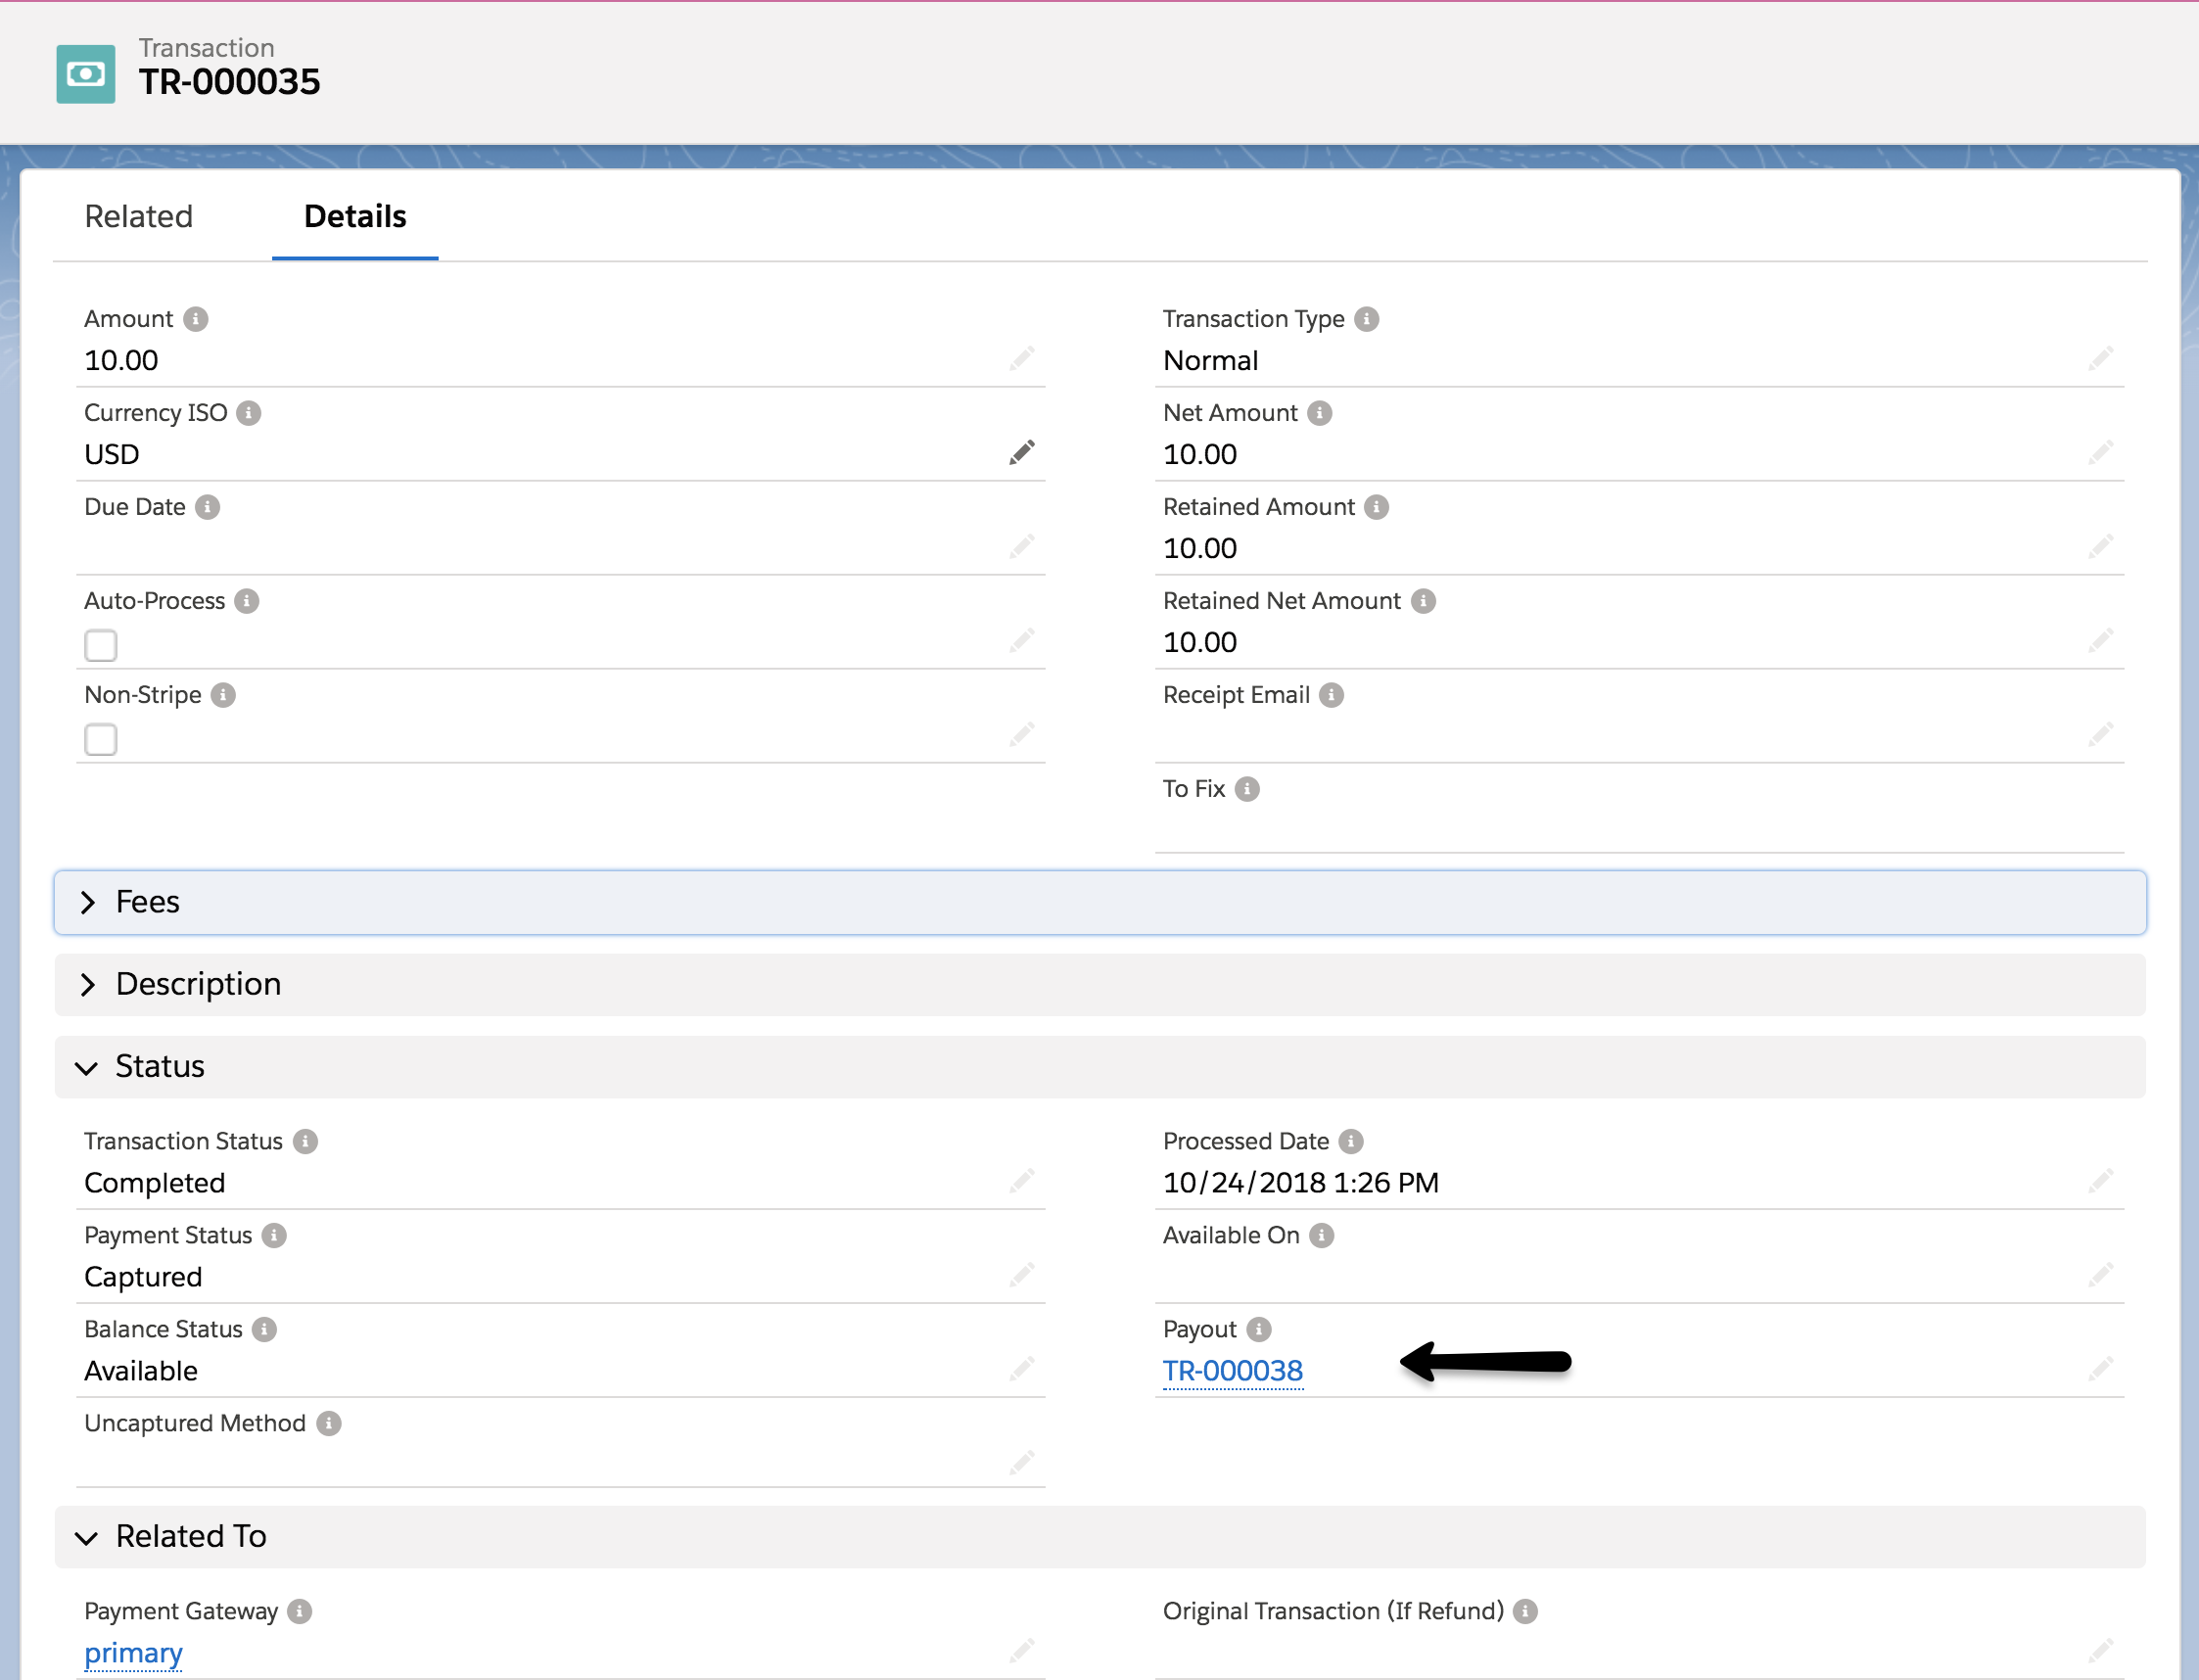
- Once a Transaction with Record Type = "Payout" has been created with a Payment Status = "Paid", all charge Transactions are related to the Payout Transaction through the Payout field on the Charge Transactions via the daily charges batch job.
It is important that payouts relate to original charges, refunds, disputed refunds and transfers so that you can successfully prove and document that account balances are in agreement.
In addition to relating a Payout Transaction record to all original charges, refunds, and transfers we provide an out-of-the-box report on payouts and related Transactions.
Batch job process
- All Payout Transactions with a Record Type = "Payout", Transaction Status = "Completed" and Payment Status = "Paid".
- The Payout Transaction record then sets the Payout Processed Date field with a timestamp when the record was processed so the batch job will not process it again.
This batch job can also be triggered manually. Go to the Blackthorn | Payments Admin tab, click the Batch Jobs tab, and click Process Payout Balance History.
Adjustment Transaction
This Transaction is created via webhook by Stripe. It should not be manually created.
Parent Object Roll-up Fields
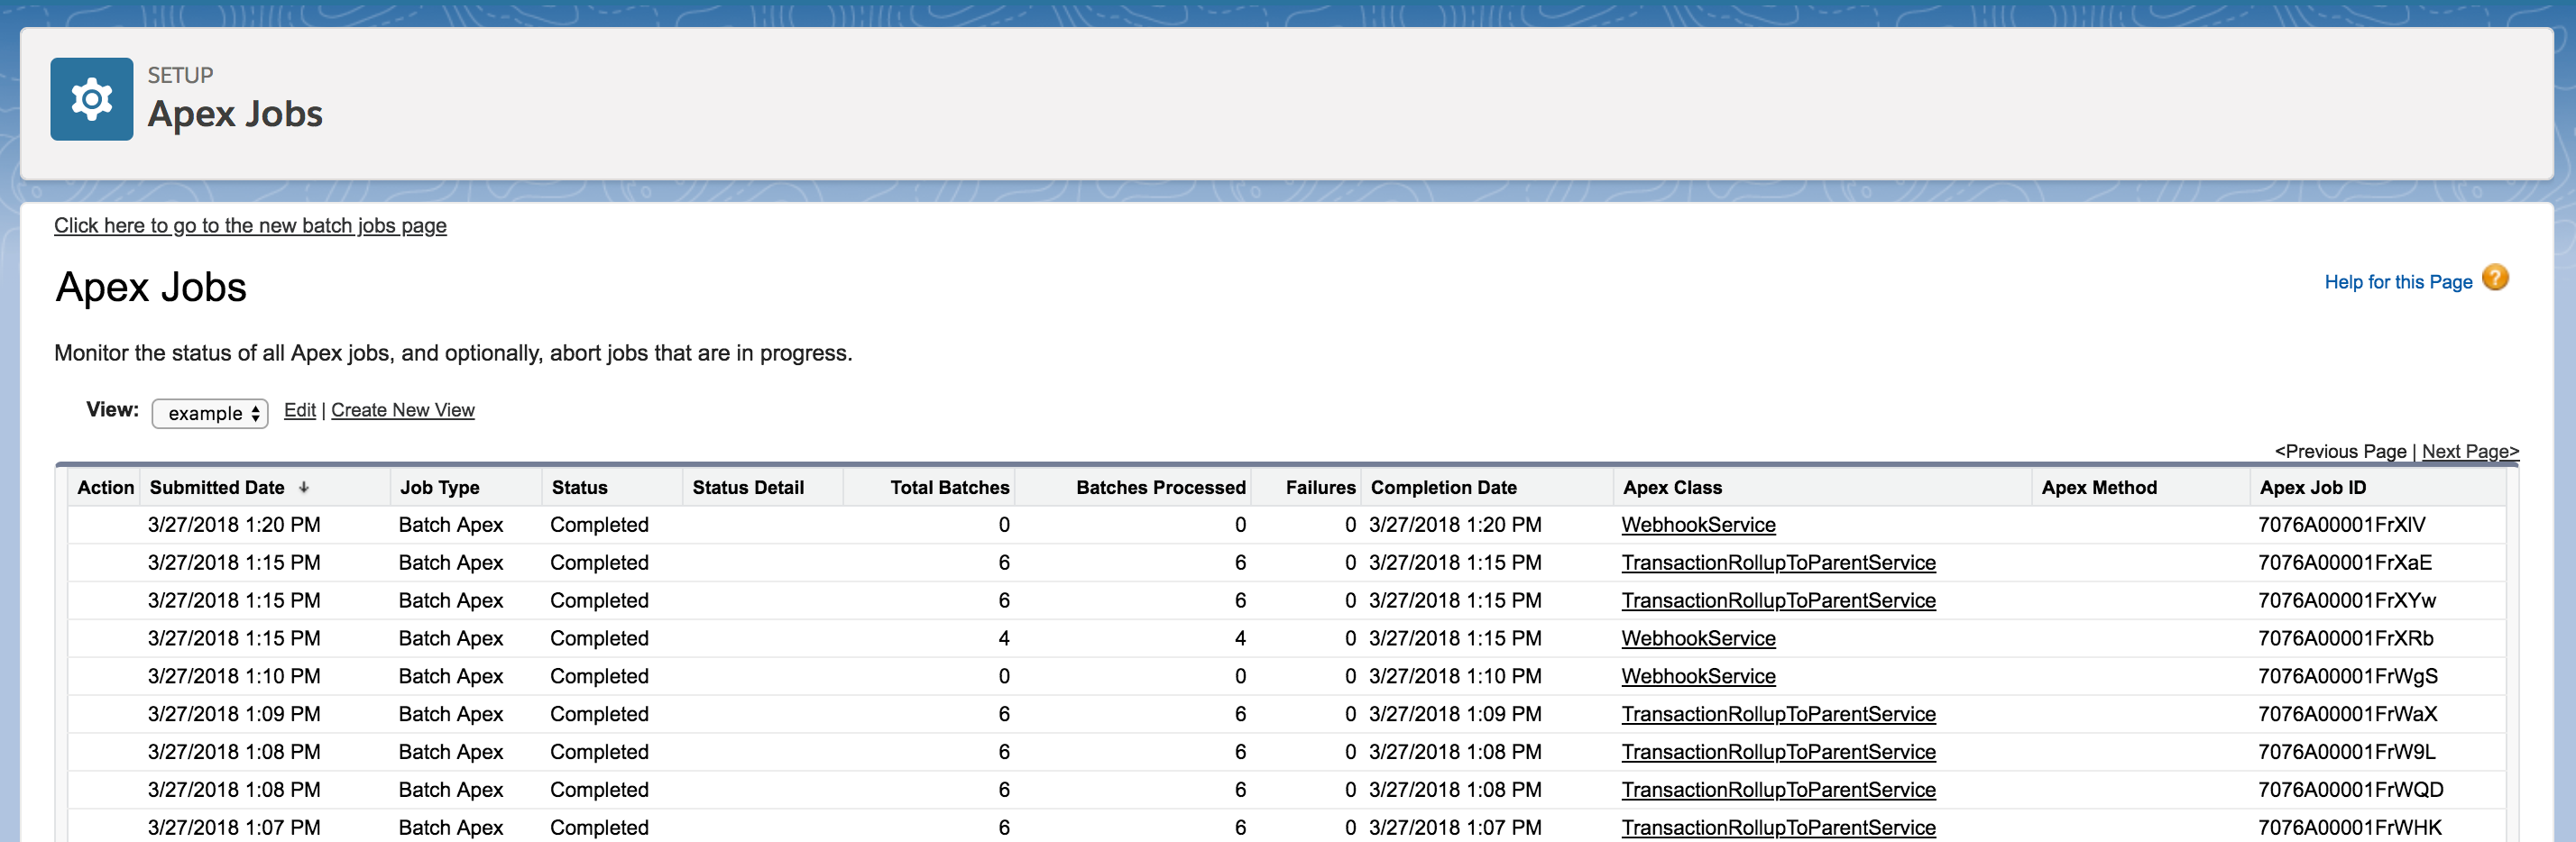
There are roll-up fields that get automatically created on the parent object(s) you define in the Blackthorn | Payments Setup Wizard on the Relationship(s) Step. Each time you create or edit a Transaction, an apex job called, "TransactionRollupToParentService" fires to update these balances.
Charge Transaction Fields
Charge Transaction roll-up fields are automatically placed on the parent object's page layout through the install wizard.
If you upgrade your org, these fields will need to be added manually to your page layout.
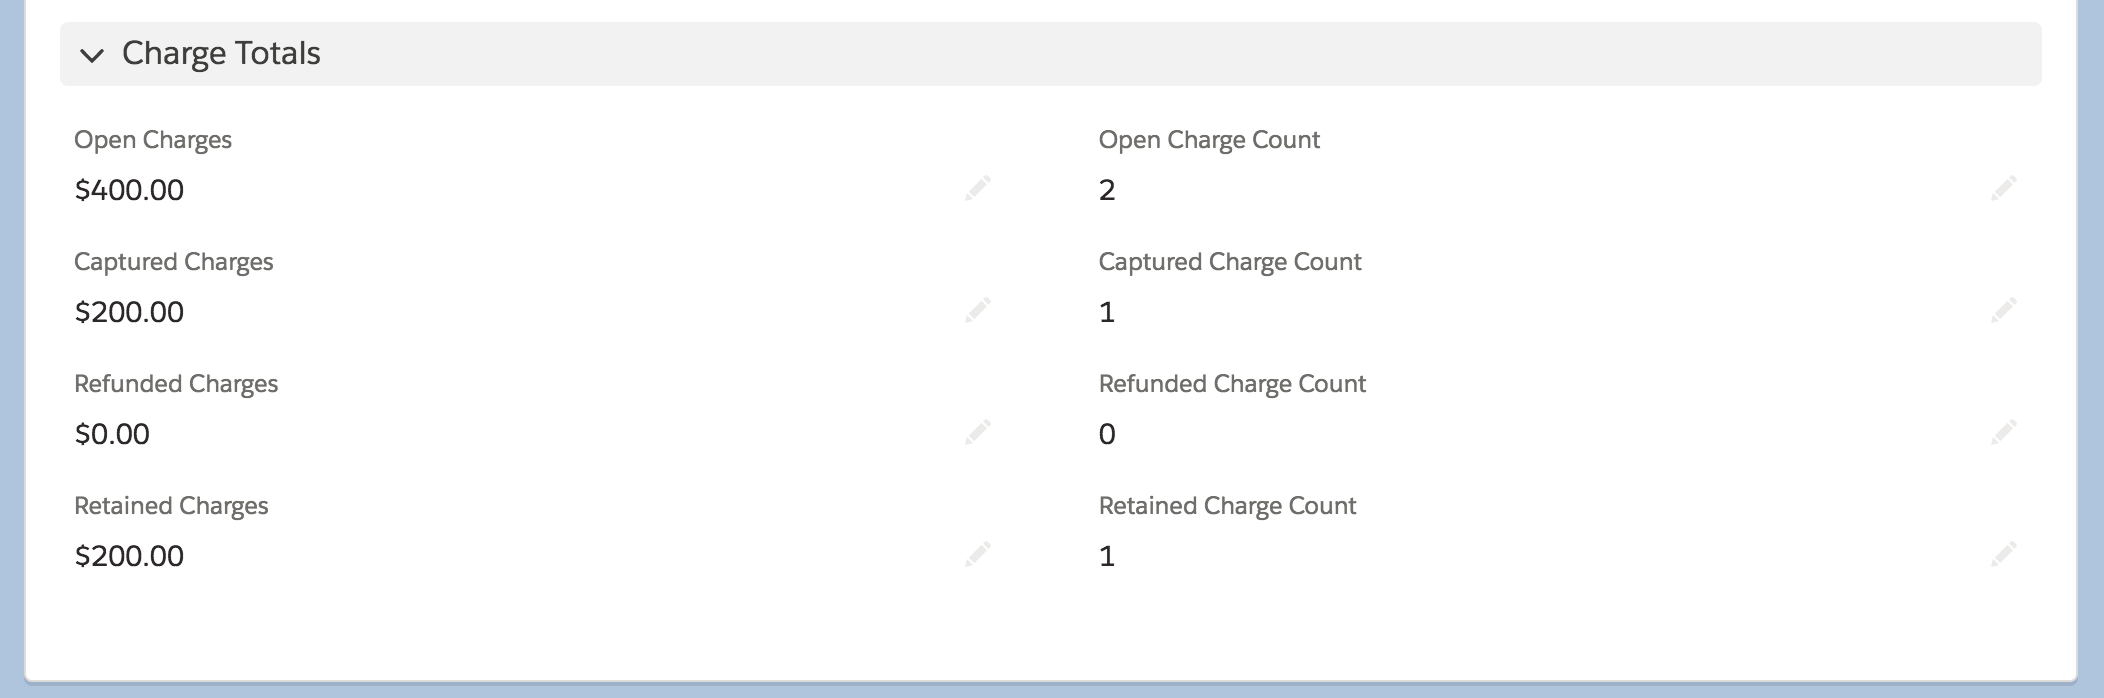
The roll-up fields provide insight into all open, captured, refunded, retained, and non-gateway charges related to the parent object, like an Opportunity record.
- Navigate to a parent object record, i.e. an Opportunity record.
- Lightning: Click the App Launcher > Under "All Items" > Click Opportunity.
- Classic: Click "All Tabs" ("+" icon in the top right) > Click Opportunity.
- Scroll down to "Charge Totals".
This section provides the roll-up fields for a Transaction with Record Type = "Charge".
Checkboxes for Declarative Automation
In addition to the Authorize, Refund, and Capture buttons to process Charge Transactions, we have provided checkbox fields that mirror the button functions.
These checkboxes allow you to process Transactions automatically without the button. When Auto-Process runs, if Authorize or Refund are checked, the Transaction will be authorized or refunded instead of being captured. Checking each checkbox will perform the same process as if you were clicking the Capture or Authorize button.
These fields are on the Transaction object but are not on the Record Type = "Charge" Transaction page layout.
Transaction Fees
There are several fields that calculate certain fees for Charge Transactions.
- Payment Gateway Fee: This is the fee from your Payment Gateway for successful Transactions.
The fee amount is based on your plan with your Payment Gateway. - Refunded Payment Gateway Fee: This is the refunded Payment Gateway fee amount if your Transaction was fully or partially refunded.
As of November 2017, Stripe stopped refunding fees for new customers. - New Payment Gateway Fee: This is the sum of the Payment Gateway Fee minus the Refunded Payment Gateway Fee.
- Application Fee (Stripe Connect only): The platform's application fee for direct charges from a Stripe Connect account.
- Refunded Application Fee (Stripe Connect only): This is the refunded application fee amount if your Transaction was fully or partially refunded.
- New Application Fee(Stripe Connect only): This is the sum of the Application Fee minus the Refunded Application Fee.
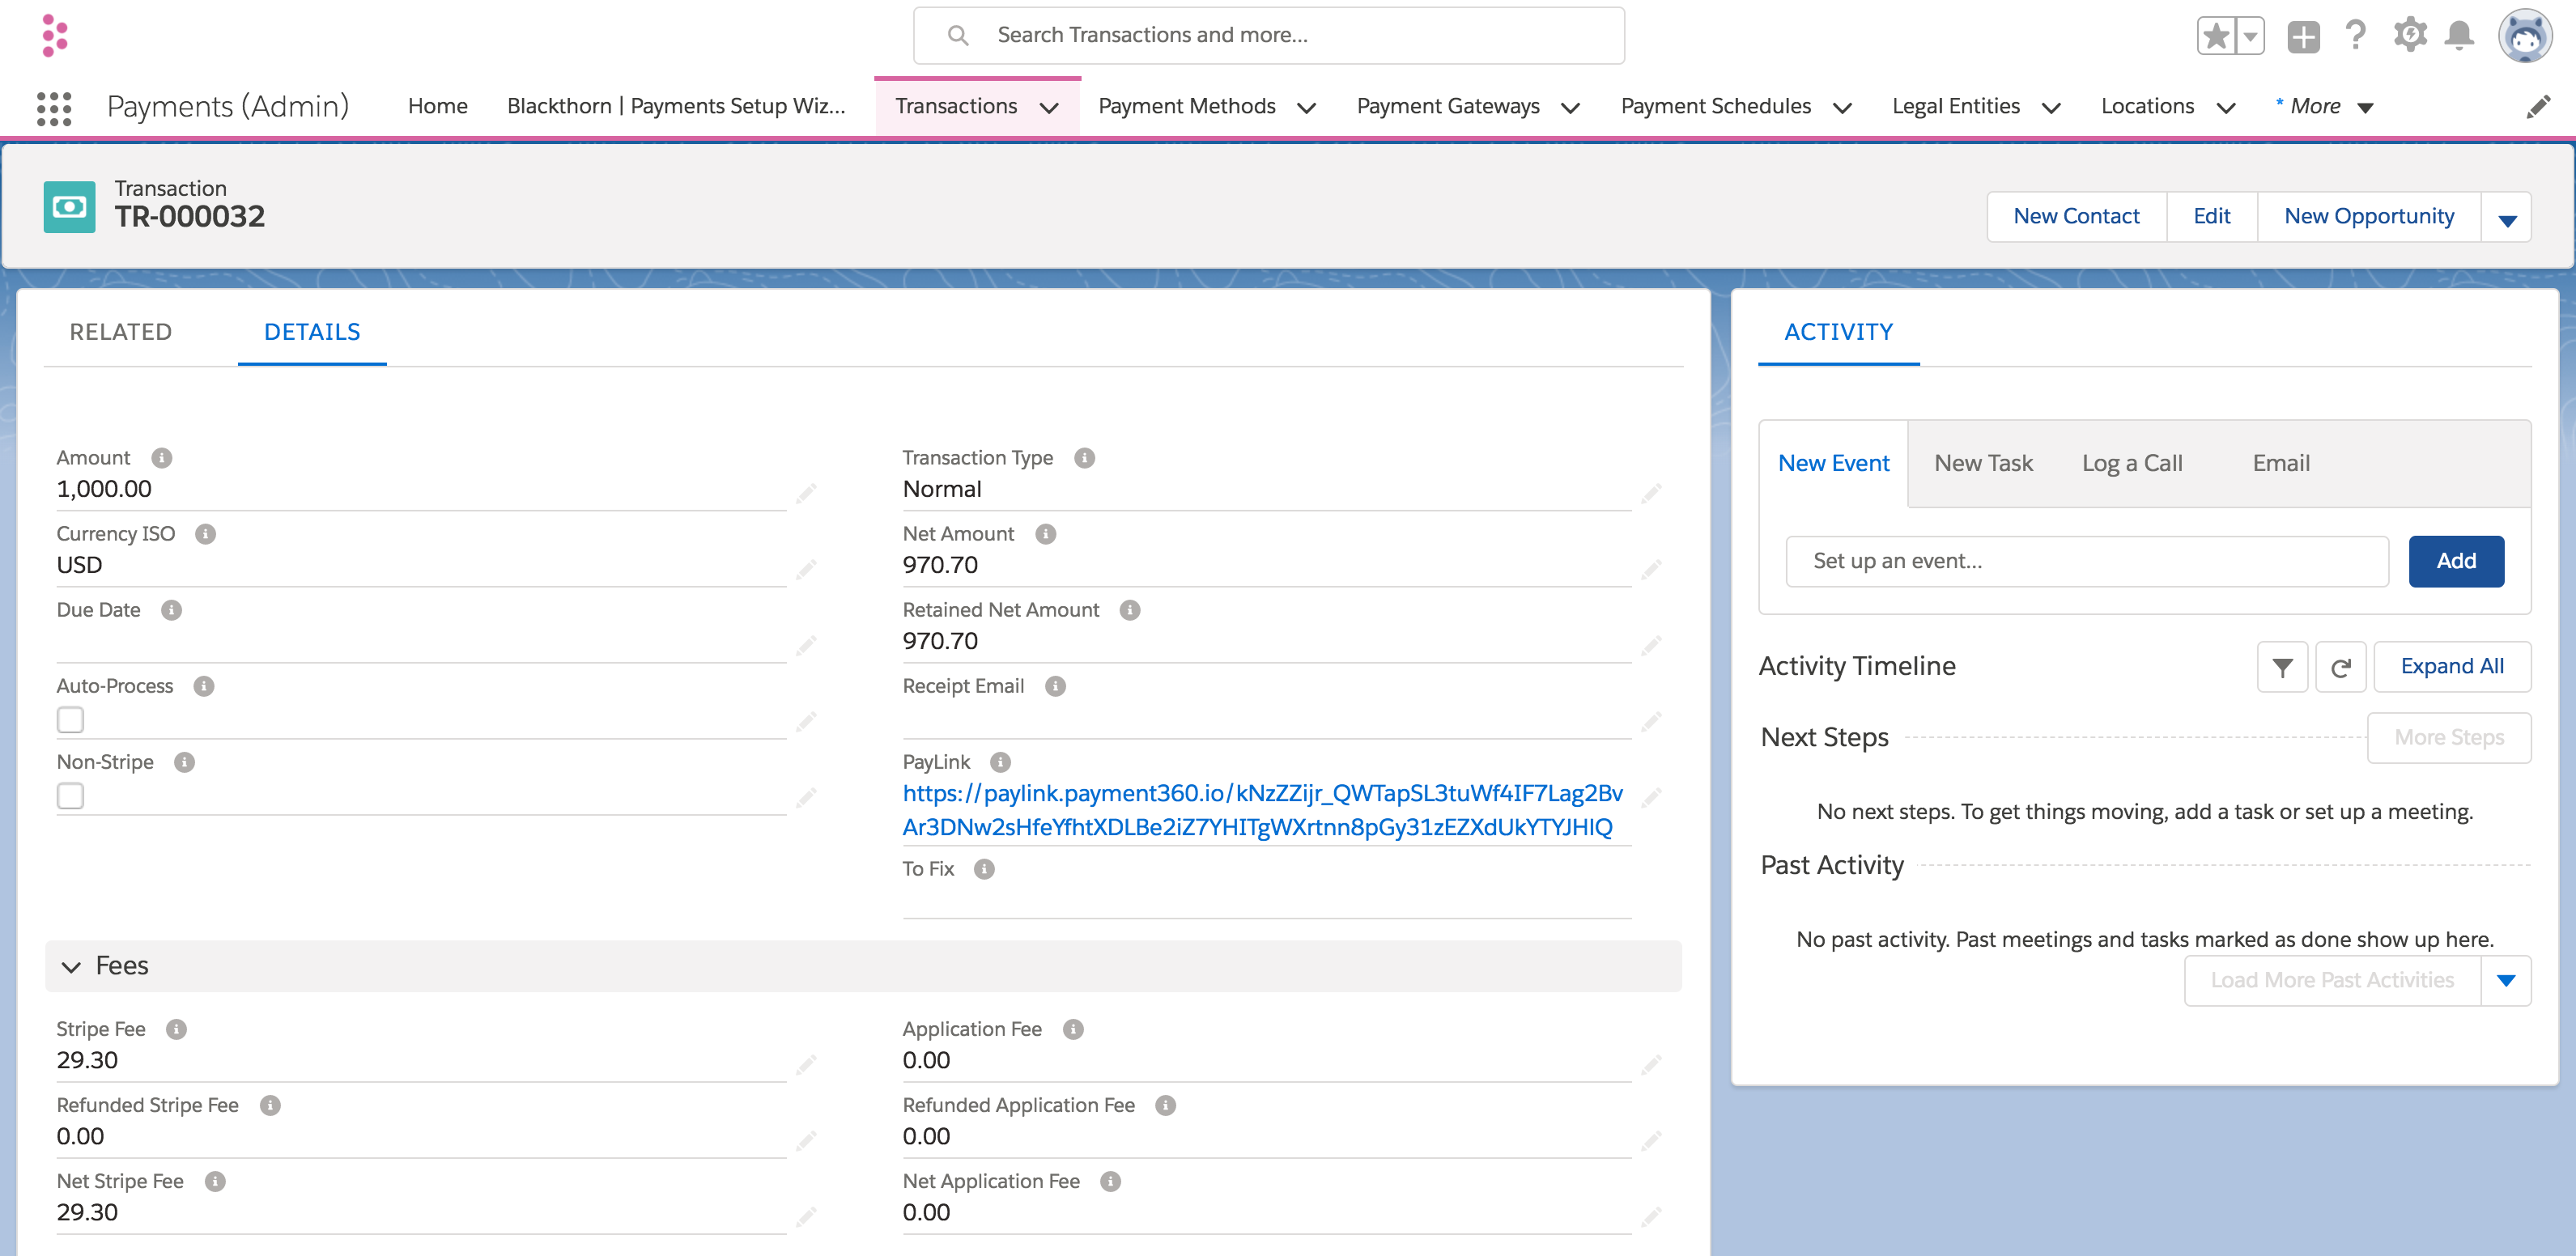
- New Amount: This is the amount you receive after subtracting Payment Gateway Fee and Application Fee fees.
- Retained Net Amount: This is the amount you receive after subtracting Payment Gateway Fee and Application Fee fees and any refunds.
This amount may be negative if you performed a full refund and the Payment Gateway fees were not refunded.
Currency Conversion with Stripe
When processing Transactions in a different currency than your bank account settles in Stripe, you will see the exchange rate and converted amount populate on the Transaction records in dedicated fields.
There are two fields available to add to your page layout or include in reports
- Exchange Rate
- Currency Conversion Payout Amount
Exchange Rate example:
- My Stripe Payment Gateway is in USD.
- My Transaction is in CAD.
- The Exchange Rate will populate with "0.74".
- 0.74 is the current value of CAD to USD.
Currency Conversion Payout Amount example:
- My Stripe Payment Gateway is in USD.
- My Transaction is in CAD.
- I charge a customer CAD 100.
- The Exchange Rate will populate with "0.74".
- I will receive "$74" in the Currency Conversion Payout Amount field.
Roll-up/Roll-down Features
Payment Method
When a Contact's or Account's default Payment Method (a lookup field on each respective object) is updated, all "Open" Transactions' Payment Methods related to that customer will update automatically.
If you don't want a certain Transaction's Payment Method to change, check the Don't Auto-Update Payment Method checkbox on the Transaction record. If you don't want any Transactions to automatically update, set the Custom Setting Disable Update PM Related Transactions = "True".
Contact and Account
When a Payment Method is defined on a Transaction, the related Contact and/or Account from the Payment Method will be added to the Transaction unless the Transaction already had those fields defined.
Removing the Transaction Parent Object
- Navigate to Setup.
- In the Quick find box, type in and search for "Custom Settings."
- Click "Manage" next to Transaction Parents.
- Click delete next to the object you want to remove.
- Delete the lookup fields on both the Transaction object and your object.
Troubleshooting
If you have received an error with your Transactions or have a question, please view our Troubleshooting or FAQ page.