Introduction
Payment Schedules allow you to create a series of forward-looking, scheduled Transactions based on criteria you define through our EZ preset or advanced fields. You can:
Relate the Payment Schedule to any object (standard/custom).
Auto capture payments.
Capture a valid Payment Method through the terminal that updates all related Transactions.
Automatically request payment through PayLink.
Create an advanced Payment Schedule for unique due dates.
Parent Object Relationship
Payment Schedules are related to the parent object(s) you defined in the Blackthorn | Payments Setup Wizard. Each parent object has a lookup field automatically created and placed on the Payment Schedule's page layout. This allows you to relate your parent object(s) to your Payment Schedule and to add the Payment Schedules Related List to your parent object(s).
Payment Schedules out-of-the-box have lookups (relationships) to both the Account and Contact objects. Just add the Payment Schedule Related List to your Account and/or Contact page layouts.
Create an EZ Preset Payment Schedule
The EZ Preset process is used for creating simple Payment Schedules.
Navigate to our Payment Schedule object.
Lightning: Click the App Launcher > In the search box enter and click Payment Schedules.
Classic: Click on "All Tabs" ("+" icon in the top right) > Click Payment Schedules.
Click New.
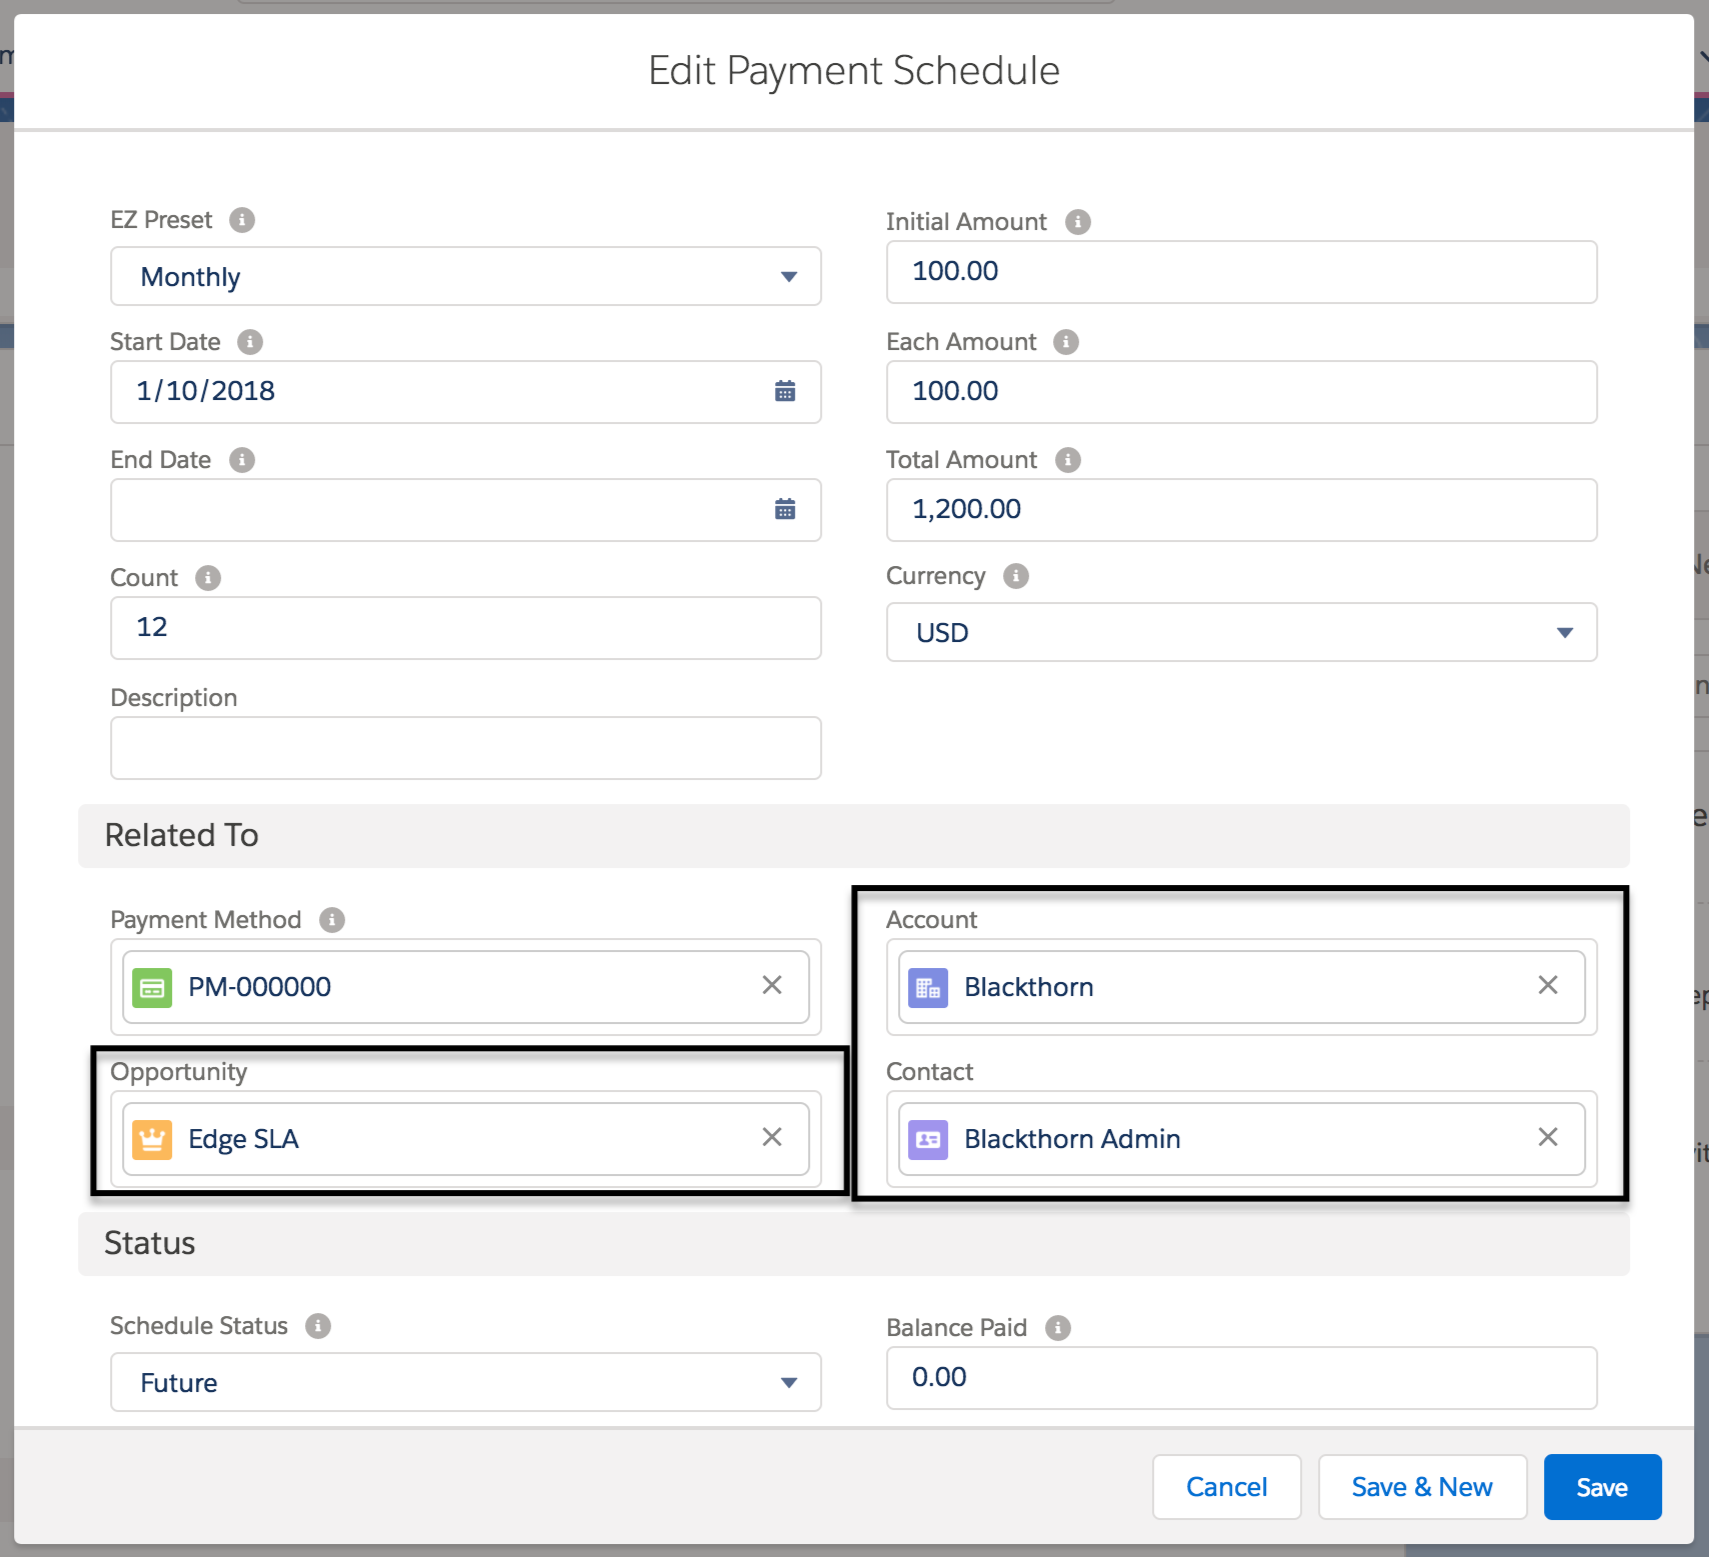
Populate required and optional fields.
The best feature of our Payment Schedule object is the ability to mix and match the fields you enter for generating scheduled Transactions. There are certain required fields (not marked required on the page layout) that need to be filled in when creating an "EZ Preset" Payment Schedule.
Required Fields
EZ Preset: This field determines the frequency of each Transaction with its Due Date.
Start Date: This date determines when the Payment Schedule should start. This date can be the first Transaction's Due Date, or the subsequent Transaction's Due Date if the first Transaction was captured immediately.
End Date or Count: Either of these fields will determine the number of Transactions that need to be created.
Each Amount or Total Amount: Either of these fields will determine the amount of each Transaction.
Currency
Optional Fields
Initial Amount: The first Transaction's Amount (for example, initial fee + monthly amount) may be different than the other recurring payments.
If you use this field, only enter Each Amount OR Total Amount, not both.Payment Method: Add the customer's related Payment Method if you want to automatically process the generated Transactions based on its Due Date. You can also use our PayLink feature. Then you would leave the Payment Method field blank and request payment through one of the Transaction's PayLinks. Once the customer pays through their link, ALL related open Transactions and the Payment Schedule's Payment Method will be updated.
Account and Contact: If these fields are left blank and the related Payment Method's Account and Contact fields have a value, they will automatically populate the Payment Schedule and associated Transactions.
Schedule Status: "Draft" and "Generate" need to be set manually (or defaulted). The remaining picklist values are automatically set based on the status of the related Transactions. To generate the Transactions for your Payment Schedule, the Schedule Status must be set to "Generate". That triggers the system to create all Transactions based on your Payment Schedule's EZ Preset and/or advanced fields. You can also generate the Payment Schedule by clicking Generate, located in the upper right corner of the Payment Schedule record page.
Payment Status: This field is updated automatically. Do not change.
Balance Paid, Balance Due, and Next Payment Due: These fields are roll-up fields that are automatically set from the related Transactions.
Capture First Transaction Now: If there is a related Payment Method and the Schedule Status = "Generate", the first Transaction will be captured immediately through a real-time API call to Stripe.
Auto-Process Transactions: This field is checked by default. Once related Transactions are created, each one will auto-process based on their Due Date.
A valid Payment Method is needed in order to auto-process the Transaction. See our Transaction documentation for more information.
Click Save.
Create an Advanced Payment Schedule
There are additional use cases where the Payment Schedule's frequency needs to be more complex than what is provided in the "EZ Preset" fields. For those use cases, you should use the advanced fields.
First, enter all of the required and optional fields listed above with the exception of the EZ Preset field. That field will be replaced by the advanced schedule fields.
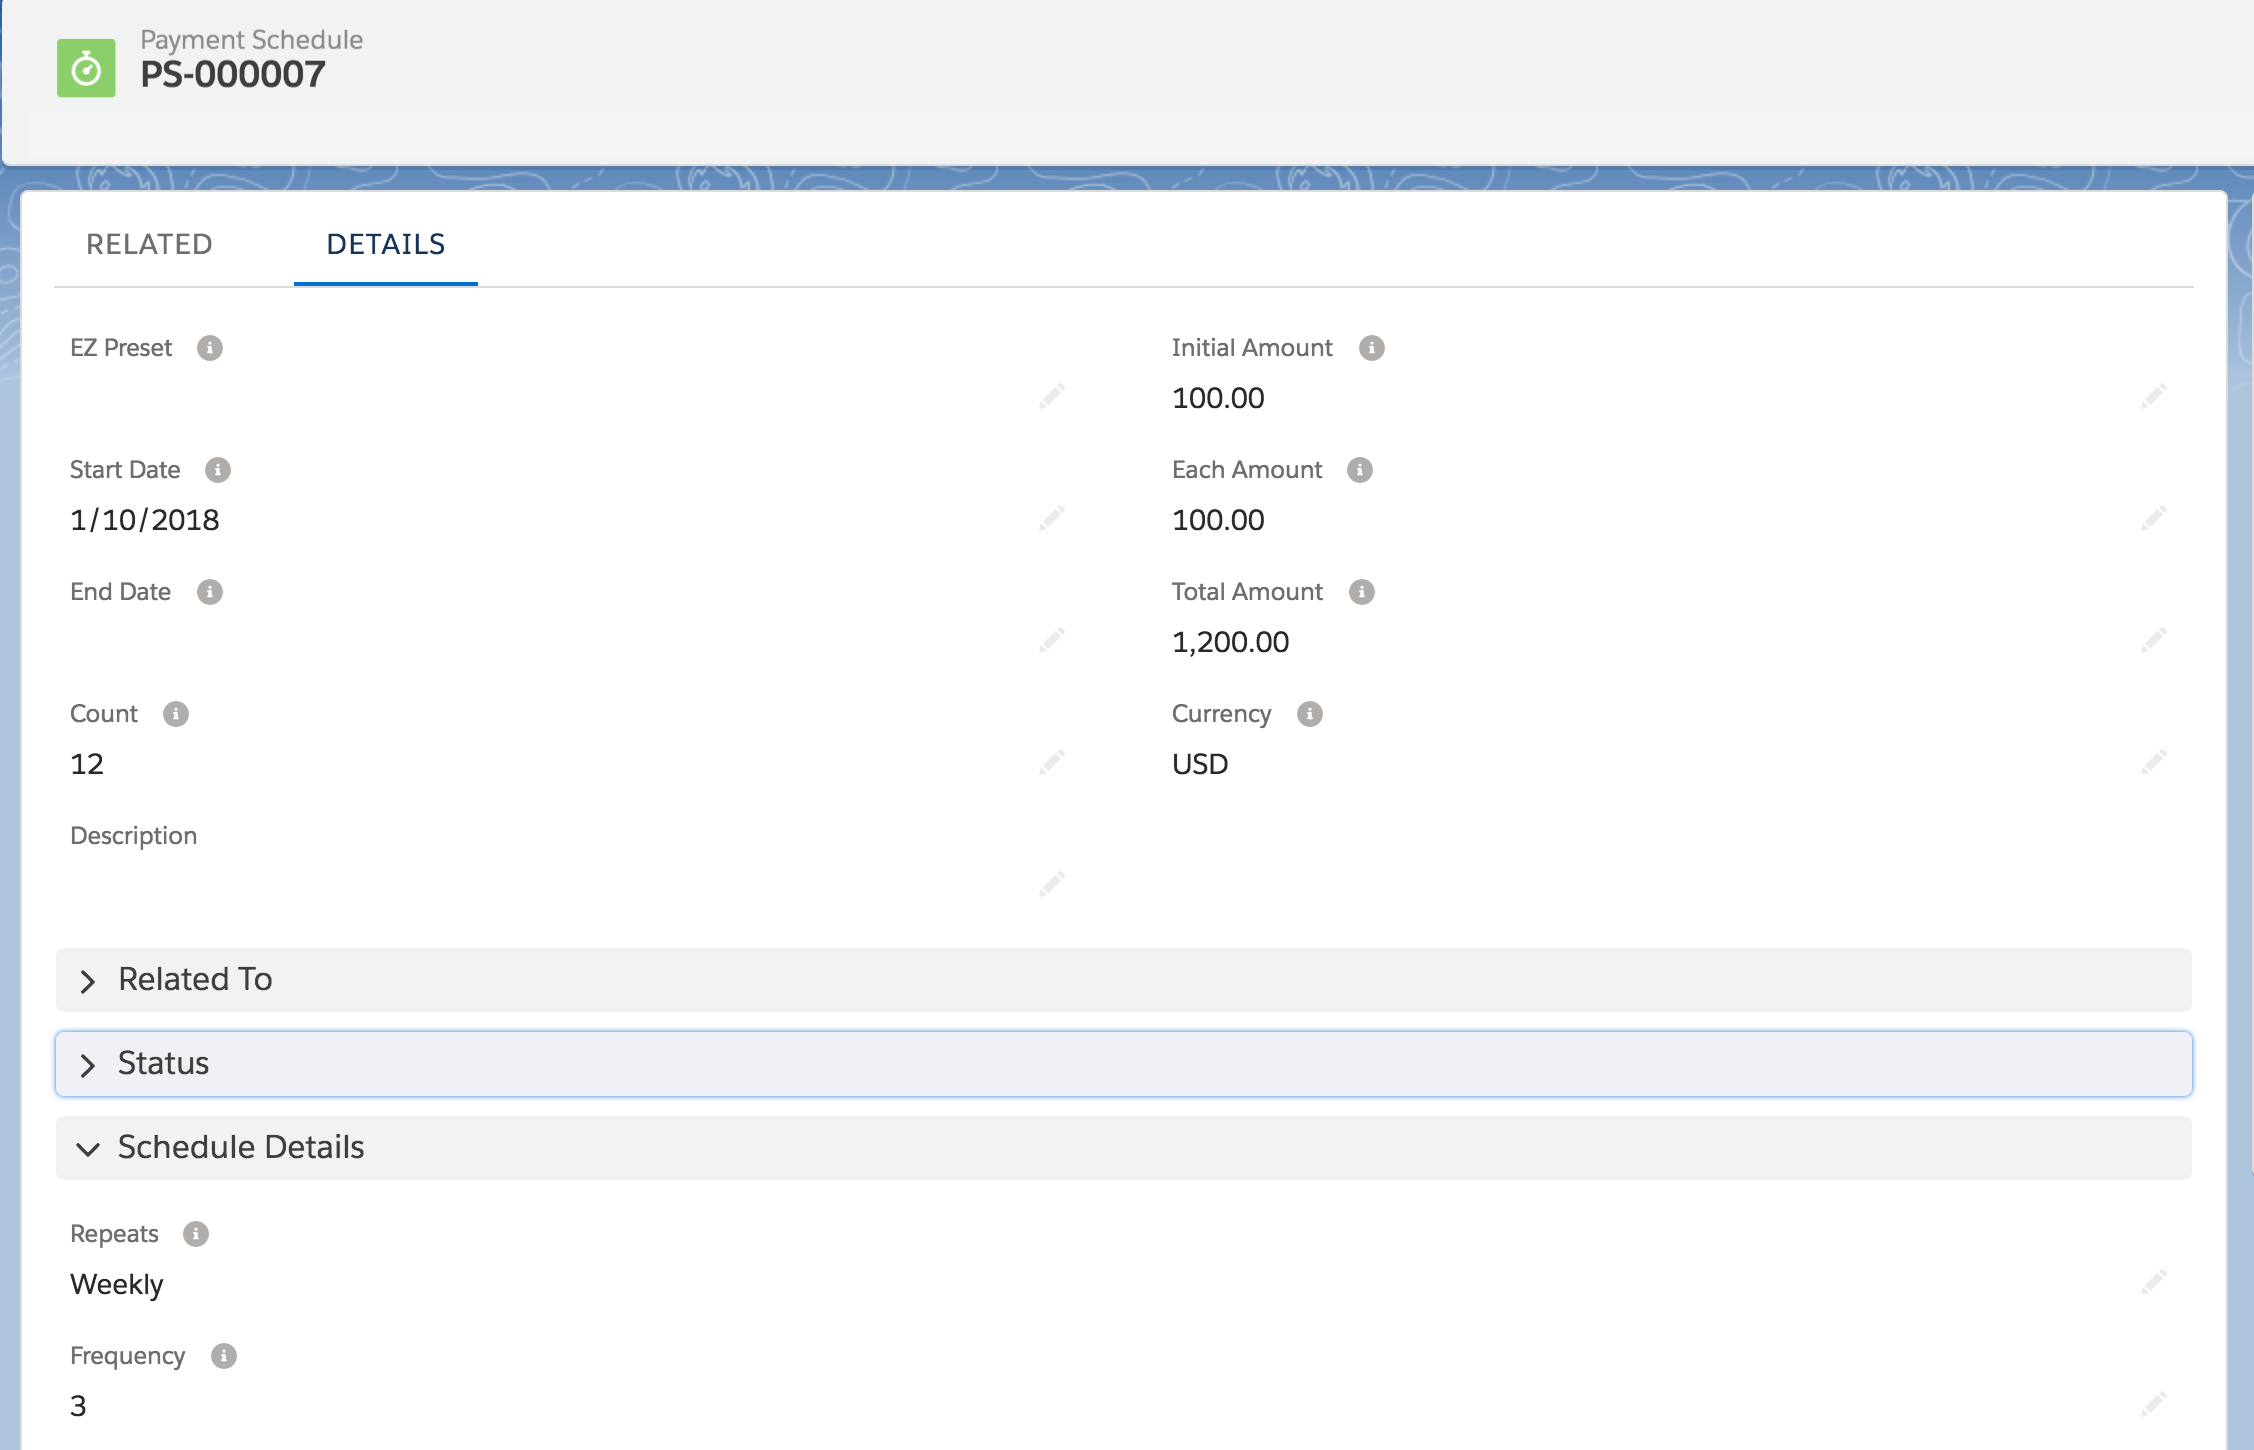
For example, if your Payment Schedule needs to capture a payment once every three weeks, you would use our advanced schedule fields.
Repeats = "Weekly"
Frequency = "3"
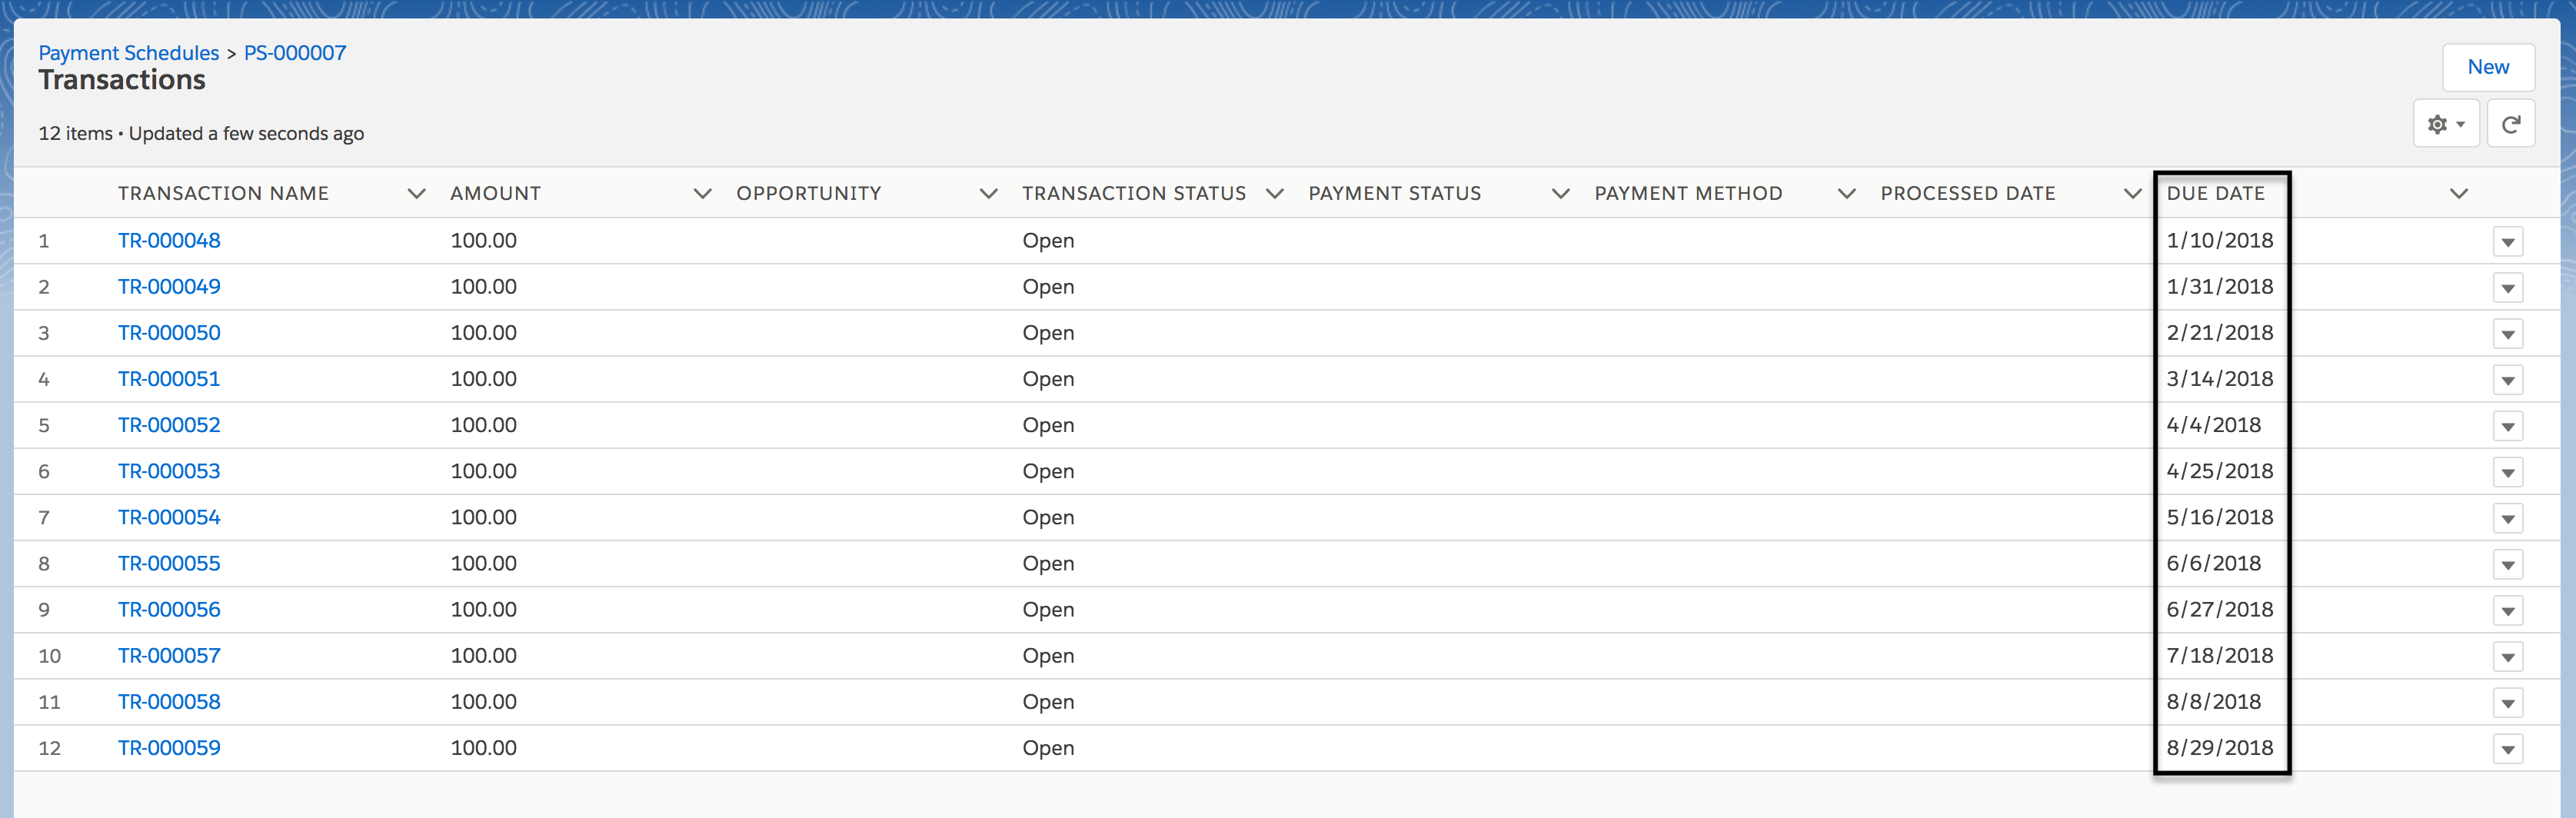
The result will show that each Transaction's Due Date will be three weeks apart.
As you can see in the below images, a Payment Schedule was created using the advanced fields Repeats and Frequency instead of the EZ Preset field since a payment needed to be captured every three weeks.
Keep in mind, if you did not add a valid Payment Method or requested a payment through PayLink, the related Transactions will NOT capture a payment from your customer.
Open-ended Payment Schedules
Open-Ended Payment Schedules are single amounts captured over and over again, with no ending date defined. The Payment Schedule will continue until you close it.
The Recurrence Method field defines the type of open-ended Payment Schedule you want.
Blank Field = The Payment Schedule is not open-ended and will end after the number of completed Transactions matches the Count.
"Keep One Open" = After one Transaction is completed, another open Transaction is generated on the same frequency.
"Auto-Renew" = After all initial Transactions are completed, the Payment Schedule will generate the full Count again. For example, if there were 12 original Transactions, there will be 12 new future Transactions.
Default the number of initial transactions created...
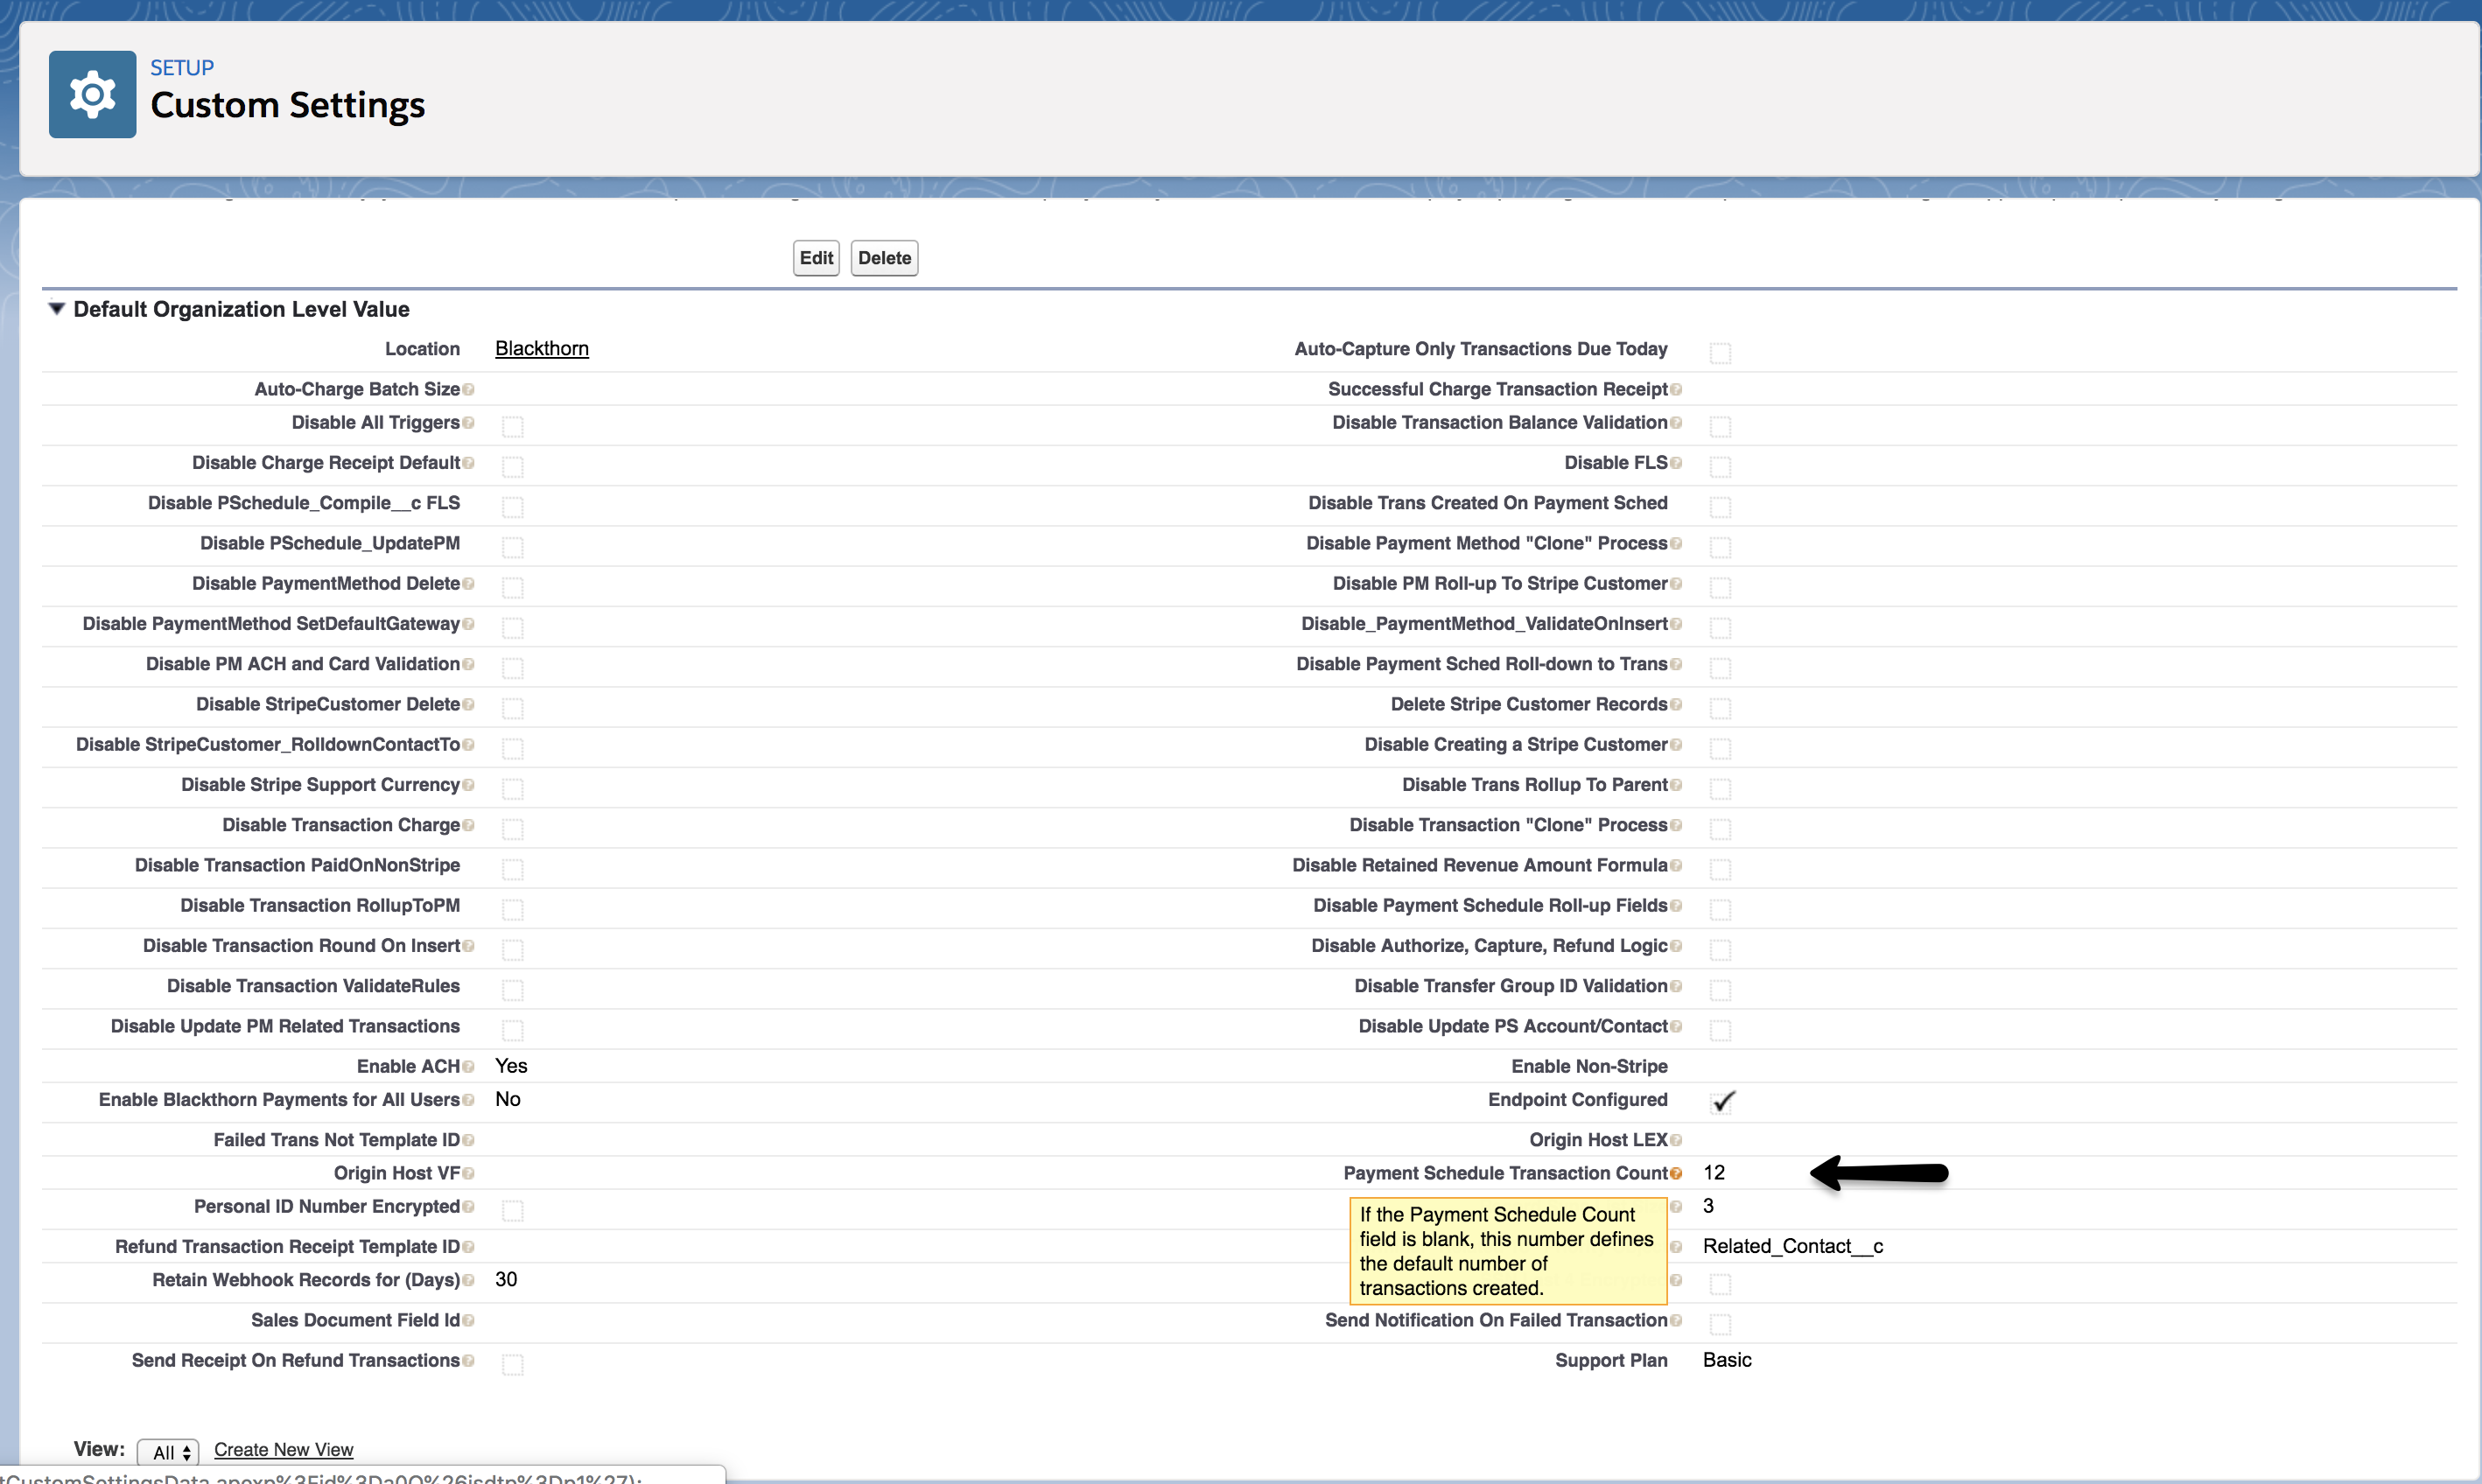
There is a custom setting that allows you to define the default number of Transactions to be created for "Keep One Open" and "Auto-Renew" options. The current default is 12 Transactions.
Navigate to Custom Settings > click Manage next to Blackthorn Pay - Trigger Settings > update the default "Payment Schedule Transaction Count".
Keep One Open Example
EZ Preset: "Monthly"
Recurrence Method: "Keep One Open"
Count: "2"
This means that there will always be two open Transactions.
Auto-Renew Example
EZ Preset: "Monthly"
Recurrence Method: "Auto-Renew"
Count: "2"
This means that after the two Transactions are completed, two more will automatically generate.
**If you didn't set the Count, 12 Transactions would automatically be created based on the default custom setting.
Schedule and Payment Statuses
Schedule Status
Completed
The sum of all Transactions’ Retained Amount equals the Payment Schedule’s Total Amount, AND there are no open Transactions remaining.
Failed
There is a Transaction with Transaction Status set to “Failed” that has no available reattempts.
Active
The related Transactions have at least one Transaction with the Transaction Status set to “Open,” and no Transactions with the Transaction Status set to “Canceled,” OR there are Transactions with a Due Date on or before today.
Future
There are Transactions with the Transaction Status set to “Open,” and none of them have the Transaction Payment Status set to “Captured.”
Canceled and Refunded
All Transactions with Transaction Status set to “Completed” are refunded, and the remaining Transactions with Transaction Status = “Open” are canceled.
Canceled
All remaining Transactions have the Transaction Status set to “Canceled,” and there is a Cancel button on the Payment Schedule record.
Payment Status
Failed to Collect
The Transaction failed, and there are no available reattempts or refunds. OR the Payment Schedule was canceled and had no Transactions with the Transaction Status set to “Captured” or “Refunded.”
Scheduled
There are open Transactions. And there are no Transactions with the Transaction Status set to “Open” or “Canceled” or the Payment Status set to “Captured” or “Refunded,” or an unpaid Transaction with a Due Date before the current date.
Overdue
An open Transaction has a Due Date in the past.
Partially Paid
The sum of all Transactions’ Retained Amount is greater than 0 and less than the Payment Schedule's Total Amount. There are no refunded or canceled Transactions or open Transactions left to be captured.
Refunded
The sum of the related Transactions' amount paid is zero (Paid = "0"), and there are no refunds or open Transactions left to be captured.
Partially Refunded
The sum of all Transactions’ Retained Amount is greater than 0 and less than the Payment Schedule's Total Amount. There is a refunded Transaction, but there are no open Transactions left to be captured.
Paid
The sum of all Transactions’ Retained Amount is greater than or equal to the Payment Schedule's Total Amount, and there are no open Transactions left to be captured.
Good Standing
There is at least one Transaction with Payment Status set to “Captured.”
Canceled
There are no Transactions with the Transaction Status set to “Open” or Payment Status set to “Captured” or “Refunded,” but there is at least one Transaction with Transaction Status set to “Canceled.”
Matrix
Once you have read through the definitions above, review the Payment Schedule Status Matrix to see how the Schedule Status and Payment Status fields interact.
Update a Payment Schedule
There are times when you might want to update your Payment Schedule. This may occur when a Payment Gateway has changed in your org or maybe you need to swap out a Payment Method for future "Open" Transactions.
Navigate to your existing Payment Schedule record.
Update the Payment Gateway field to the updated value.
Notice that the related Transactions with a Transaction Status = "Open" are updated to include the new Payment Gateway value.
NOTE: An error message will pop up on save if you have already associated the Payment Schedule with a Payment Method from a different Payment Gateway. This ensures that the associated Transactions don't fail later due to Payment Gateway mismatches.
Can I pause a Payment Schedule?
No. Out of the box, we don't offer an option to pause a Payment Schedule. To stop the Payment Schedule, you must cancel or delete the Payment Schedule and redo it when you need to restart it.
Cancel a Payment Schedule
When a Payment Schedule is canceled, the status on the Payment Schedule will be set to "Canceled" and the Transaction Status of all open and related Transactions will also be updated to "Canceled". Use any of the below options to cancel an active Payment Schedule.
Click the Cancel button to cancel the Payment Schedule.
There is a hidden (off the page layout) checkbox field (label: Cancel Payment Schedule) on the Payment Schedule object. Check this checkbox using automation logic (Workflow, Process Builder, or Flow) to cancel the Payment Schedule.
Delete a Payment Schedule
When deleting a Payment Schedule record, all related "Open" Transactions will also be deleted. Any Transactions with a Transaction Status other than "Open" will not be deleted and will continue to be related to the parent record (ie Contact, Account, Custom Object, etc...)
Changes to Payment Schedules
There are only certain changes that will sync between Payment Schedules and the associated Transactions after the initial creation of Transaction records. Those changes are described in the Roll-up/Roll-down Features section below. If you need to make changes related to the Payment Schedule dates or amounts, we recommend canceling the current Payment Schedule and creating a new one.
Roll-up/Roll-down Features
Payment Method
From the Payment Schedule
Updating the Payment Method updates all related Transactions with the Transaction Status = "Open".
For example, if a customer wants to change their Payment Method at any time during the schedule, update the Payment Method field and the remaining "Open" Transactions will be updated.
From the Related Transaction
Updates to the Payment Method on a Transaction with the Transaction Status = "Open" are rolled up to the related Payment Schedule. They are then rolled down to all other related "Open" Transactions.
For example, if a customer updates their Payment Method through PayLink on one Transaction, all other related Transactions and the Payment Schedule's Payment Method will be updated. If you don't want this to occur, set the Transaction's Don't Auto-Update Payment Method field to "True".
Account and Contact Lookup Fields
From the Payment Schedule: If the Account and/or Contact lookup fields are populated when the Payment Schedule was first created or edited, all related "Open" Transaction's Account and/or Contact will be populated or updated.
Troubleshooting
If you have received an error with your Payment Schedule or have a question, please contact Blackthorn Support.