Introduction
The purpose of the Payment Method object is to store the method by which you charge your customers. Payment Method types are segmented by Record Type and can be related to Accounts, Contacts, and/or other objects.
Blackthorn Payments is built with PCI compliance in mind, we never store sensitive Payment Method details. Click here for information on PCI compliance.
Obtain Payment Methods
To capture card or bank account information from a customer, there are multiple, PCI compliant, options using Blackthorn Payments.
Phone
If you are not recording your phone calls (if you are, this goes against the tenants of PCI compliance)...
-
Payment Method Object
Manually enter the Payment Method through the Card or ACH Record Type. A real-time API call sends the record to Stripe/Authorize.net to tokenize the Payment Method information. A card can be verified within seconds, where for Stripe ACH Payment Methods, it takes 4-5 days to be verified. -
Virtual Terminal
Manually enter the Payment Method through a popup, embedded Visualforce Page, or LWC component. The Virtual Terminal supports credit card, debit card, and ACH Payment Method types.
Web
- PayLink feature.
- Public web page as part of your website.
- Salesforce Experience Cloud
Within a Salesforce Experience Cloud, you can display the native objects to enter Payment Method information with the default user interface (UI), or you can create a custom Experience Cloud user interface.
In-Person
- Create your own custom page as part of a web app and access it via your mobile device.
- Use the Virtual Terminal in Salesforce.
Initial Setup
Setup Wizard
When you click Grant Access in the Payments Setup Wizard, a Payment Method with Record Type = "Card" is created. If you select "Yes" for ACH payments, a Payment Method with Record Type = "ACH" is also created. These record types live on the Payment Method object and relate to two different Payment Method page layouts and used to collect necessary card or bank account information.
If you need to add ACH payments, navigate back to the Blackthorn | Payments Setup Wizard tab, click on the "Record Types" step, select "Yes" for ACH payments, then click Make magic happen.
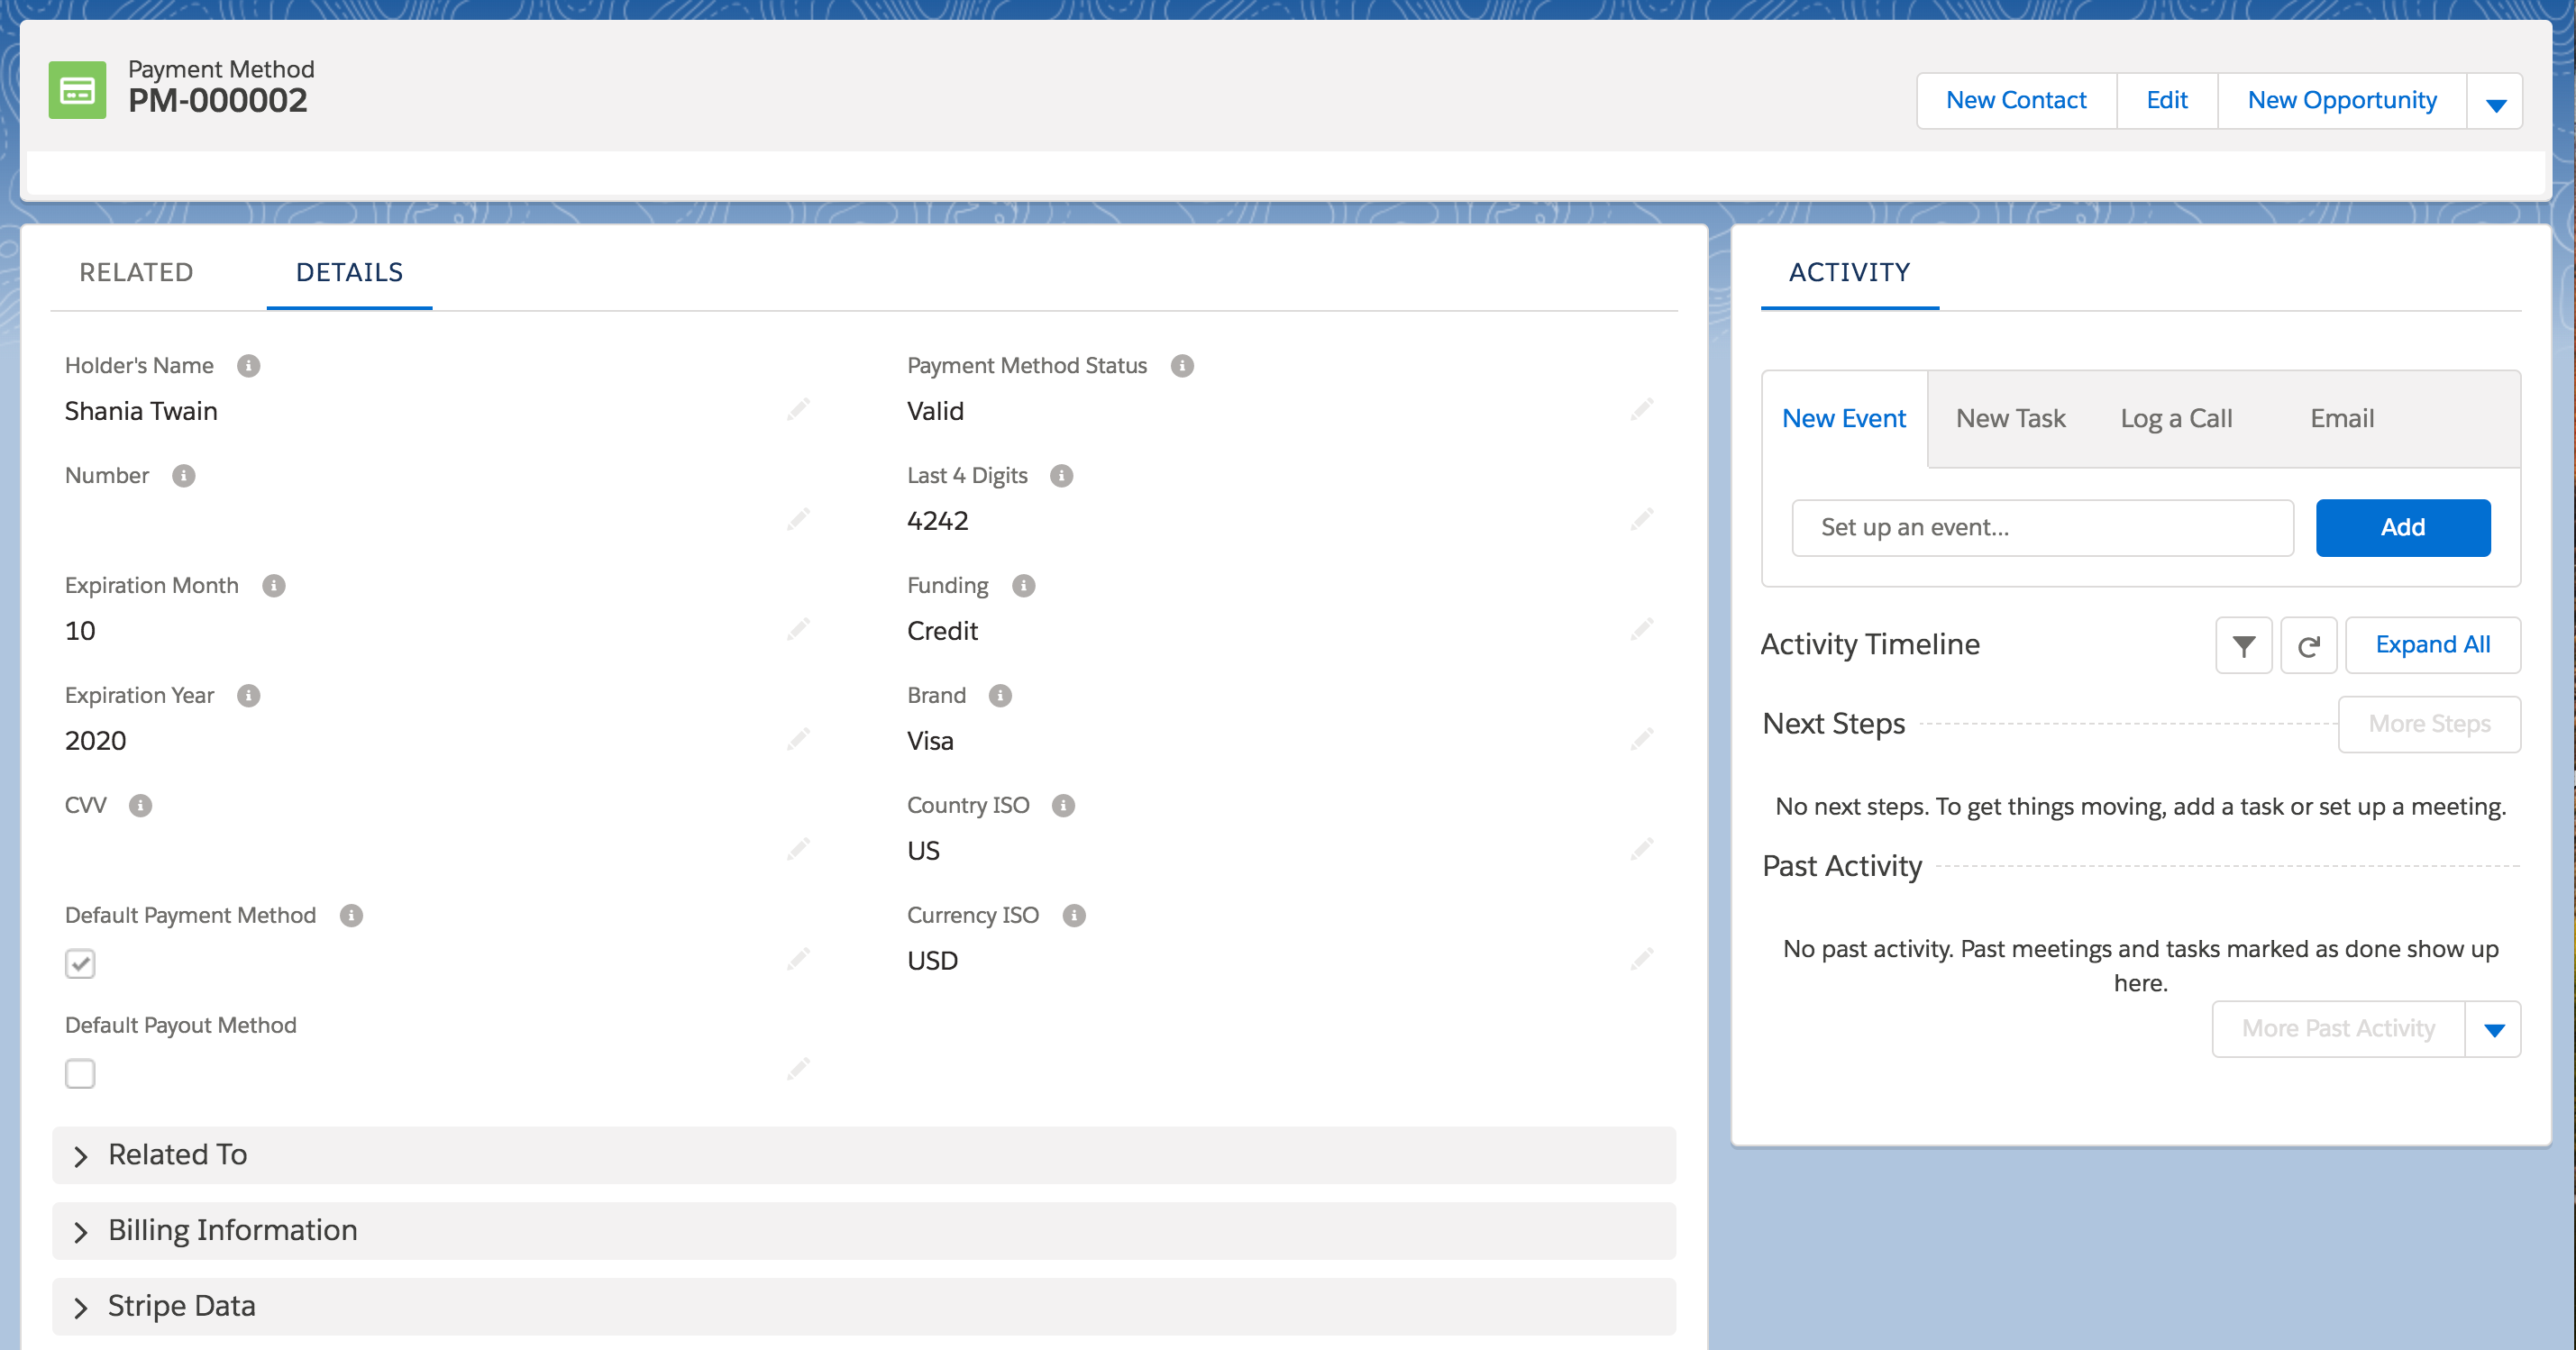
Card Payment Method
- Navigate to the Payment Method object.
Lightning: Click on the App Launcher > Under "All Items" > Click on Payment Methods.
Classic: Click on "All Tabs" ("+" icon in the top right) > Click on Payment Methods.
- Click New.
- Select "Card" for the Record Type.
- Required card details to enter
- Holder's Name (required)
- Number
- Expiration Month (required)
- Expiration Year (required)
- CVV
- Postal Code (required)
- Email
- While this is not a required field, we recommend you require it as we use email for Payment Gateway Customer matching logic in Salesforce.
- For example, if you already have an existing Stripe/Authorize.net Payment Gateway Customer in Salesforce with a Payment Method and a new Payment Method with the same email is added, it directly relates to the existing Payment Gateway Customer record.
- Payment Gateway
- If a Payment Gateway is not selected, the default gateway will be used.
- Related To Fields
- If you add additional objects to the "Relationships" step in the Setup Wizard, meaning you want additional objects as the Transaction parent, those related objects will show up in this section as a "Lookup Field" along with the Account and Contact lookup fields. We recommend entering an Account and Contact for all Payment Method records.
- Street - This field can be used for additional verification for the Payment Method.
- The Payment Gateway Data section is data created for error logging and storing the tokenized card details on the Payment Method.
- Fingerprint is not available with Authorize.net gateway.
- When using External Accounts as part of Stripe Connect, the Customer ID will not be populated on the Payment Method.
- When a Payment Method with Payment Method Status = "Valid" is created, the Card ID, Customer ID, and Fingerprint fields are populated.
- Click Save.
What happens after clicking Save?
The card information is sent to Stripe/Authorize.net. The sensitive card information is removed from the Salesforce record and the gateway sends back a token for the Payment Method. This keeps us PCI compliant. No card information is ever saved in Salesforce.
The default setting for the Postal Code field is required. If you need to change the default setting to not required, contact Blackthorn Support, and they will change the setting.
Card Status
When saving the Payment Method record, the Payment Method Status will update to either "Valid" or "Invalid."
-
When Payment Method Status = "Valid", the record can be used to process immediate or scheduled Transactions.
-
When Payment Method Status = "Invalid", the record cannot be used.
There are two error fields on the Payment Method record's page layout, Error Message and Error Type, that provide information on why the Payment Method's Payment Method Status is "Invalid".
Need a way to block American Express Card charges? Read more here.
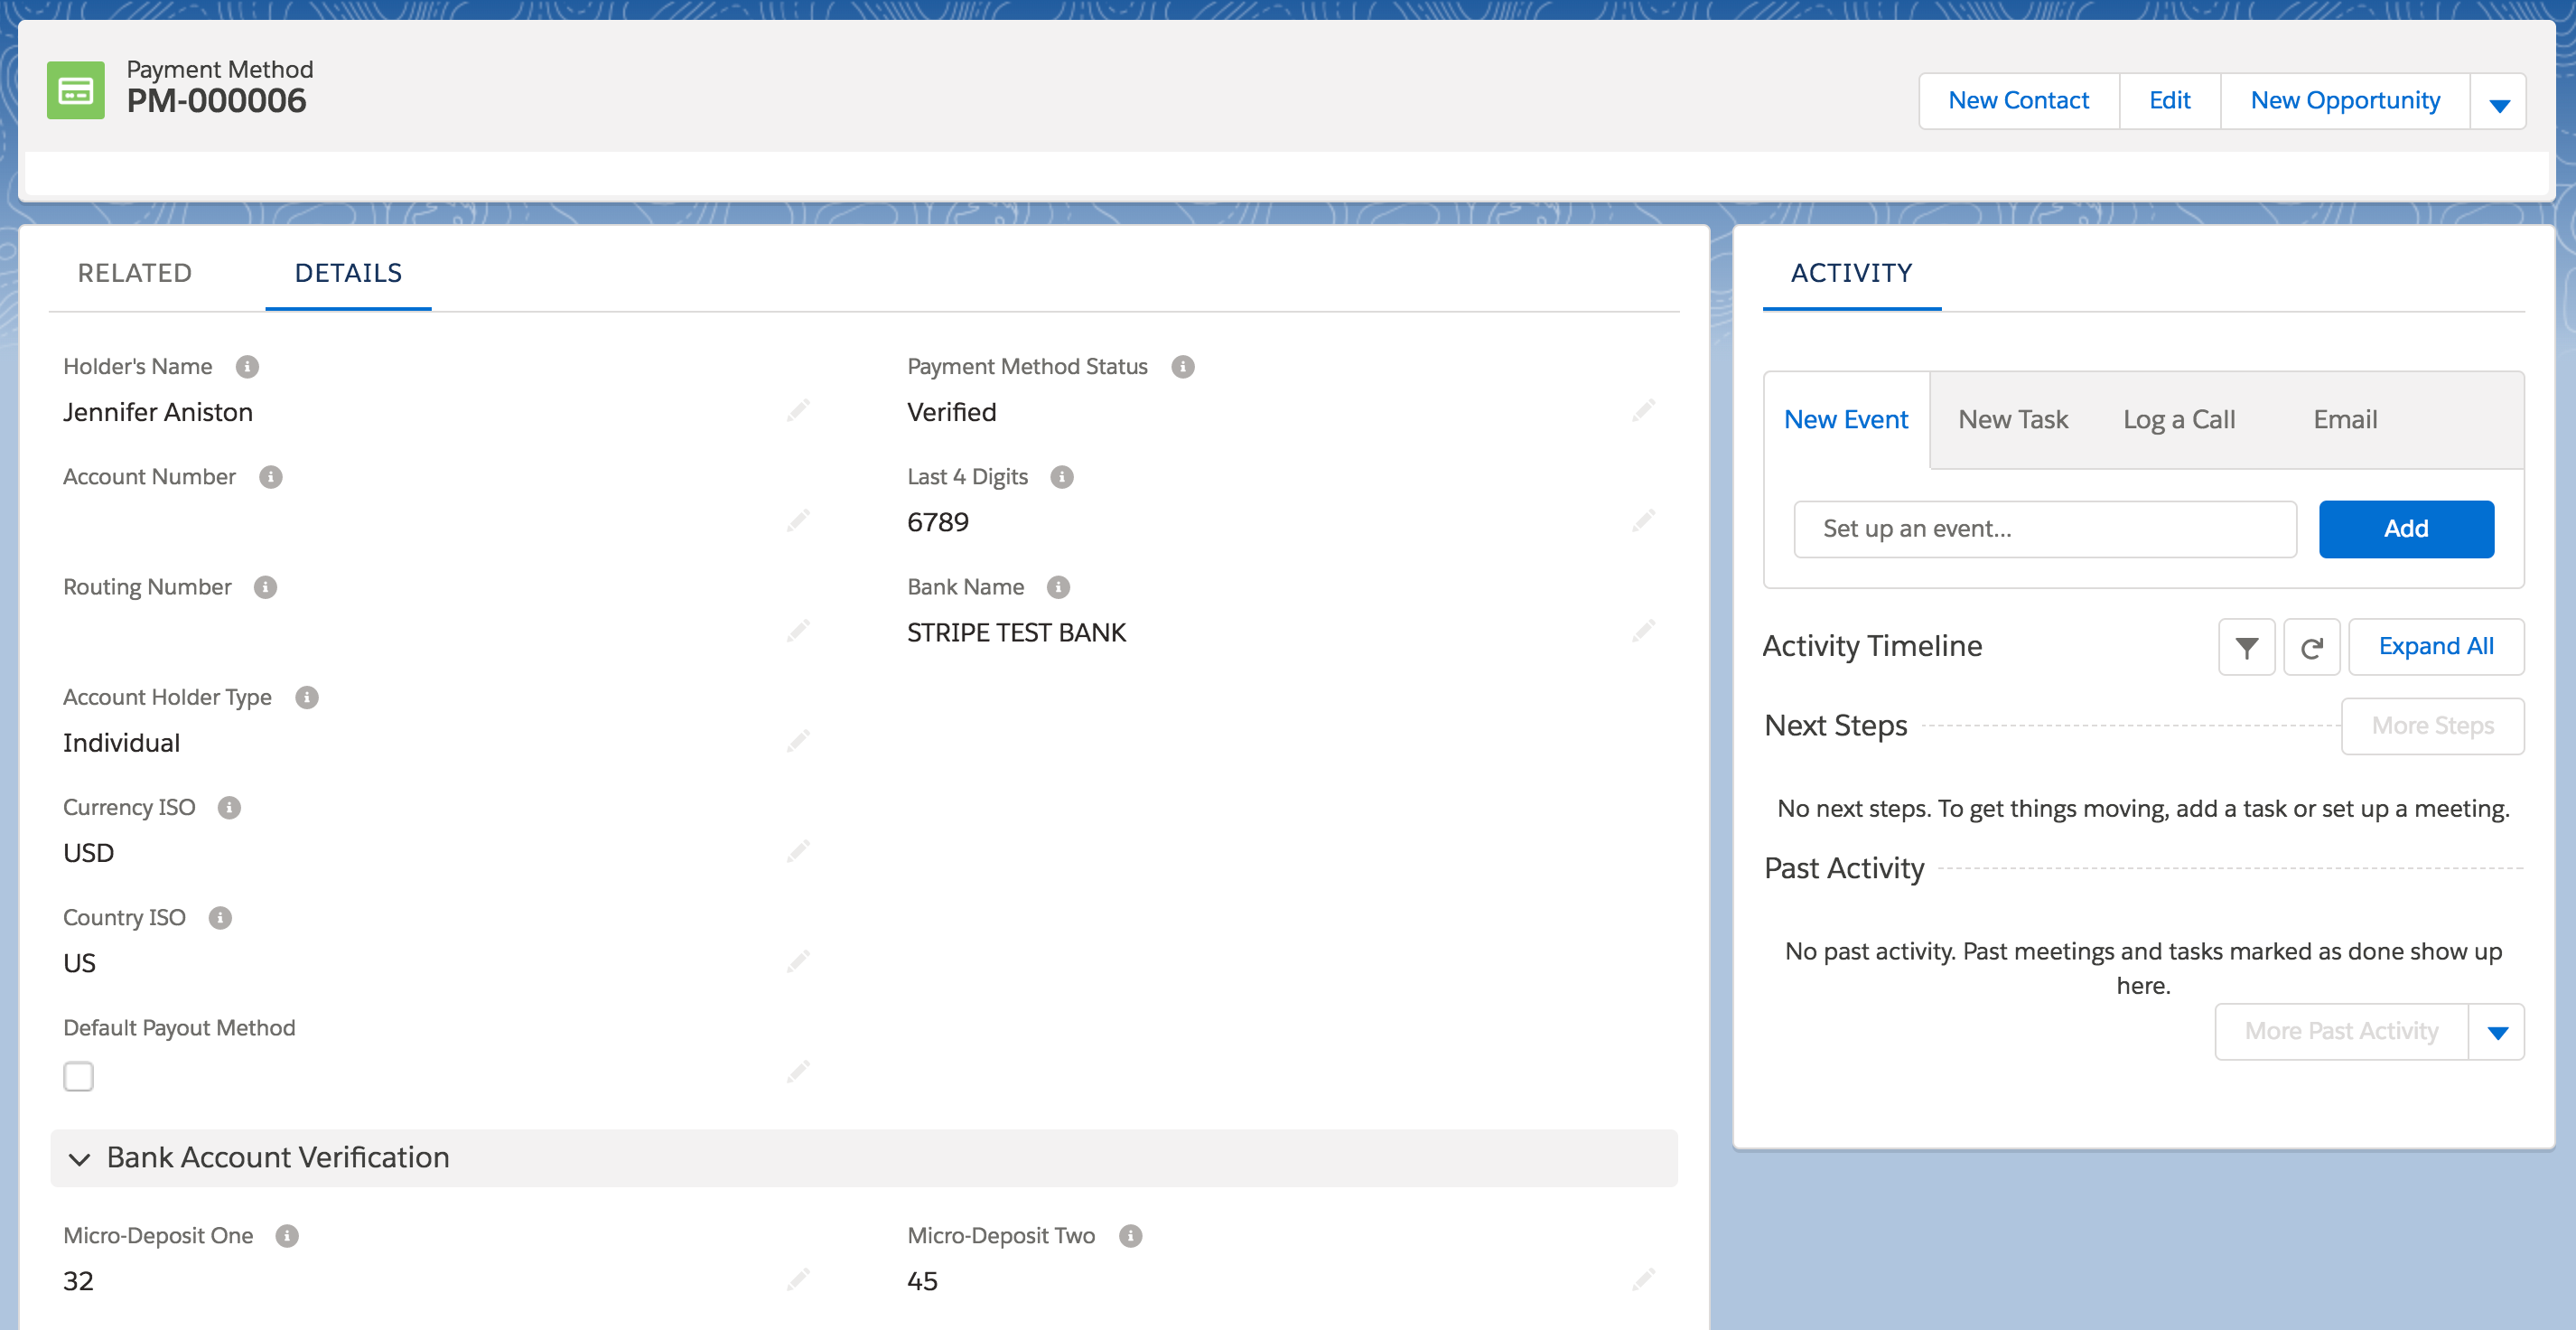
ACH Payment Method
For Stripe
Micro-Deposit Verification
Before attempting to create an ACH Payment Method, it may be helpful to confirm that a Salesforce Contact record exists for the bank account holder. This will help ensure that Transaction data will be recorded for the intended person. Many organizations request a voided check to ensure the accuracy of the data to be entered.
Stripe Fingerprint
The Fingerprint is automatically added to an ACH Payment Method once it has been saved and validated. This ID is used to uniquely identify bank accounts.
Users can opt out of using the fingerprint matching logic by using one of our Custom Settings:
- Navigate to Custom Settings in Setup.
- Click Blackthorn Pay - Trigger Settings.
- Click Manage.
- Click Edit.
- Find "Disable Fingerprint Matching (ACH)" and mark it as "TRUE".
Following the above steps will bypass the Stripe fingerprint matching logic and defer to Blackthorn's legacy ACH matching logic which uses an ACH key and Customer ID.
Add ACH Payment Methods with Non-USD Currencies
To add ACH Payment Methods with non-USD Currency ISO values to Stripe accounts, you need to update the ACH Record Type on the Payment Method object.
-
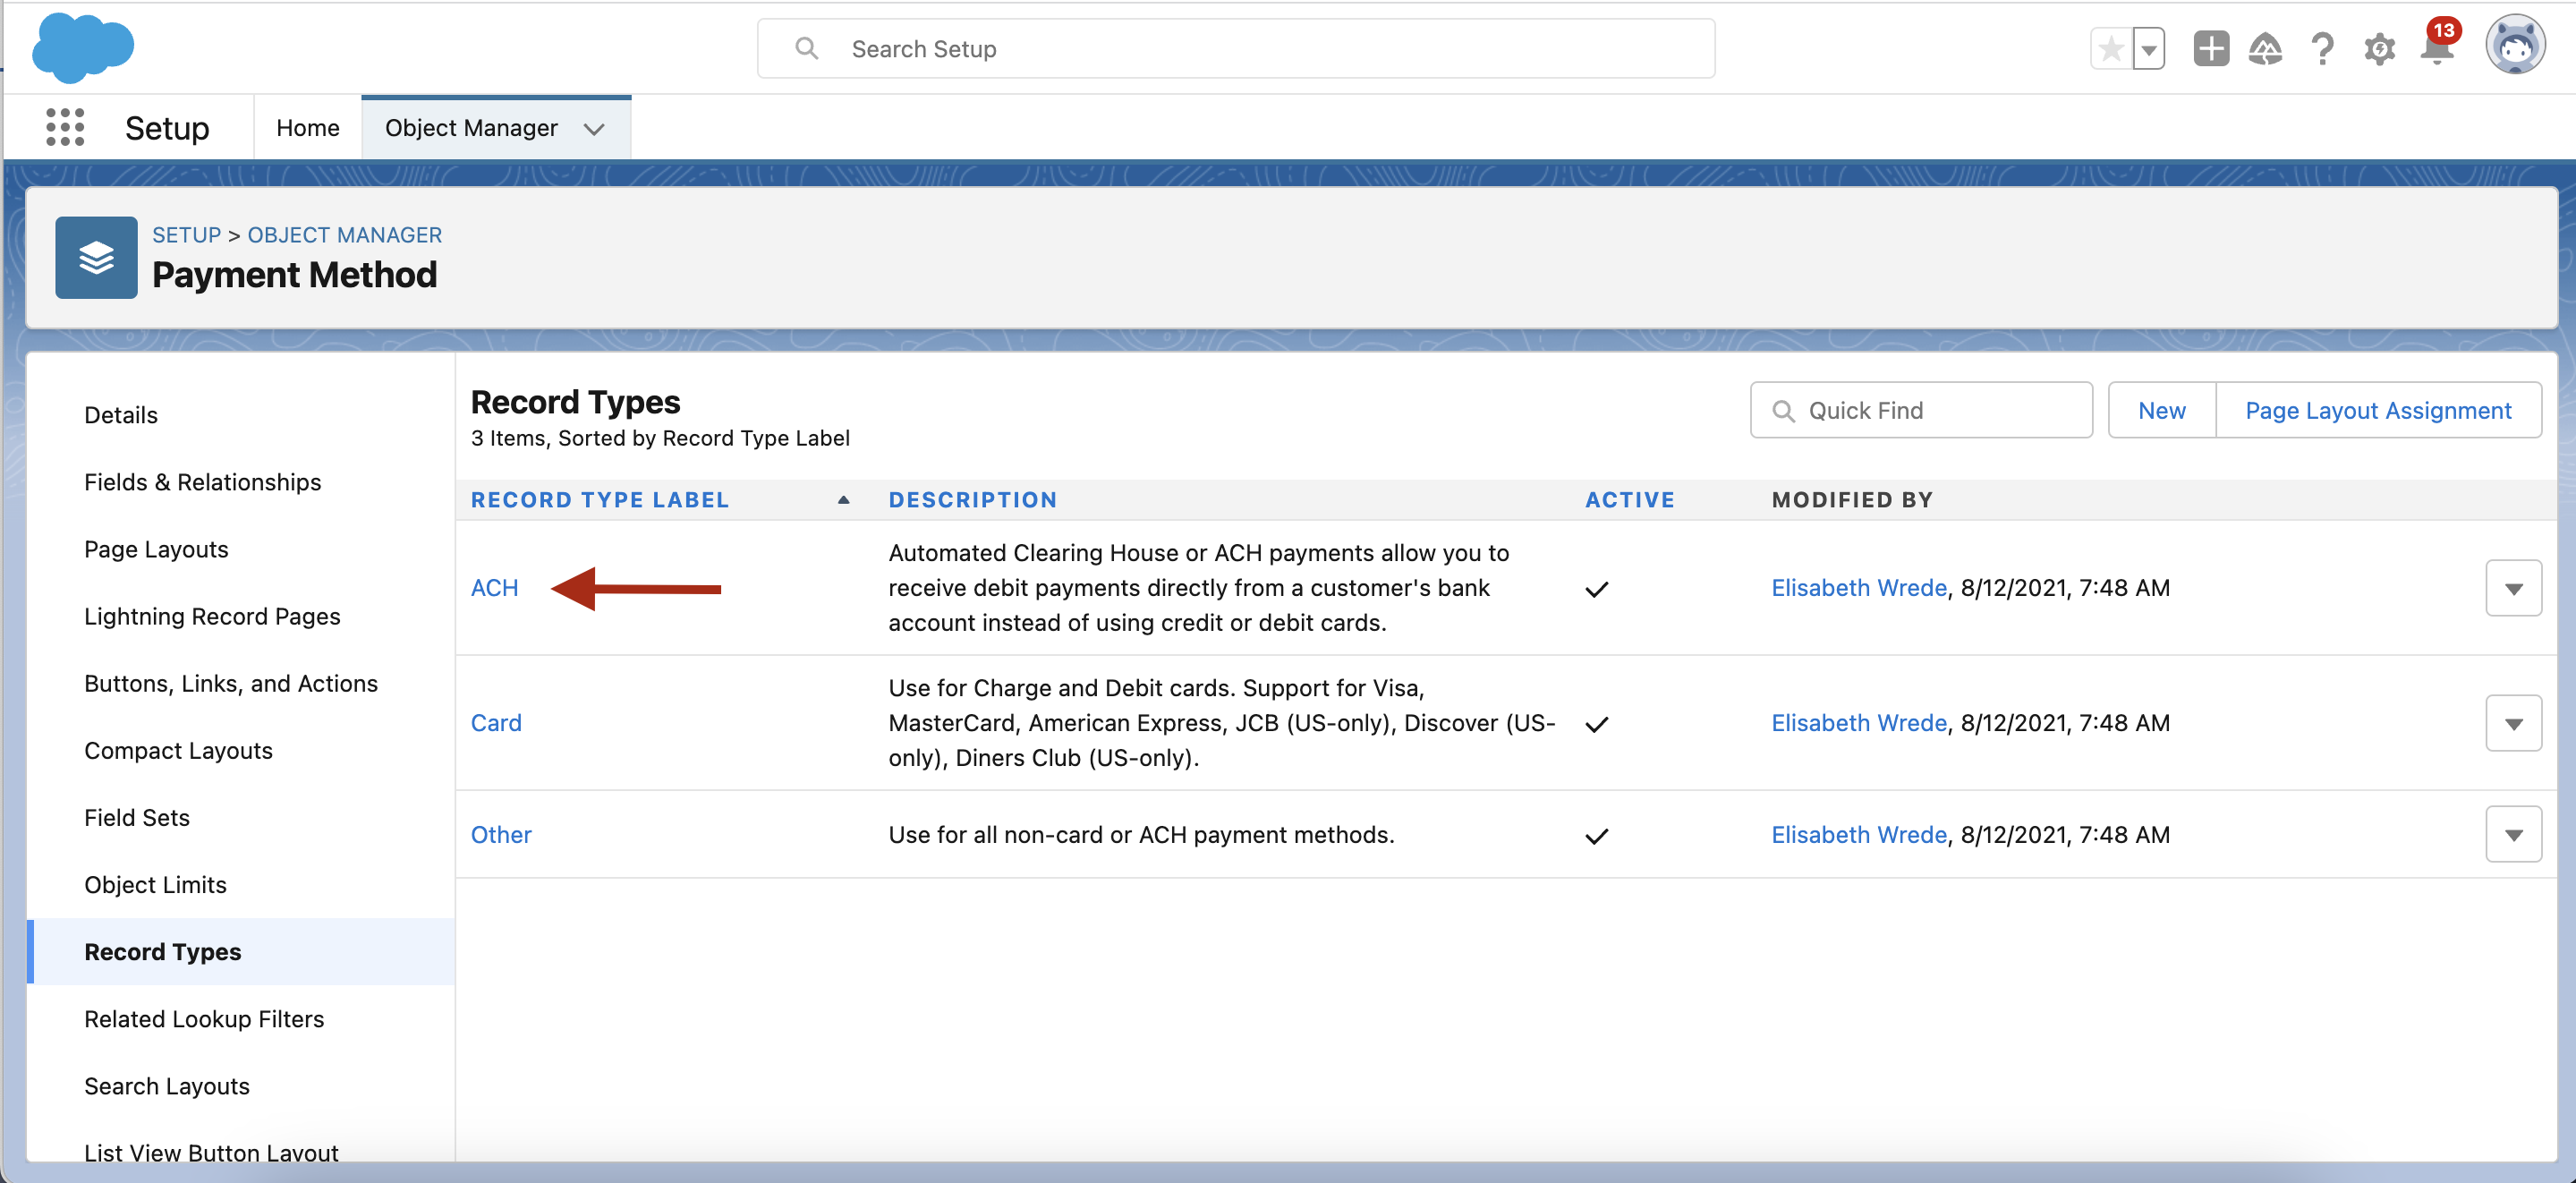
Go to Setup.
-
Click the Object Manager tab.
-
Go to the Payment Method object.
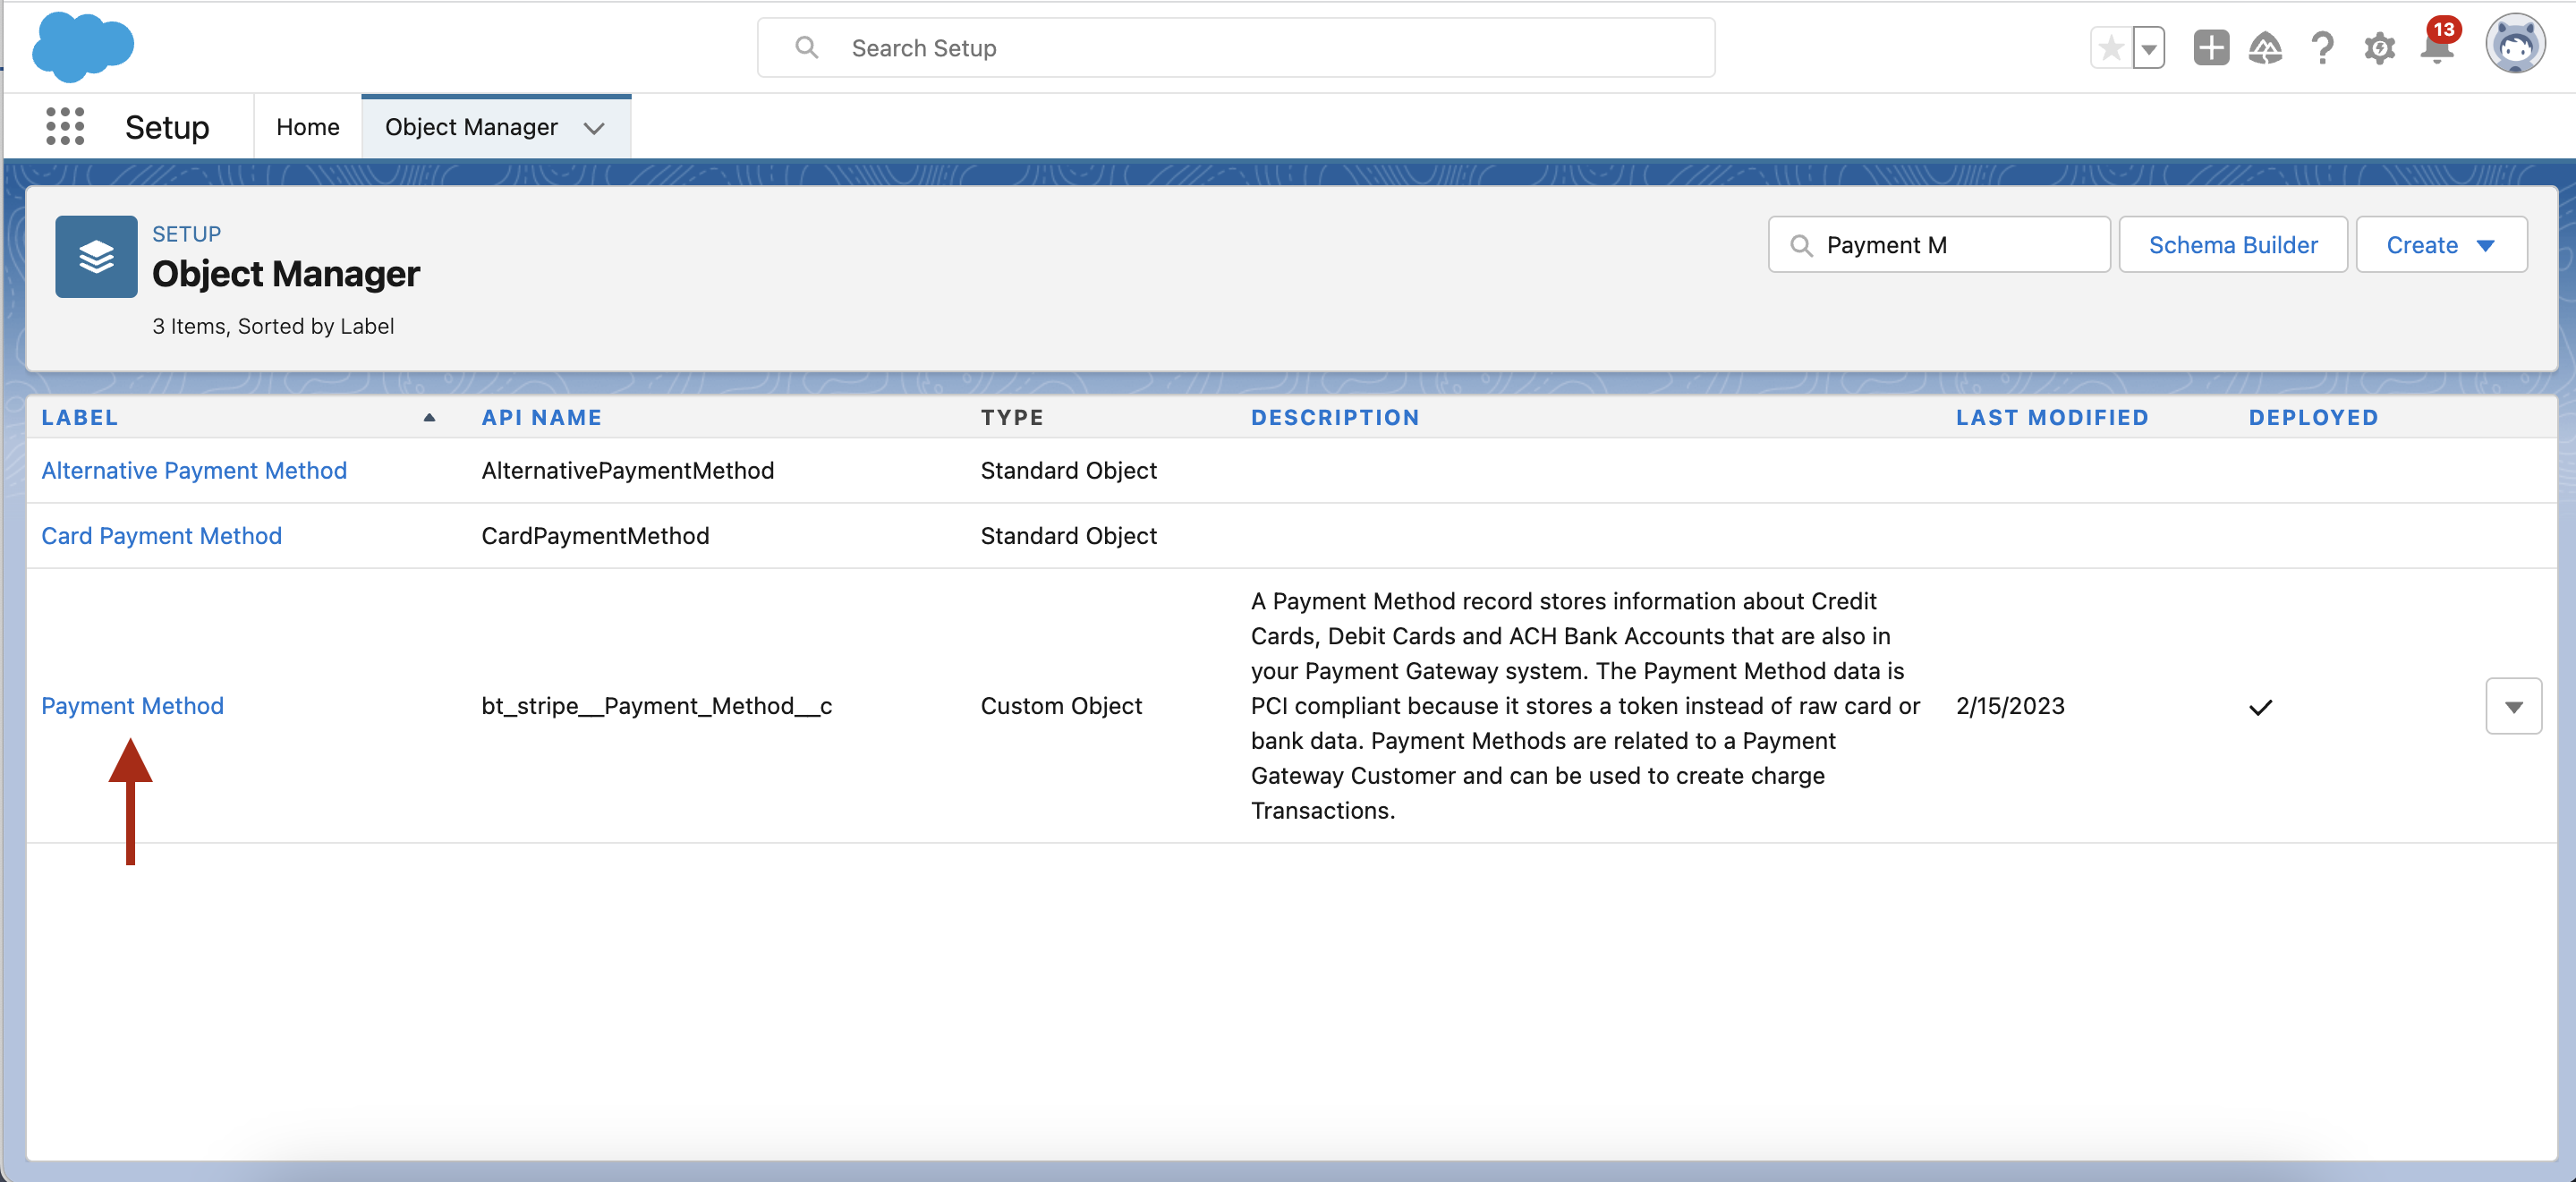
-
Click the Record Types tab in the left navigation bar.
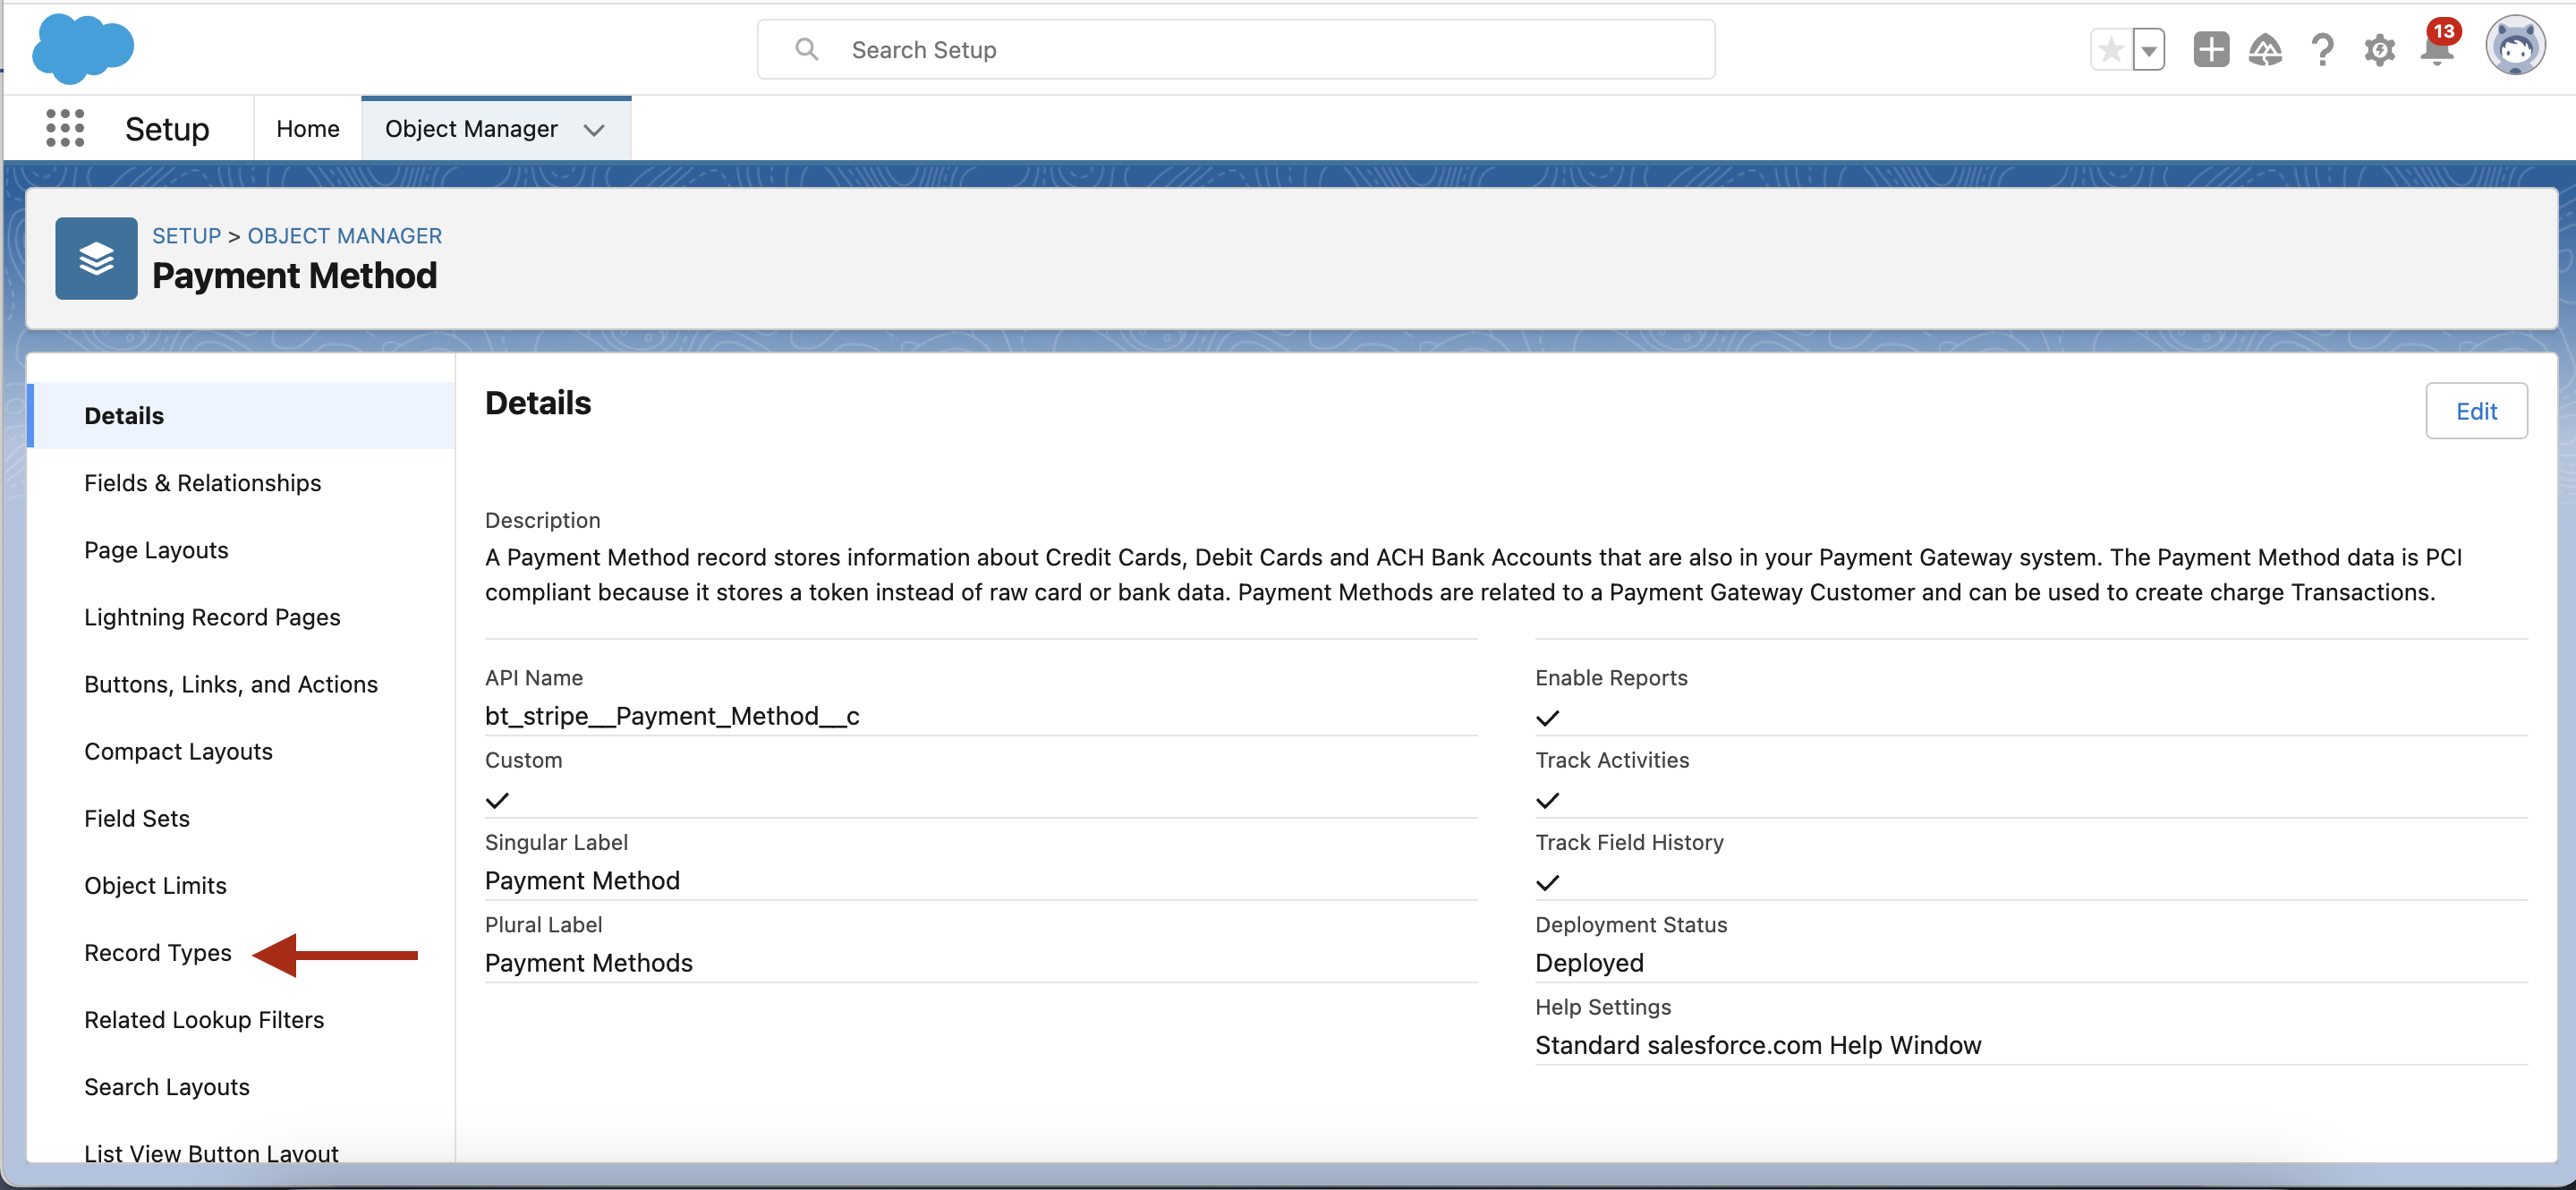
-
Click ACH.
-
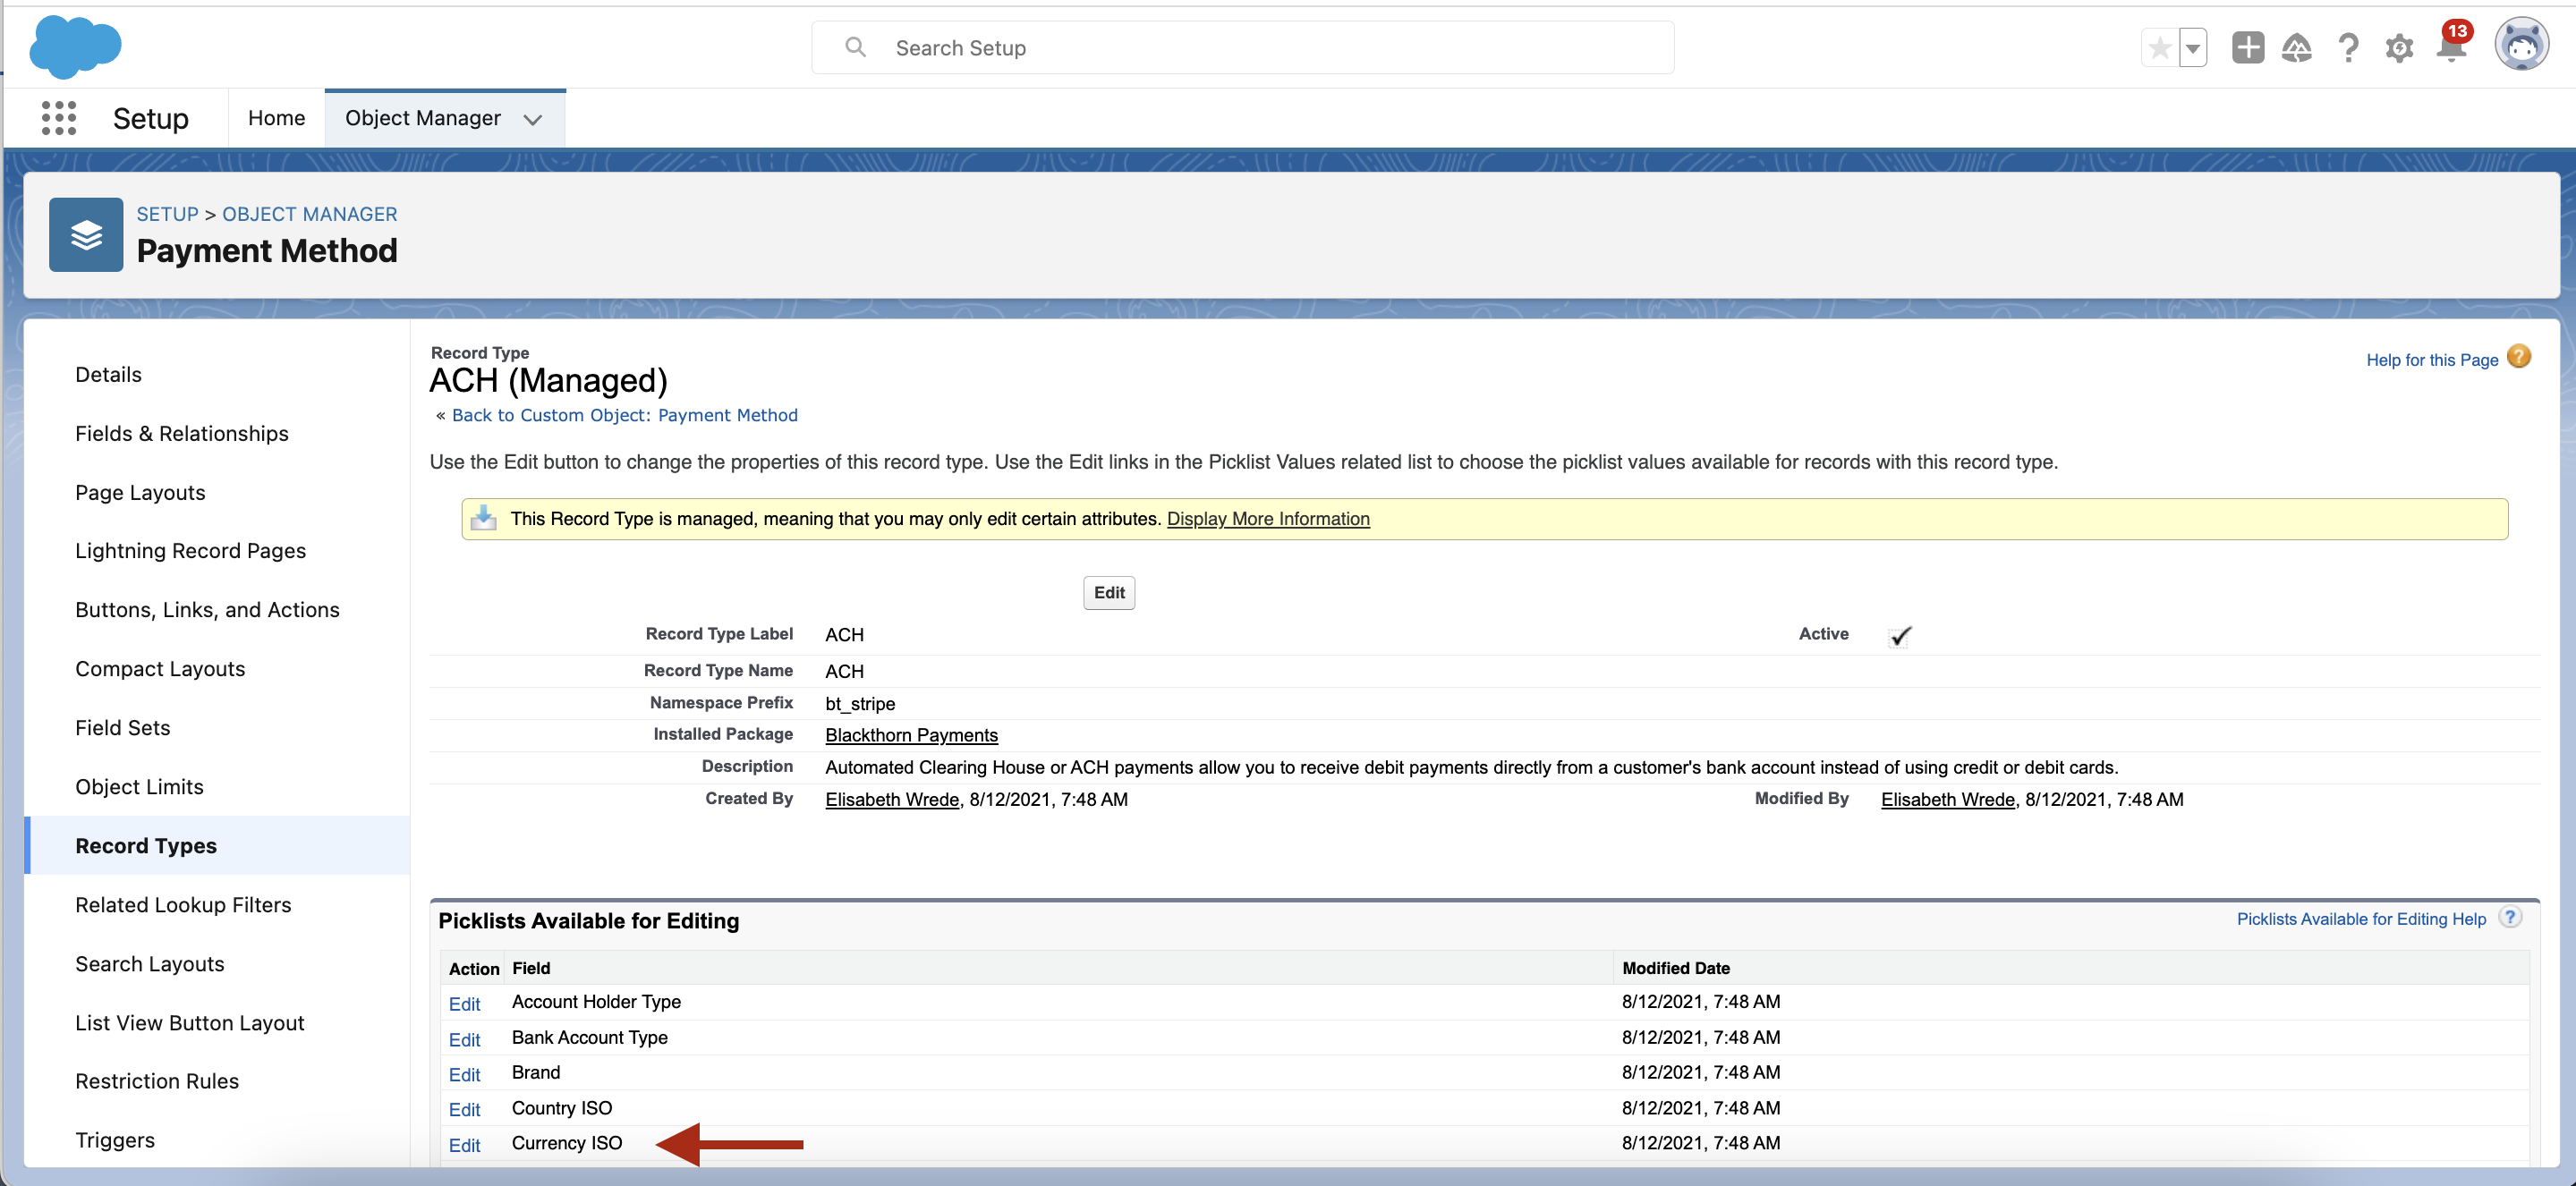
Click Edit next to Currency ISO.
-
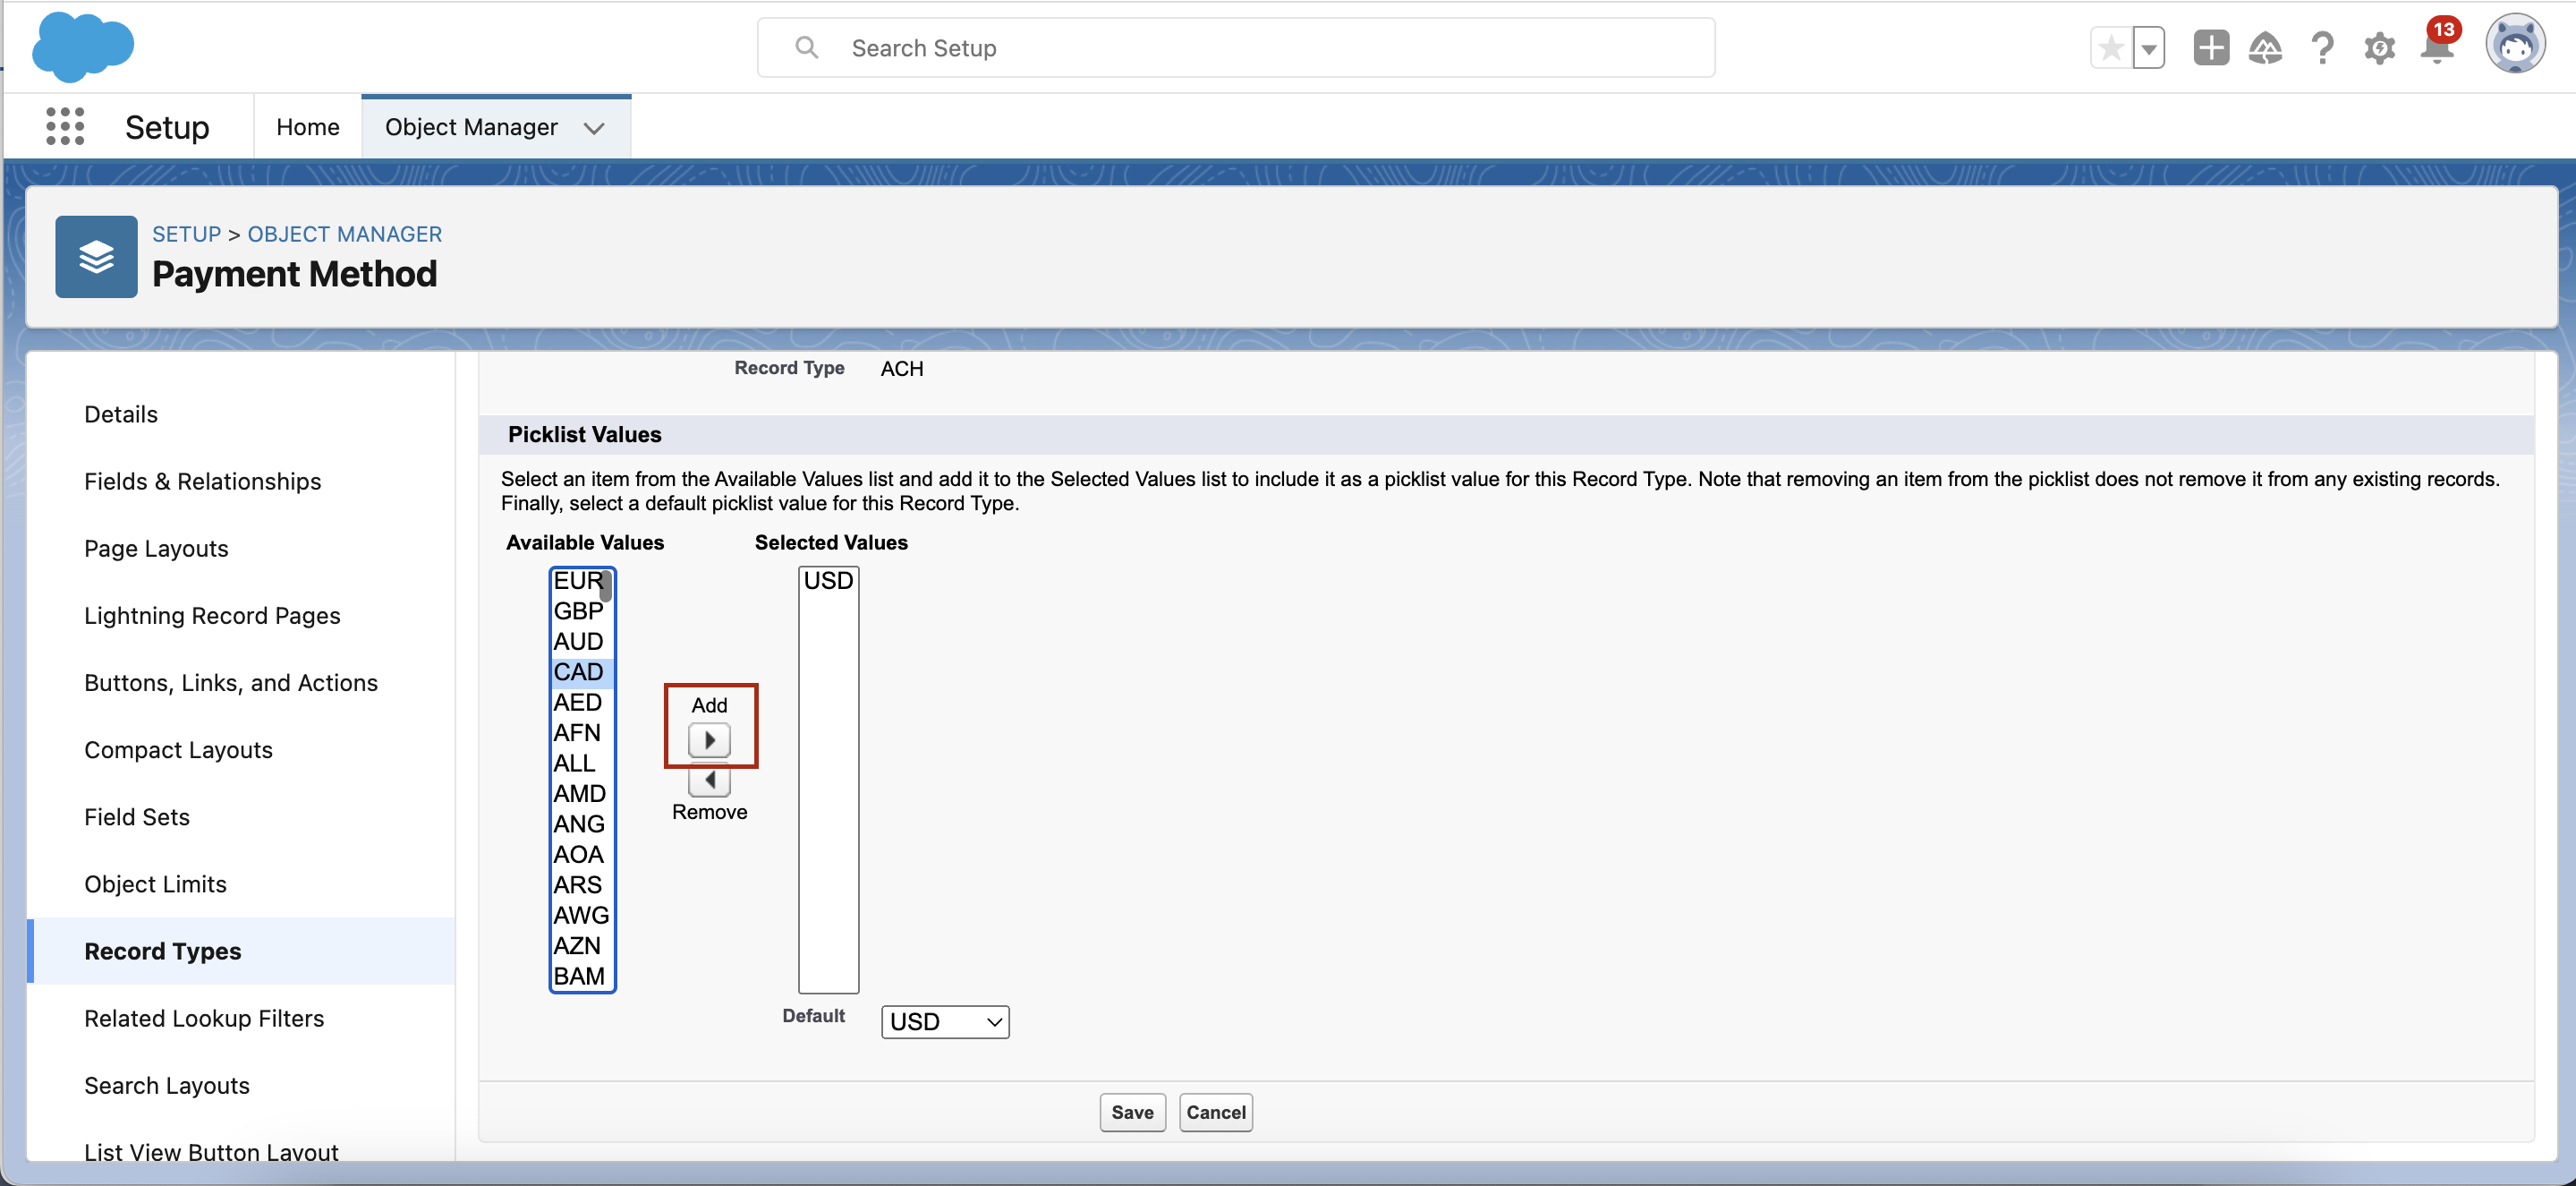
In the Picklist Values’ Available Values Column, select the currency ISO code you want to use.
-
Click Add.
-
Click Save.
Create an ACH Payment Method
- Navigate to the Payment Method object.
Lightning: Click on the App Launcher > Under "All Items" > Click on Payment Methods.
Classic: Click on "All Tabs" ("+" icon in the top right) > Click on Payment Methods.
-
Click New.
-
Set Record Type= "ACH".
-
Required ACH details to enter:
- Holder's Name
- Account Number
- Routing Number
- Account Holder Type
The fields on the right-hand side of the Payment Method detail section will be automatically populated from Stripe.
-
Bank account verification fields: Micro-Deposit One and Micro-Deposit Two Your customer will receive two verification amounts in their bank account. They will need to provide you with those two amounts to make their Payment Method "Verified". Only enter the amounts (such as 35 and 42, there is no need for 0.xx or a decimal).
-
Email (Optional)
The Email field is not a required field; however, we highly recommend requiring it as we use email for Payment Gateway Customer matching logic in Salesforce.For example, if you already have an existing Payment Gateway Customer in Salesforce with a Payment Method and a new Payment Method with the same email is added, it directly relates to the existing Payment Gateway Customer record. -
Related To Fields
If you add additional objects to the "Relationships" step in the Setup Wizard, meaning you want additional objects as the Transaction parent, those related objects would show up in this section as a "Lookup Field" along with the Account and Contact lookup fields.We recommend entering a contact and/or account for all Payment Method records. -
Optional Fields
- Street can be used for additional verification for the Payment Method and is only required if you enable it in your Stripe Dashboard.
- The Payment Gateway Data section is data created by Stripe. When a "Valid" Payment Method is created the Card ID, Customer ID, and Fingerprint fields are populated.When using External Accounts as part of Stripe Connect, Customer ID will not be populated on the Payment Method.
-
-
Click Save.
The bank information is sent to Stripe. The sensitive bank account information is removed from the Salesforce record and Stripe sends back a token for the Payment Method. This keeps us PCI compliant. No bank account information is ever saved in Salesforce.
ACH Status
The Payment Method Status will update to "Pending" when the bank information has been entered and the record has been saved. If there is anything wrong with the Account Number or Routing Number you will receive an error message.
When you enter the micro-deposit numbers (this may take a few days to capture) and save the record, the Payment Method Status updates to "Verified". At this point, you are able to capture Transactions. Keep in mind that Transactions generally take 4-5 days to show up as a "Pending" amount in your Stripe account or External Account if Stripe Connect is enabled.
If the micro-deposit numbers are incorrect, the Payment Method Status will update to "Verification Failed". Once the correct micro-deposits are entered, the Payment Method Status will update to "Verified".
If a Transfer sent to this bank account fails, the Payment Method Status updates to "Errored" and will not continue to send Transfers until the bank details are updated.
There are two error fields on the Payment Method record's page layout, Error Type and Error Message, that provide information about why the Payment Method is "Invalid".
For Authorize.net
- Navigate to the Payment Method object.
Lightning: Click on the App Launcher > Under "All Items" > Click on Payment Methods.
Classic: Click on "All Tabs" ("+" icon in the top right) > Click on Payment Methods.
- Click New.
- Set Record Type= "ACH".
- Required ACH details to enter:
- Holder's Name
- Account Number
- Routing Number
- Account Holder Type
- Set the ECheck Type (CCD, PPD, WEB).
Visit Authorize.net to know the more about echecks. - Set the Bank Account Type (Optional).
- Set the Bank Name (Optional).
For ACH test Payment Methods, a valid Routing Number is required.
You can set the Customer Lookup field if you don't want to create a new customer.
- Click Save.
The bank information is sent to Authorize.net. The sensitive bank account information is removed from the Salesforce record and Authorize.net sends back a token for the Payment Method. This keeps us PCI compliant. No bank account information is ever saved in Salesforce.
-
Email (Optional)
Email is not a required field, however, we highly recommend requiring it as we use email for Payment Gateway Customer matching logic in Salesforce.For example, if you already have an existing Payment Gateway Customer in Salesforce with a Payment Method and a new Payment Method with the same email is added, it directly relates to the existing Payment Gateway Customer record.
-
Related To Fields
If you add additional objects to the "Relationships" step in the Setup Wizard, meaning you want additional objects as the Transaction parent, those related objects would show up in this section as a "Lookup Field" along with the Account and Contact lookup fields.We recommend entering a Account and/or Contact for all Payment Method records.
-
Optional Fields
-
Street can be used for additional verification for the Payment Method.
-
The Payment Gateway Data section is data created for error logging and storing the tokenized ID's in Salesforce.
When a "Valid" Payment Method is created the Card ID, Customer ID.
-
ACH Status
The Payment Method Status will update to "Valid" when the bank information has been entered and the record has been saved. If there is anything wrong with the Account Number or Routing Number you will receive an error message.
There are two error fields on the Payment Method record's page layout, Error Type and Error Message, that provide information about why the Payment Method is "Invalid".
Please note that ACH transactions with ECheck Type = "WEB" can't be refunded. You will see a validation error message if a WEB Transaction is attempted to Refund.
Kindly visit Authorize.net to know the more about eCheck Type Requirements
When entering the CVV and information in the billing fields, there is an AVS (address verification) check and the three fields: CVV Check, Street Check, and Postal Code Check will automatically update with an "Unavailable", "Pass" or "Fail" status.
If you have more than one Payment Gateway set up, manually enter in the Payment Gateway lookup field to make your selection otherwise, if left "Blank", the default Payment Gateway will be used.
Non-Gateway Payment Methods
You can create records which represent a Payment Method, but they are not actually sent to the Payment Gateway. This means that any Transaction linked to these records are symbolic, i.e. not sent to the gateway.
In order to create a Non-Gateway Payment Method:
- Create a new Payment Method record.
- Uncheck the Send to Gateway checkbox.
- Populate all the required fields.
- Click Save.
Remove the Payment Method
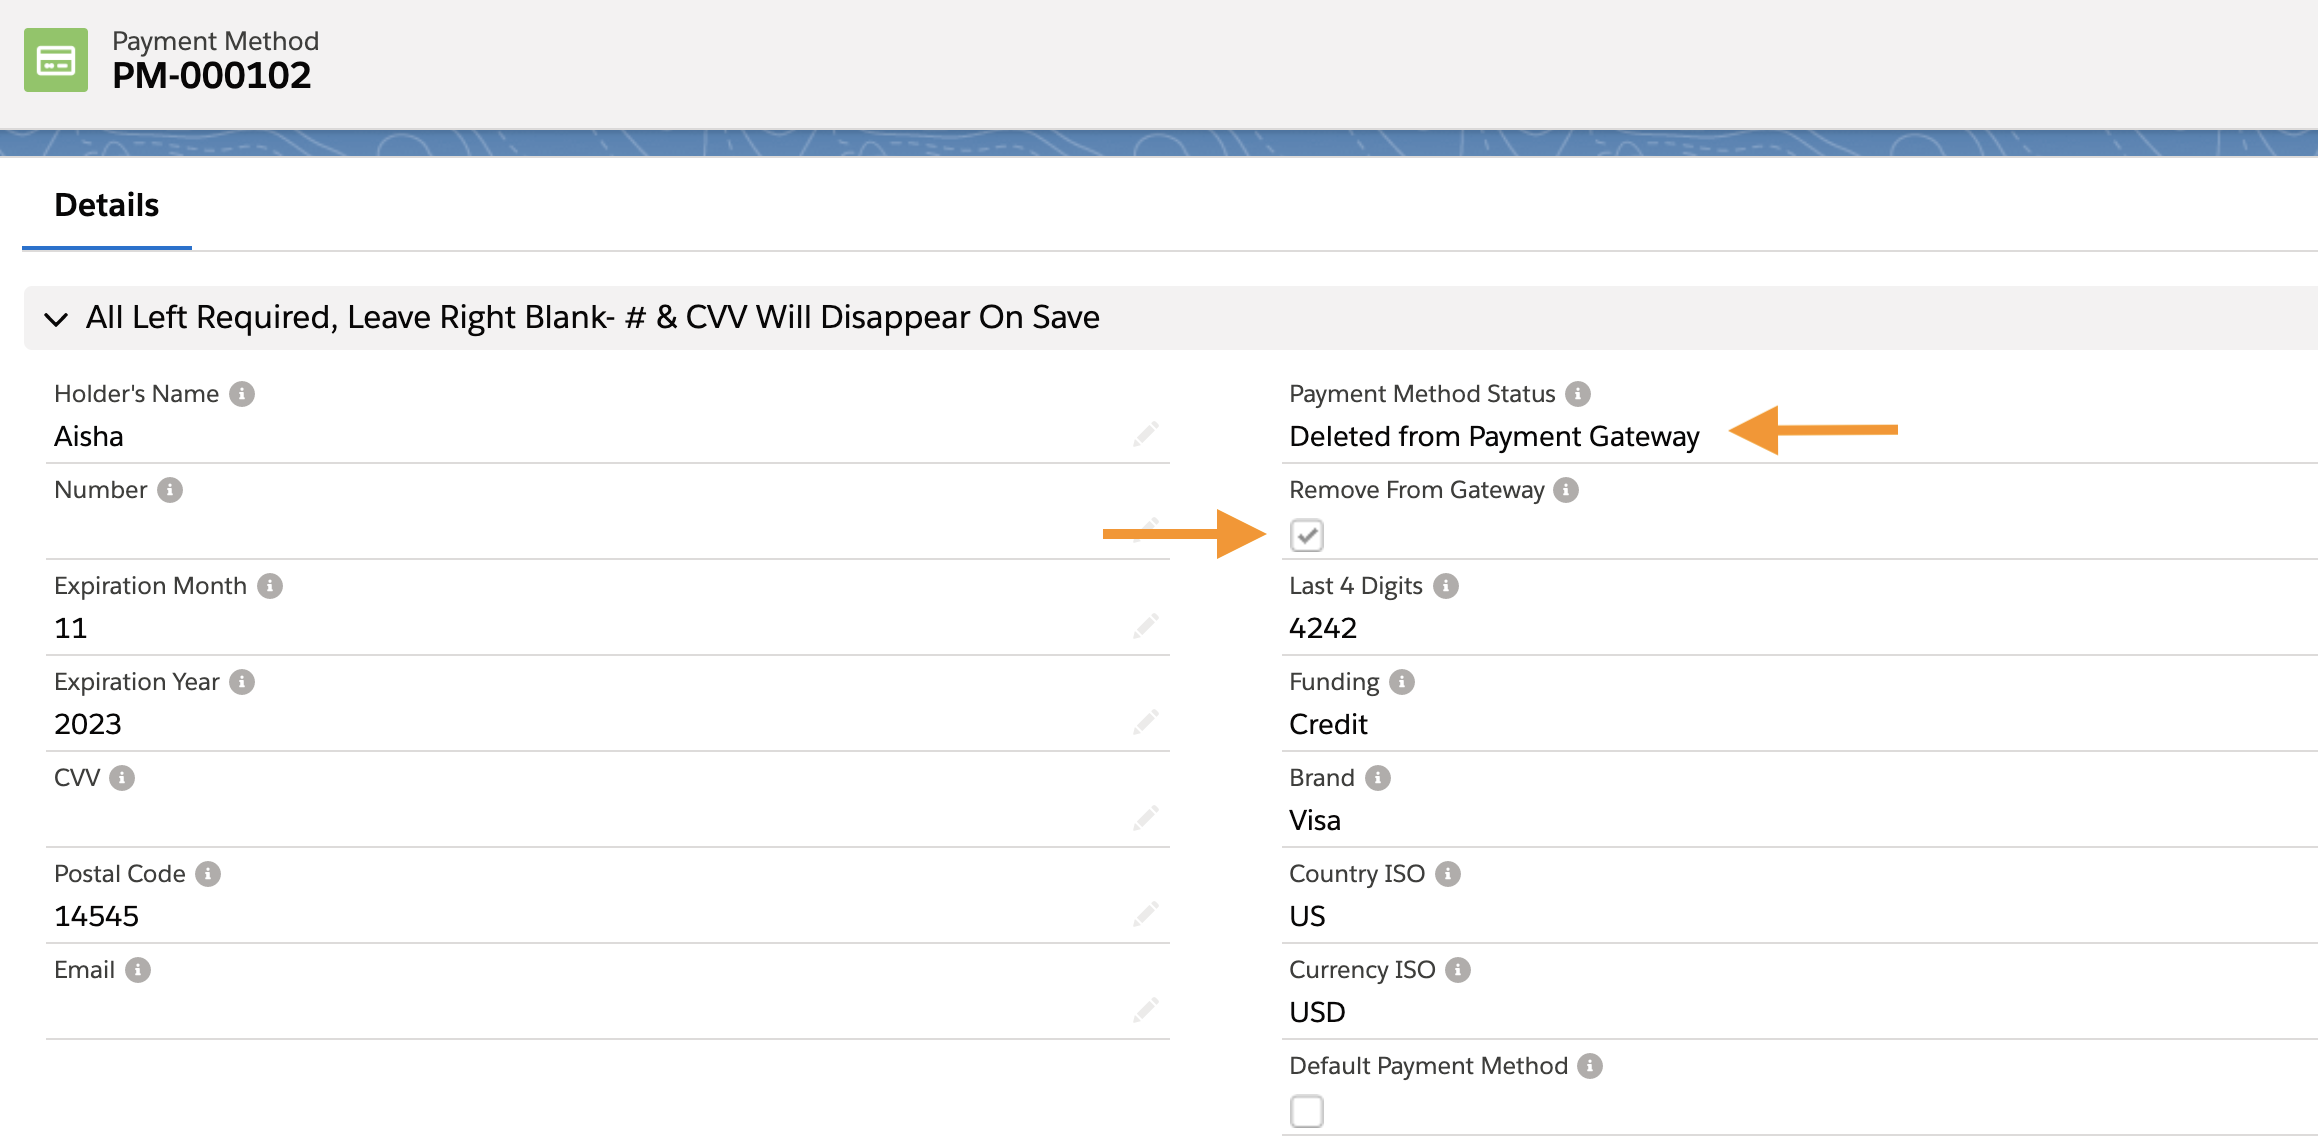
Once a Payment Method record in Salesforce has synced to the Payment Gateway (Stripe/Authorize.net), you are unable to delete the record. If you need to remove the Payment Method for any reason, that can be done by clicking the Remove From Gateway button or checking the Remove From Gateway checkbox. This functionality was created so historical information can be kept while ceasing all ways to capture transactions.
- Navigate to the Payment Method object.
- Lightning: Click on the app launcher > Under "All Items" > Click on Payment Methods.
- Classic: Click on "All Tabs" ("+" icon in the top right) > Click on Payment Methods.
- Click on the record you want to remove from Stripe.
- Click the Remove From Gateway button or check the Remove From Gateway checkbox.
The Payment Method Status will update to "Deleted from Payment Gateway".
Related Contact, Account, and Lead Logic
- When defining the Contact and/or Account fields on a Payment Method for a new customer, the Payment Gateway Customer record will inherit the same Contact and Account as well.
- If you set the Contact field on a Payment Method where the Contact is related to an Account, the Account will automatically be added to the Payment Method Account field.
- When the Contact, Account, or Lead fields are set on the Payment Gateway Customer record, the newly created Payment Method will inherit the same Contact, Account, and Lead as well.
Remove the Payment Method Parent Object
- Navigate to Setup.
- In the Quick Find, type in and search for "Custom Settings".
- Click Manage next to Payment Method Parents.
- Click Delete next to the object you want to remove.
- Delete the lookup fields on both the Payment Method object and your object.
Update an Existing Payment Method
Sometimes Payment Methods expire, but retain the same card details like card number. When this happens you can edit the expiration date. See instructions below:
- Search for the existing Payment Method that requires the update.
- Click Edit.
- Type in the new 2 digit month value in the Expiration Month field.
- Type in the new 4 digit year value in the Expiration Year field.
- Click Save.
The updated Expiration Month and Expiration Year fields will be sent to Stripe for the edited Payment Method.
Troubleshooting
If you have received an error with your Payment Method or have a question, please view our Troubleshooting or FAQ page.