Contents x
- Blackthorn Candy Shop
- Blackthorn Events
- Welcome to Blackthorn Events!
- Events Quick Start Guide
- Install Events
- Payment Gateway Setup
- Payment Gateway Setup Overview
- Connect to Stripe
- Connect to Authorize.net
- Connect to Spreedly
- Connect to Transact (CashNet)
- Connect to TouchNet
- Add-Ons
- Entity Relationship Diagrams
- Blackthorn | Events Admin Tab
- Event Builder
- Event Wizard
- Events: Objects
- Attendee
- Budget and Expense
- Custom Content
- Discount Codes
- Event Content
- Event Groups
- Event Items
- Event Keywords
- Event Registration Submission Process
- Event Settings
- Events
- FAQs
- Fees
- Forms
- Hotel Room Block Management
- Recurring Events
- Reserved Seats and Tables
- Sessions
- Speakers
- Sponsors
- Staff
- Static Translations
- Tracks
- Events: Features
- ADA & WCAG Accessibility
- Advanced Visibility
- Attendee Builder
- Attendee Registration Component
- AttendeeLink
- Authentication via iframe
- Campaign and Event Sync
- Transact (CashNet)
- Clone
- Customized Blackthorn Events Domain
- Data Persistence
- Enable Cookies
- Event Configuration
- Event Email Communication
- Events Summary Home Page
- Experience Cloud (Communities)
- Event Tracking
- Express Registration
- Fees
- Google Analytics
- Iframes
- Images
- Marketing Communication
- Matching and Duplication
- Permissions - Restricting Event Visibility
- Permission Sets
- Pre-checkout and Checkout Details
- reCAPTCHA
- Reports
- Restrict Capacity
- Salesforce Products
- Scheduled Jobs
- Sharing via Social Media
- Smart Scheduler
- Stripe Checkout
- TouchNet
- User Interfaces
- Webinar Integrations
- Checkout Process
- Mobile Check-in App
- Events: Troubleshooting
- Events: Release Notes & Webinar Recordings
- January 2025 - Version 4.44
- December 2024 - Version 4.42
- November 2024 - Version 4.40
- October 2024 - Version 4.36
- September 2024 - Version 4.34
- August 2024 - Version 4.31
- July 2024 - Version 4.29
- June 2024 - Version 4.27
- May 2024 - Version 4.24
- Caching 2.0 and Capacity Management - Version 4.23
- April 2024 - Version 4.22
- March 2024 - Version 4.20
- February 2024 - Version 4.19
- January 2024 - Version 4.17
- 2023
- December 2023 - Version 4.14
- November 2023 - Version 4.11
- October 2023 - Version 4.9
- September 2023 - Version 4.5
- August 2023 - Version 4.0
- July 2023 - Version 3.103.2
- June 2023 - Version 3.102
- May 2023 - Version 3.99
- April 2023 - Version 3.97
- March 2023 - Version 3.95
- February 2023 - Version 3.90.2
- January 2023 - Version 3.88
- 2022
- 2021
- December 2021 - Version 3.48
- November 2021 - Version 3.42
- October 2021 - Version 3.39
- September 2021 - Version 3.34
- August 2021 - Version 3.32
- July 2021 - Version 3.30
- June 2021 - Version 3.27
- May 2021 - Version 3.24
- April 2021 - Version 3.22
- March 2021 - Version 3.19
- February 2021 - Version 3.18
- January 2021 - Version 3.11
- Blackthorn Payments
- Welcome to Blackthorn Payments
- Payments Quick Start Guide
- Overview
- Install Payments
- Provide Users Access
- Payment Gateway Setup
- Instructions
- Connect to Stripe
- Connect to Authorize.net
- Connect to Spreedly
- PayLink
- Virtual Terminal
- DocumentLink
- Move Historical Data to Blackthorn
- FSL Extension Package (Optional)
- Go Live in Production
- Use Cases
- Payments: Objects
- Payments: Features
- Authorize.net
- Blackthorn | Payments Admin
- Communities & Billing Portal
- Custom Metadata Types
- Custom Settings
- Dashboard
- Default Payment Method
- DocumentLink
- Email Receipts
- Field Service Lightning Payments
- Flow Screen Charge Component
- FSL Mobile Actions (without our iOS/Android app)
- High Volume Batch Processing
- Historical Sync
- Level 3 Processing
- Matching and Duplication
- Multi-Currency
- PayLink
- Permission Sets
- Plaid
- Process Scheduled Transactions and Reattempt Logic
- Recurring Charges and Subscription Options
- Reports
- Salesforce Shield / Platform Encryption with all Blackthorn apps
- SCA and MOTO
- Scheduled Batch Jobs
- Spreedly
- Stripe
- Stripe Billing
- Stripe Checkout
- Stripe Metadata
- Stripe Radar Integration
- Test Data
- Virtual Terminal
- Webhooks
- Mobile Payments App
- Payments: Troubleshooting and FAQ
- Payments: Release Notes & Webinar Recordings
- January 2025 - Version 6.28
- December 2024 - Version 6.27
- November 2024 - Version 6.26
- October 2024 - Version 6.25
- September 2024 - Version 6.23
- August 2024 - Version 6.22
- July 2024 - Version 6.20
- June 2024 - Version 6.19
- May 2024 - Version 6.18
- April 2024 - Version 6.17
- March 2024 - Version 6.16
- February 2024 - Version 6.13
- January 2024 - Version 6.11
- 2023
- December 2023 - Version 6.8
- November 2023 - Version 6.6
- October 2023 - Version 6.4.1
- September 2023 - Version 6.3
- August 2023 - Version 6.0.1
- July 2023 - Version 5.108.2
- June 2023 - Version 5.106
- May 2023 - Version 5.103
- April 2023 - Version 5.99.1
- March 2023 - Version 5.95
- February 2023 - Version 5.93
- January 2023 - Version 5.91
- 2022
- 2021
- December 2021 - Version 5.46
- November 2021 - Version 5.41
- October 2021 - Version 5.34
- September 2021 - Version 5.33
- August 2021 - Version 5.31
- July 2021 - Version 5.29
- June 2021 - Version 5.24
- May 2021 - Version 5.22
- April 2021 - Version 5.20
- March 2021 - Version 5.17
- February 2021 - Version 5.15
- January 2021 - Version 5.14
- Blackthorn Messaging
- Welcome to Blackthorn Messaging!
- Configure Bulk Messaging
- Installation
- Create a Template
- Account Setup
- Individual Messaging
- Conversation Maintenance
- Phone Number Lookups
- Campaigns
- Automation
- Additional Features
- A2P Form in Admin Page
- After Hours Response
- Auto Recharge your Message Balance
- Click to Call with CTI
- Configure Default and Excluded Phone Fields by Object
- Filter your Inbox Using Conversation List Views
- HELP and STOP Message Compliance
- How Do I Increase our Message Balance?
- Improved File Management for MMS Attachments
- Link Tracking
- Manage Opt-outs
- Number of Conversations in the Messenger
- Number of Conversations to Load in Inbox
- Prohibit Sending Attachments (Custom Permission)
- Schedule Jobs for Admin
- Schedule SMS Messages
- Set a Default from Number
- Short Codes
- Smart Scheduler
- Sticky Sidebar in the Inbox
- Track Phone Number Opt-ins
- Smart Scheduler
- Setup
- Getting Started
- Self-Service Tasks
- FAQ
- General FAQ
- Attachments FAQ
- Do You Have a List of Published IP Addresses?
- How Do I Update my Payment Method?
- How Do I Grant Access to Messaging Support?
- What Does this Error Message Mean?
- What Happens When my Message Balance Reaches Zero?
- Why don’t I see any phone numbers when I try to send a message?
- Release Notes
- February 2025 - Version 3.47
- October 2024 - Version 3.46
- July 2024 - Version 3.44.3
- June 2024 - Version 3.44.1
- May 2024 - Version 3.44
- April 2024 - Version 3.43.21
- February 2024
- January 2024
- 2023
- 2022
- 2021
- 2020
- Blackthorn Compliance
- Installation Guide
- Extend Blackthorn Compliance to Other Objects
- Auditing
- FATQ's: Frequently Asked Technical Questions
- Detection Patterns
- Supported File Types - SecureAttachment
- API Limits - Secure Attachment
- Customize Blackthorn Compliance with Apex
- Change AppExchange Payment Method
- Extension Packages
- Install / Setup SecureAttachment
- Debugging and Errors
- Compliance Release Notes
- Compliance - January 2025
- Compliance - February 2024
- Compliance - July 2023
- Compliance - April 2023
- Compliance - December 2022
- Compliance - October 2022
- Compliance - July 2022
- Compliance - June 2022
- Compliance - March 2022
- Compliance - February 2022
- Compliance - December 2021
- Compliance - November 2021
- Compliance - Release 3.71
- Compliance - Release 3.6
- Compliance - Release 3.2
- Compliance - Release 3.0
- Blackthorn Support
Schedule Emails with SendGrid
- 05 Jun 2024
- 3 Minutes to read
- Print
- DarkLight
Contents
Schedule Emails with SendGrid
- Updated on 05 Jun 2024
- 3 Minutes to read
- Print
- DarkLight
Article summary
Did you find this summary helpful?
Thank you for your feedback
Use SendGrid from the Events app to send scheduled emails that are created using the Smart Scheduler.
For information about setting up SendGrid, please click here.
Pre-requisites
If you haven’t already set up Smart Scheduler, please complete the tasks on the following pages.
- Upgrade the Messaging App
- Upgrade the Blackthorn Base, Payments, and Events Apps
- Assign New Permission Sets
- Create an Org-wide Email Address
- Activate the Smart Scheduler's Feature Toggle
- Start Here
- Register Your Account
- Authenticate a User
- Add the BT Event Scheduler Component to the Event Record
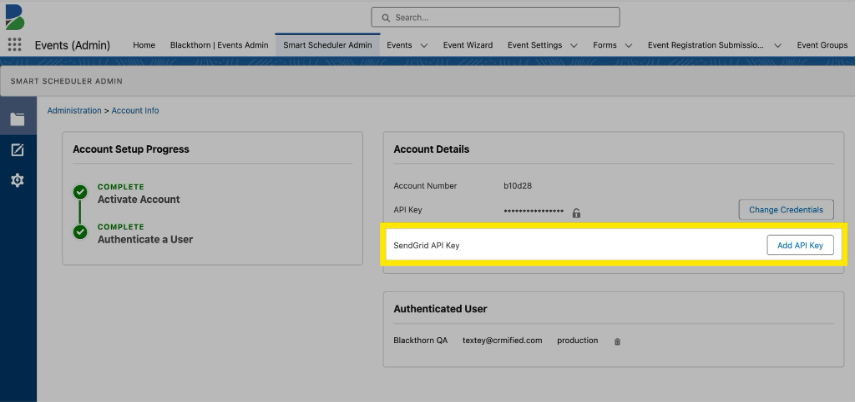
Add the SendGrid API Key in the BT Base App
- Open the Events (Admin) app.
- Click the Smart Scheduler Admin tab. (If you don’t see the tab, click here to review the steps.)
- Click Add API Key.
- Enter the SendGrid API Key.
- Click Save.
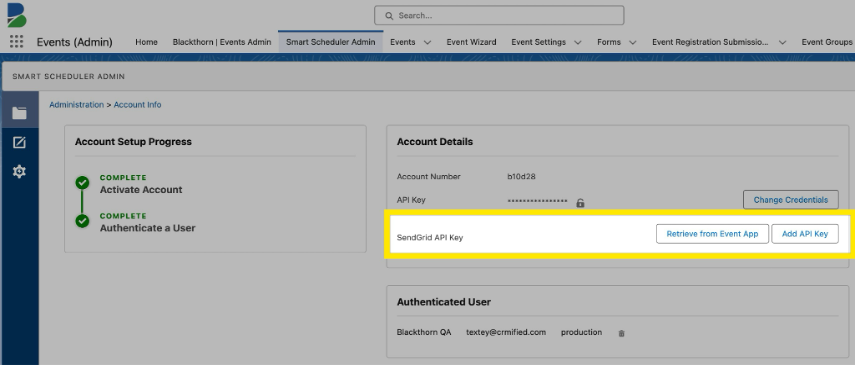
Once the SendGrid API Key is available in the Events app, you can retrieve it from the Smart Scheduler Admin tab by clicking Retrieve From Event App and use it in the BT Base app.
Settings
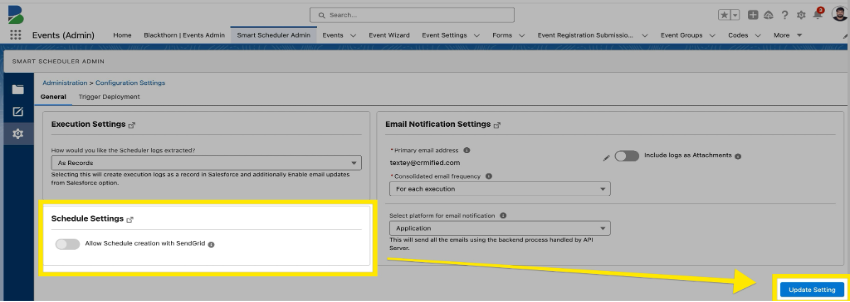
Turn On/Off the SendGrid Feature
You can turn on/off the feature that allows users to schedule SendGrid emails from the BT Base app.
- Open to the Events (Admin) app.
- Click the Smart Scheduler Admin tab.
- Click the Configuration Settings tab.
- Toggle the Allow Schedule creation with SendGrid setting on or off.
- Click Update Setting.
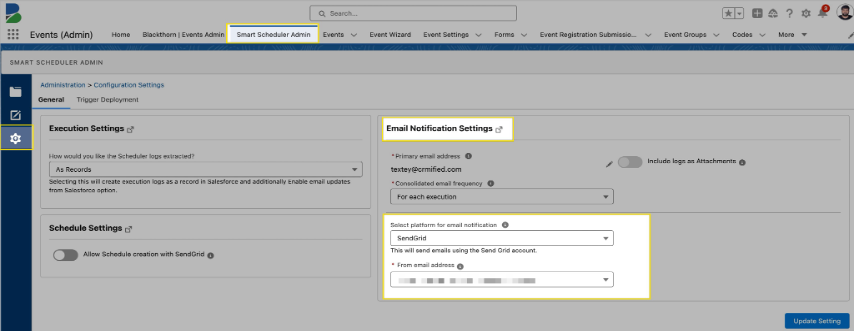
Set Email Notifications
You can select SendGrid for email notifications from the Email Notification Settings on the Smart Scheduler Admin tab.
- Open to the Events (Admin) app.
- Click the Smart Scheduler Admin tab.
- Click the Configuration Settings tab.
- Set Select platform for email notification to “SendGrid.”
- Select an email address in the From Email Address field.
- Click Update Settings.
Functionality
- Allow Schedule creation with SendGrid can only be toggled on/off if the SendGrid API Key field contains a value.
- The SendGrid API Key must be added to the BT Base Admin app before users can select "SendGrid" in the Select platform for email notification field.
- Users cannot remove/modify the API Key if the Allow Schedule creation with SendGrid setting is toggled "ON."
- Users cannot remove/modify the API Key if there is an active email scheduled job with SendGrid selected as the from email.
- Users cannot remove/modify the API Key when SendGrid is selected as the platform for email notification in the Email Notification Settings.
Schedule SendGrid Emails
Use the Smart Scheduler to schedule SendGrid emails.
- Make sure Allow Schedule creation with SendGrid is set to “On.”
- Open the relevant Event record.
- Click the Communications tab. (If you don’t see the Communications tab, click here to learn how to add it.)
- Click New Message.
Recipients Section
- Select Schedule “an Email.”
- Select “Event Attendees” or “Session Attendees.”
- Enter a Schedule Name.
- Select “SendGrid.”
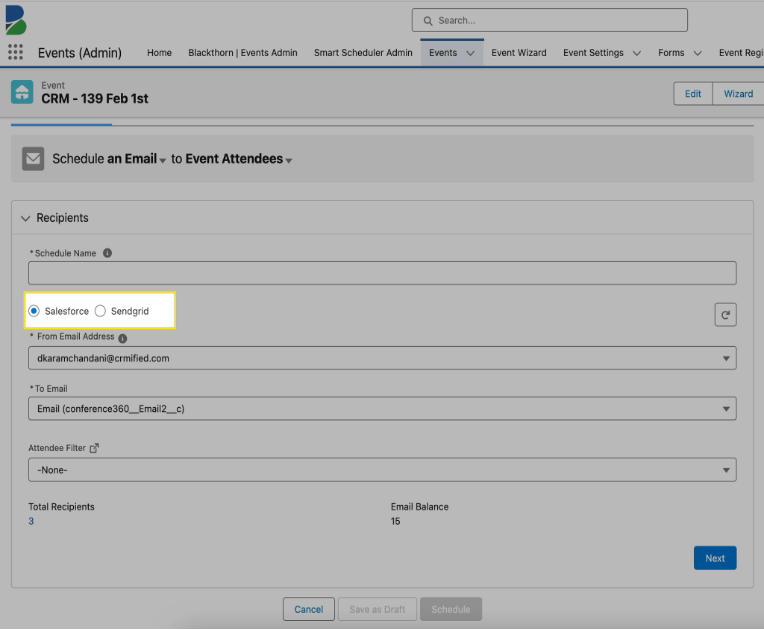
- Select a From Email Address.
- Select a To Email.
- Choose an Attendee Filter.
- If you set Attendee Filter = “Attendance Status”, select the relevant options in the Attendance Status field.
- If you set Attendee Filter = “Registration Status”, select the relevant options in the Registration Status field.
- There must be at least one recipient listed in Total Recipients.
- If a zero is listed under Total Recipients, check that you have the correct status selected and review the Attendees that should have the chosen status.
- Confirm that the amount under Email Balance is greater than the number of Total Recipients.
- Click Next.
Schedule Section
- Choose one of the three options below to schedule your email.
- Send the email at a specific date and time
- Choose the specific date and time in the Select a Date / Time fields.
- Send the email X Minutes/Hours/Days After/Before the selected trigger.
- Enter the number.
- Choose “Days”, “Hours”, or “Minutes”.
- Select “Before” or “After”.
- Choose “Event Start Date/Time”, Event End Date/Time”, “Event Attendee Registration Date”, or “Event Attendee Created Date”.
- Select Now to send the email two minutes after the email is scheduled.
- Send the email at a specific date and time
- Click Next.
Message Section
- In the Email Template field, search for an existing Email Template or click Create New to create a new one.
- Click Next.
Send Test Section
- Enter a Test Email. Make sure to use an email that can be checked easily. Using your email is a good option.
- Select a Test Record.
- Click Send Test.
- After you receive the success message, click Schedule.