Users must have Read access to any fields added to the “Blackthorn Pay - Transaction Parent” custom setting. If Read access isn’t granted, users will receive an ‘insufficient permissions’ error when using the Mobile Payments app.
This issue is scheduled to be fixed in early 2026.
Package Install
- Install the latest version of Blackthorn Payments and complete the setup wizard.
- Install the Blackthorn Mobile Payments package in a sandbox or production and assign licenses to all users that need access.
- Install our iOS app.
Add Mobile Pay Action to Transaction Page Layout
The Mobile Pay action can be added to the Transaction page layout to link the Salesforce mobile app to the Blackthorn Mobile Payments app. This allows Salesforce mobile app users to take a mobile payment.
Follow the steps below to add the Mobile Pay action to the Transaction page layout.
- In Salesforce, click the Gear icon to go to Setup.
- Click the Object Manager tab.
- In the Quick Find box, search for and click the Transaction object.
- Click the Page Layouts tab.
- Click the Charge Transaction Layout.
- Click the Mobile & Lightning Actions tab.
- Drag and drop the Mobile Pay action in the Salesforce Mobile and Lightning Experience Actions section.
- Click Save.
Select a Payment Gateway
If you are using Stripe, you must confirm that a location is set for the Payment Gateway in Stripe before using the Mobile Payments app.
The user can select a Payment Gateway when creating a Transaction either in Salesforce or in the Mobile Payments app. If there are multiple Payment Gateway records, the app will default to the default Payment Gateway.
If the user creates the Transaction from the Mobile Payments app, they can select a Payment Gateway on the Home page. Initially, the default Payment Gateway will be selected. If a user selects a different Payment Gateway, the app will remember the new selection the next time a new Transaction is created.
Enable Send Receipt Email in Salesforce
After a mobile transaction is complete, Salesforce can send a receipt via email to the customer if the Receipt Email field is populated AND the Transaction Status = “Completed”.
Follow the steps below to enable this feature.
- In Salesforce, go to Setup > Workflow Rules.
- Click Activate next to "Send Blackthorn | Payments Receipt (Text)".
Set Up Stripe Locations
Before using your Stripe account, confirm that Locations have been set up. All card readers require an assigned Location. Use the following steps to set up Locations in your Stripe Dashboard if they aren’t already set up.
- Log into your Stripe Dashboard.
- Click Payments.
- Click Readers.
- Click Locations.
- On the Locations page, click New.
- Enter the name and address details for each physical location.
- Click Save.
- Once you’ve created each Location, click New in the Location’s “Reader” section to register each card reader to a Location.
Card Reader Firmware Updates
Stripe users must add locations to their Stripe dashboard before upgrading their iOS mobile devices to the latest version. If you do not add locations first, you won't be able to connect to a Stripe card reader.
We've added the ability to update your card reader firmware inside the Mobile Payments app.
- Navigate to the Reader screen.
- Connect your reader.
- Notice that while connecting the reader, we are checking for firmware updates.
- If your reader has a firmware update available, a link to install the update will appear.
- Follow the on-screen prompts to install the update.
Connecting to an Android Device
When connecting a Stripe card reader, a modal screen will appear on the Mobile Payments app to ask for Bluetooth permissions for the following new permissions in Android 12 or higher. It may take up to two to three minutes for the card reader to appear on the screen.
- BLUETOOTH_CONNECT: required to connect to paired Bluetooth devices.
- BLUETOOTH_SCAN: required to scan and pair nearby Bluetooth devices.
- BLUETOOTH_ADVERTISE: required to advertise to nearby Bluetooth devices.
Save Card Details with the Stripe Terminal
There are two options for collecting reusable card details with Stripe Terminal. Please click one of the options below for specific instructions from Stripe.
SetupIntents
Collect information directly, without charging a card: This method uses SetupIntents, a new API endpoint, to collect a card’s details without charging the card.
Payment Intents
Save card details after payment (US only): This method uses PaymentIntents to create reusable tokens for US customers.
The Payment Intent’s Capture Method field also includes the following picklist values: “Manual,” “Automatic,” or “Automatic Async” (automatic_async), which matches Stripe’s library. The default value for the Capture Method field is “Automatic Async.”
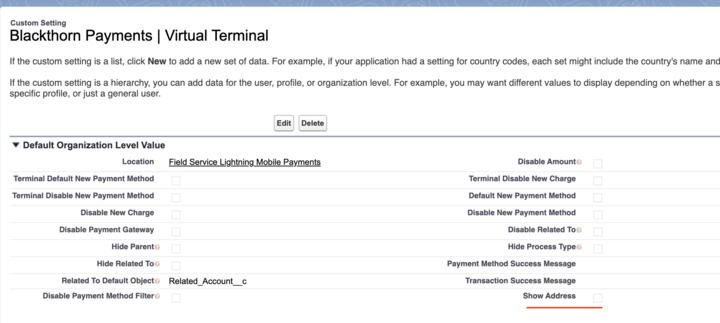
Virtual Terminal Custom Setting
Before using Spreedly with Cybersource to accept payments, the Virtual Terminal custom setting Show Address must be enabled. This ensures that the address fields (Street, City, State, and Country/Region) will be visible on the Payment Method creation page in the Virtual Terminal.
Skip Receipt Screen Custom Setting
iOS Mobile Payments app users can now use the Blackthorn Payments | Mobile Settings custom setting Skip Receipt Screen to determine if the last screen will show the option to send a receipt.
- If Skip Receipt Screen = “True” (checked), the last screen won’t show the option to send a receipt.
- If Skip Receipt Screen = “False” (unchecked), the last screen will show the option to send the receipt.
To update the setting, follow the steps below.
- Click the Gear icon.
- Click Setup.
- In the Quick Find box, enter and click “Custom Settings.”
- Click Manage next to Blackthorn Payments | Mobile Settings.
- Click New.
- Check the Skip Receipt Screen checkbox.
- Click Save.
Troubleshooting
If you need to determine which software version was used for a Transaction, add the Mobile App Version field to your Transaction object. The Mobile App Version will automatically populate with the application platform name (iOS or Android) and the version number.
If you have any questions about the setup process, please contact Blackthorn Support. We're happy to help!