The Blackthorn API, by design, does NOT run capacity validations. Users must add their own logic to implement capacity restrictions.
The API intentionally does not trigger the validation on capacity to allow for flexibility for all customers. When sending registrations through the API, customers can utilize their own custom logic to prevent registrations when the capacity is sold out.
The Status Formula field is on the Event Item object. If the Quantity Remaining is "0", then the Status Formula field will show Sold Out. The custom code can evaluate the formula to block the registration once the Quantity Remaining is zero.
For an incoming payload:
- 0 is treated as a sold-out.
- Null or empty Events are treated as infinite, and Total Capacity is automatically set to “999999”.
You can set up a waitlist that automatically triggers when your Event reaches capacity, a specific Event Item sells out, or when a Session reaches capacity. Please read the documentation before using this feature. This works for paid and free Events.
Event Waitlisting
Waitlisting can only be enabled on the Event OR the Event Item. It cannot be enabled on both.
There are three fields on the Event object:
Waitlist Enabled
Waitlist Capacity
Remaining Waitlist Capacity

If you created a custom permission set, users assigned to that custom permission set will need to access waitlisting. Please add Read or Edit access to the fields listed above.
Enable Waitlisting
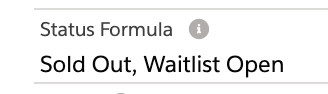
Check the Waitlist Enabled field to enable waitlisting. The waitlist will become available once your Event reaches its Total Capacity. At this point, the Status Formula field on the Event will change to "Sold Out, Waitlist Open". This tells your Event page that the normal Event registration is closed, but open to waitlist registrations.
Waitlist Process
The images below show what the registration process looks like when an Event has the Waitlist Enabled field checked.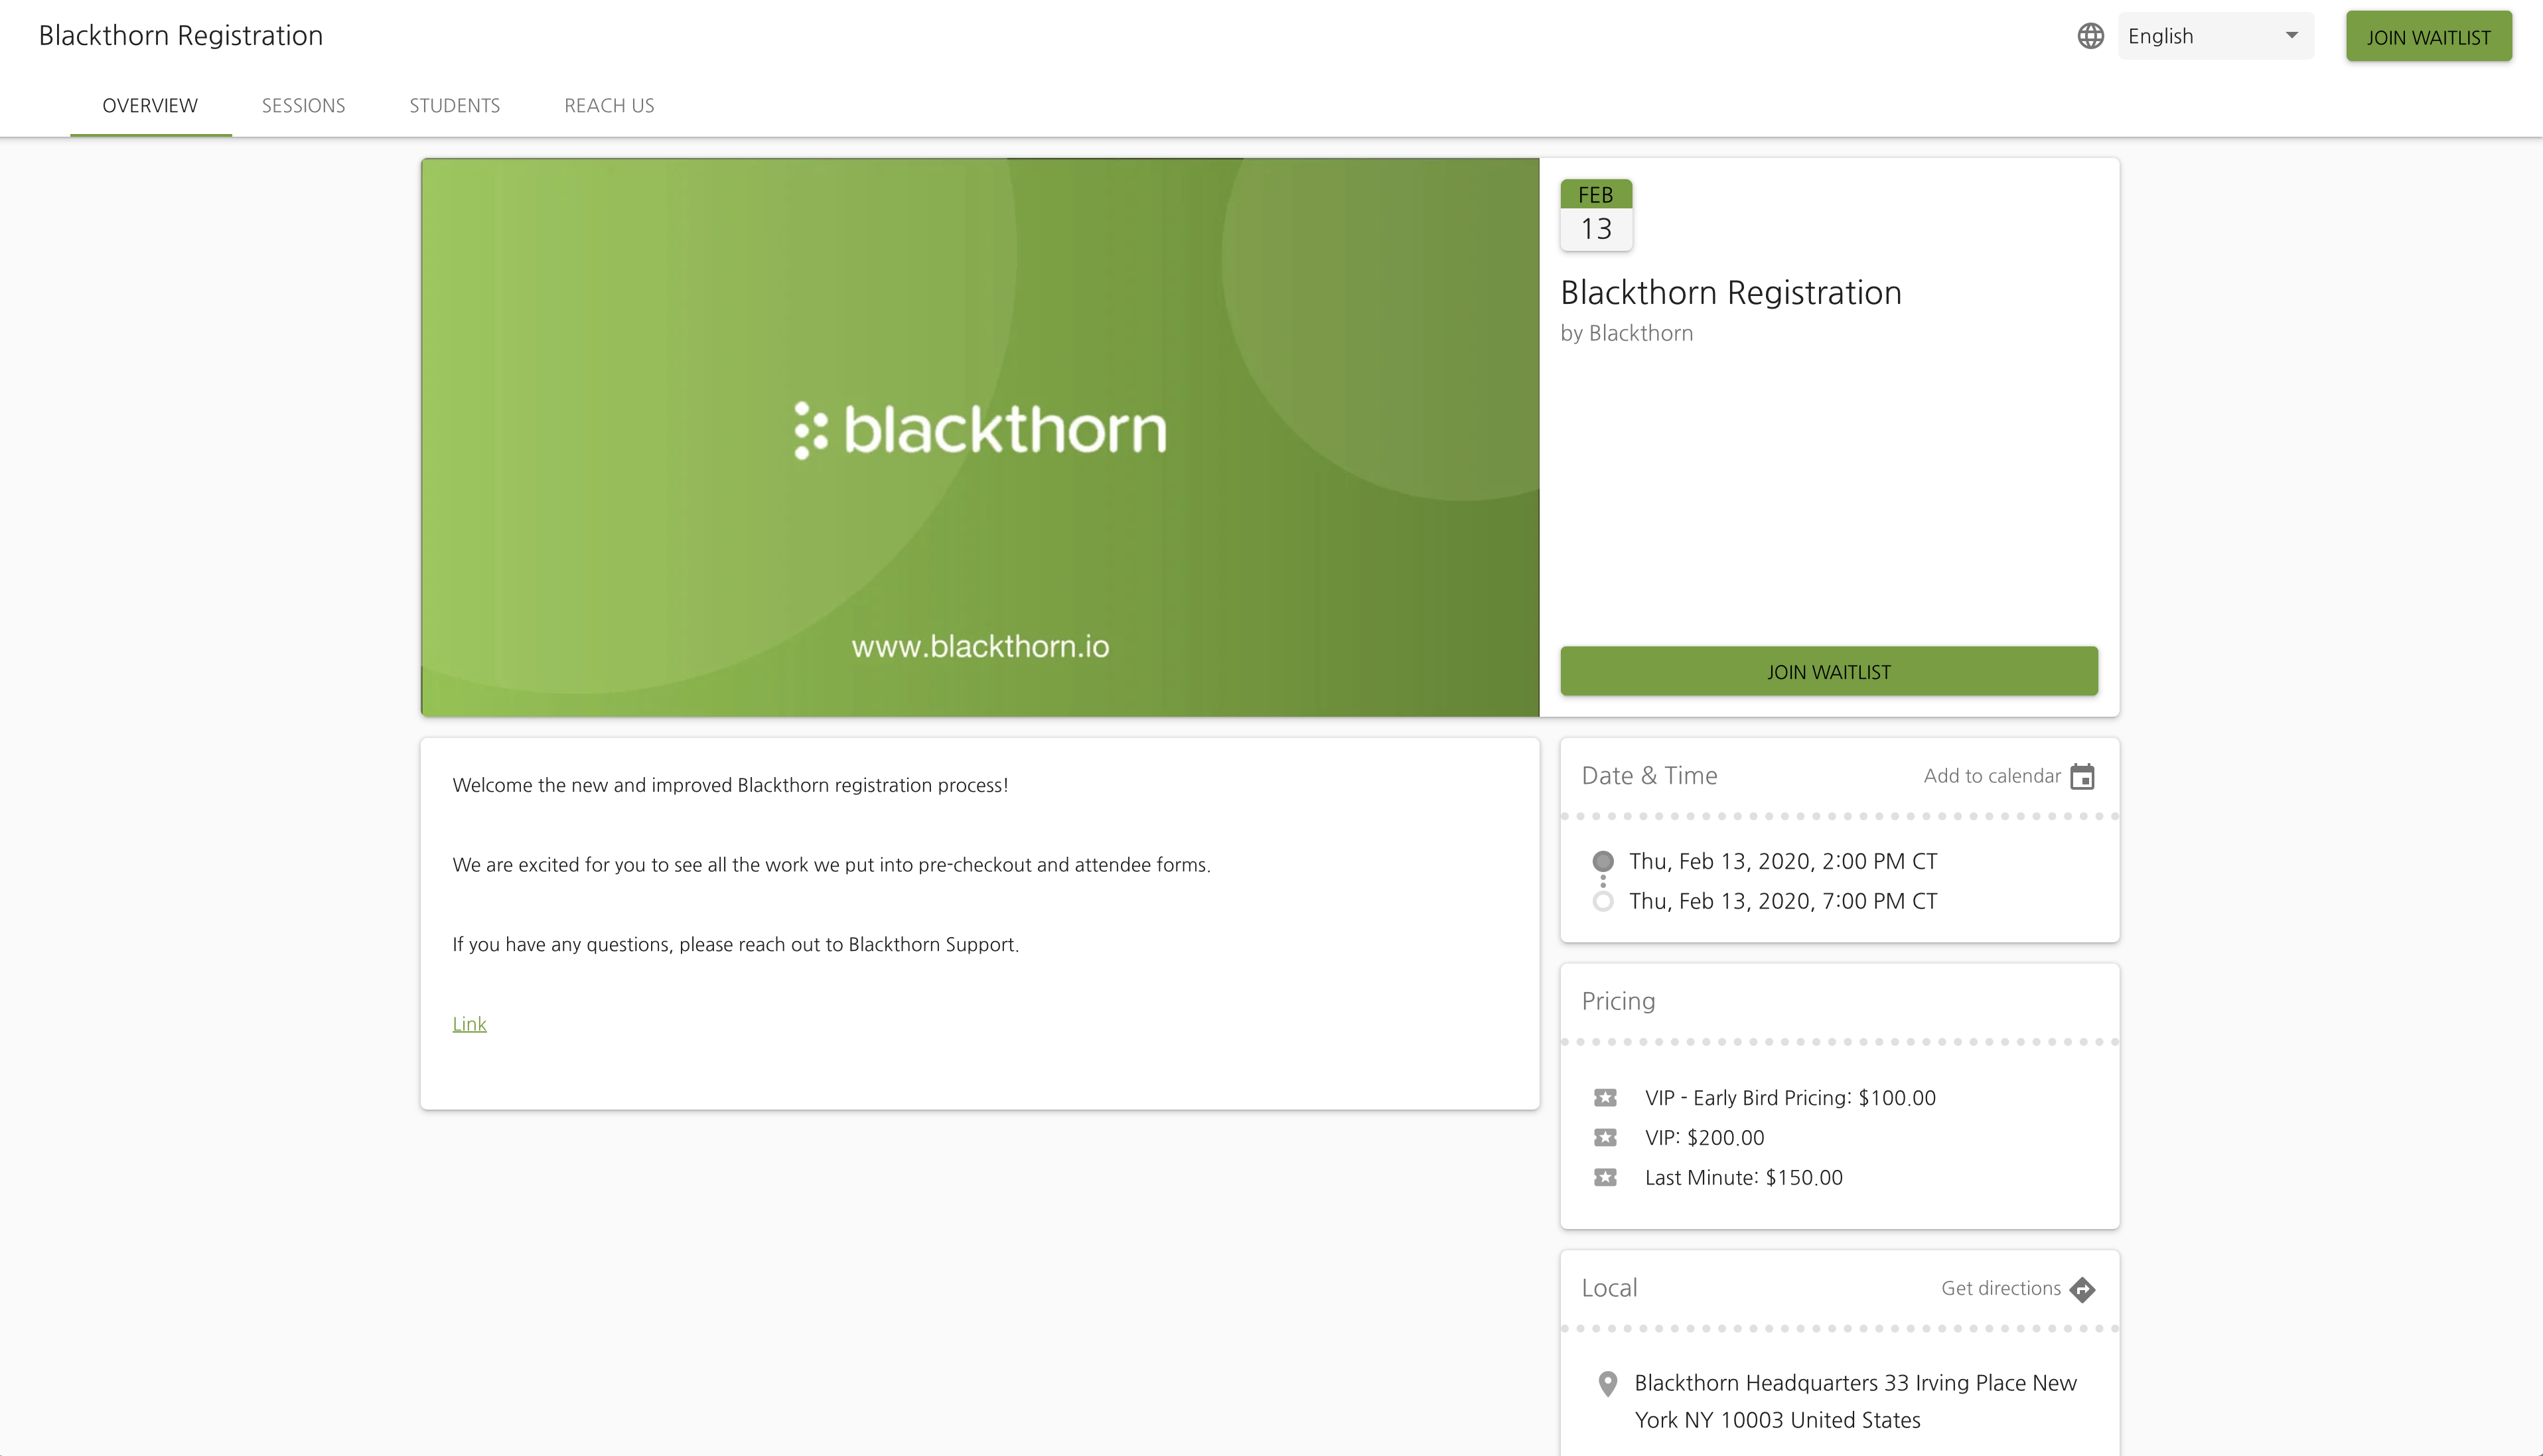
The Register button becomes the Join Waitlist button.
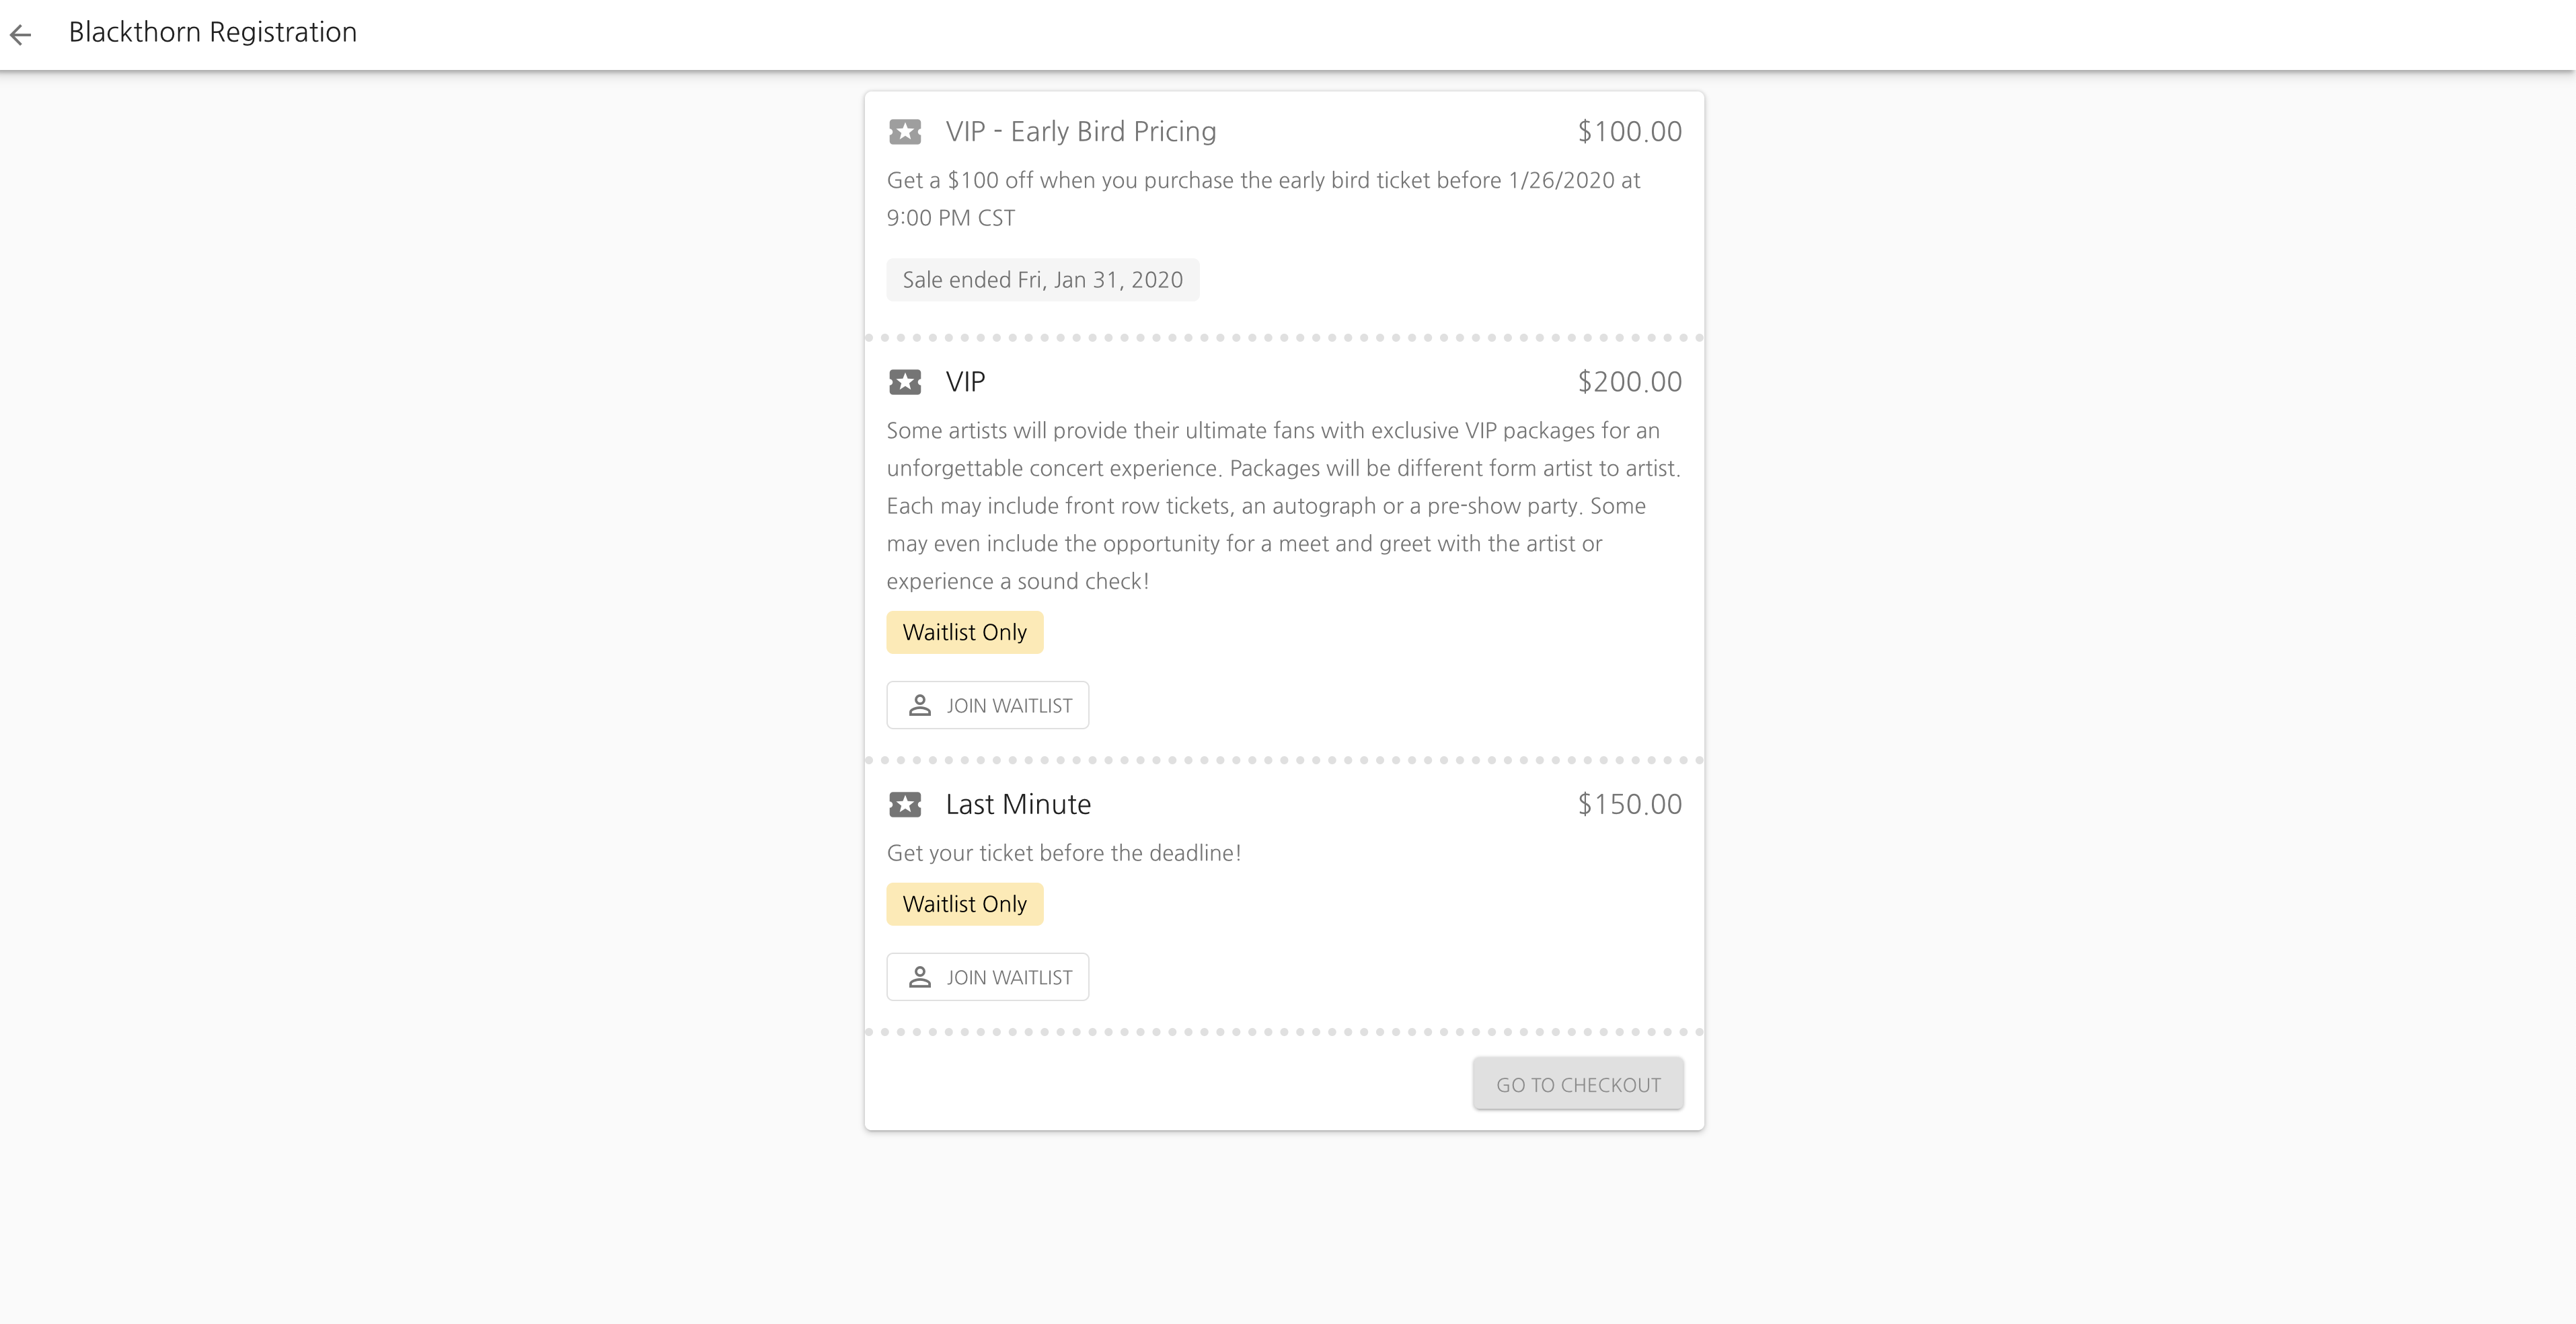
All Event Items that are available will have a "Waitlist Only" label.

The fields or questions included on the Attendee Form for an Event Item will be displayed when registering an Attendee for the waitlist.
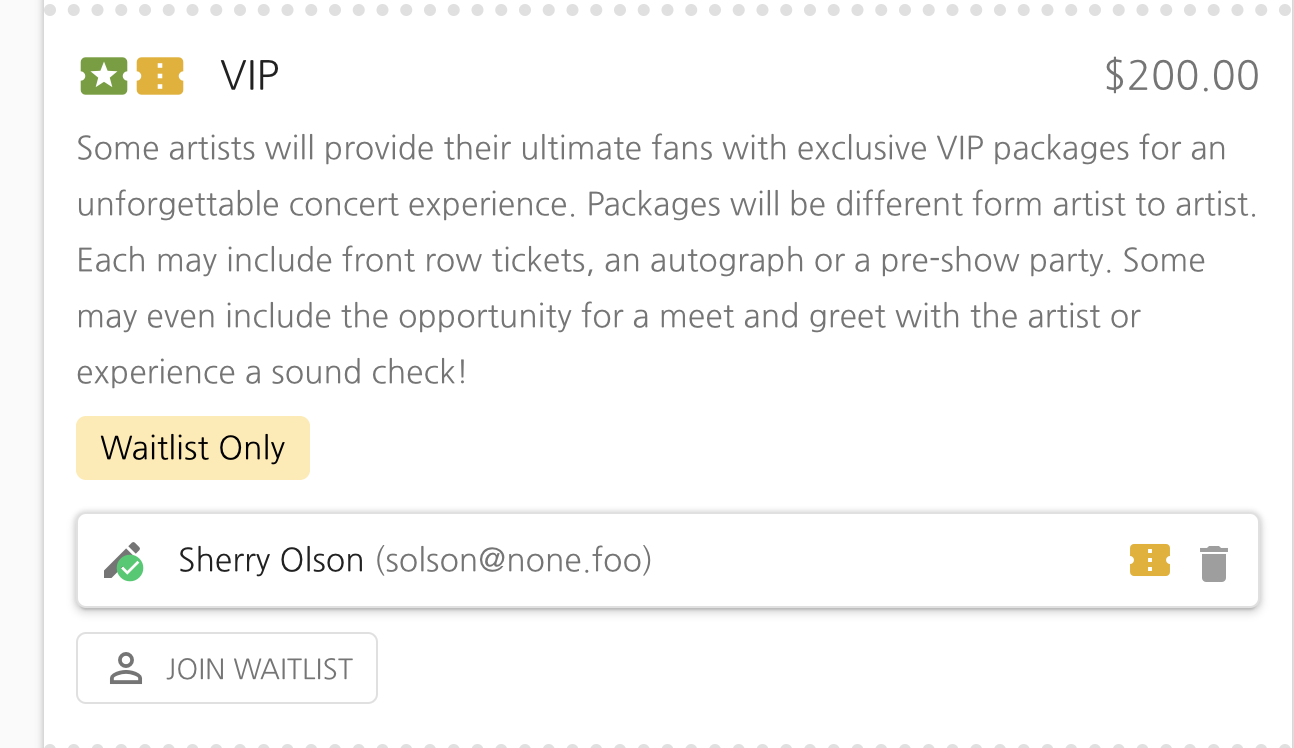
After defining the Attendee information, you'll see a yellow ticket next to them. This signifies the Attendee is on the waitlist.
Once a potential Attendee finishes registering, an Attendee record with the Registration Status of "Waitlisted - Pending" will be created. The Attendee will receive the email stored in the Waitlisted Email field. The out-of-the-box workflow/email template is provided, but will need to be activated.
Attendees won't be charged for paid registrations until they are removed from the waitlist.
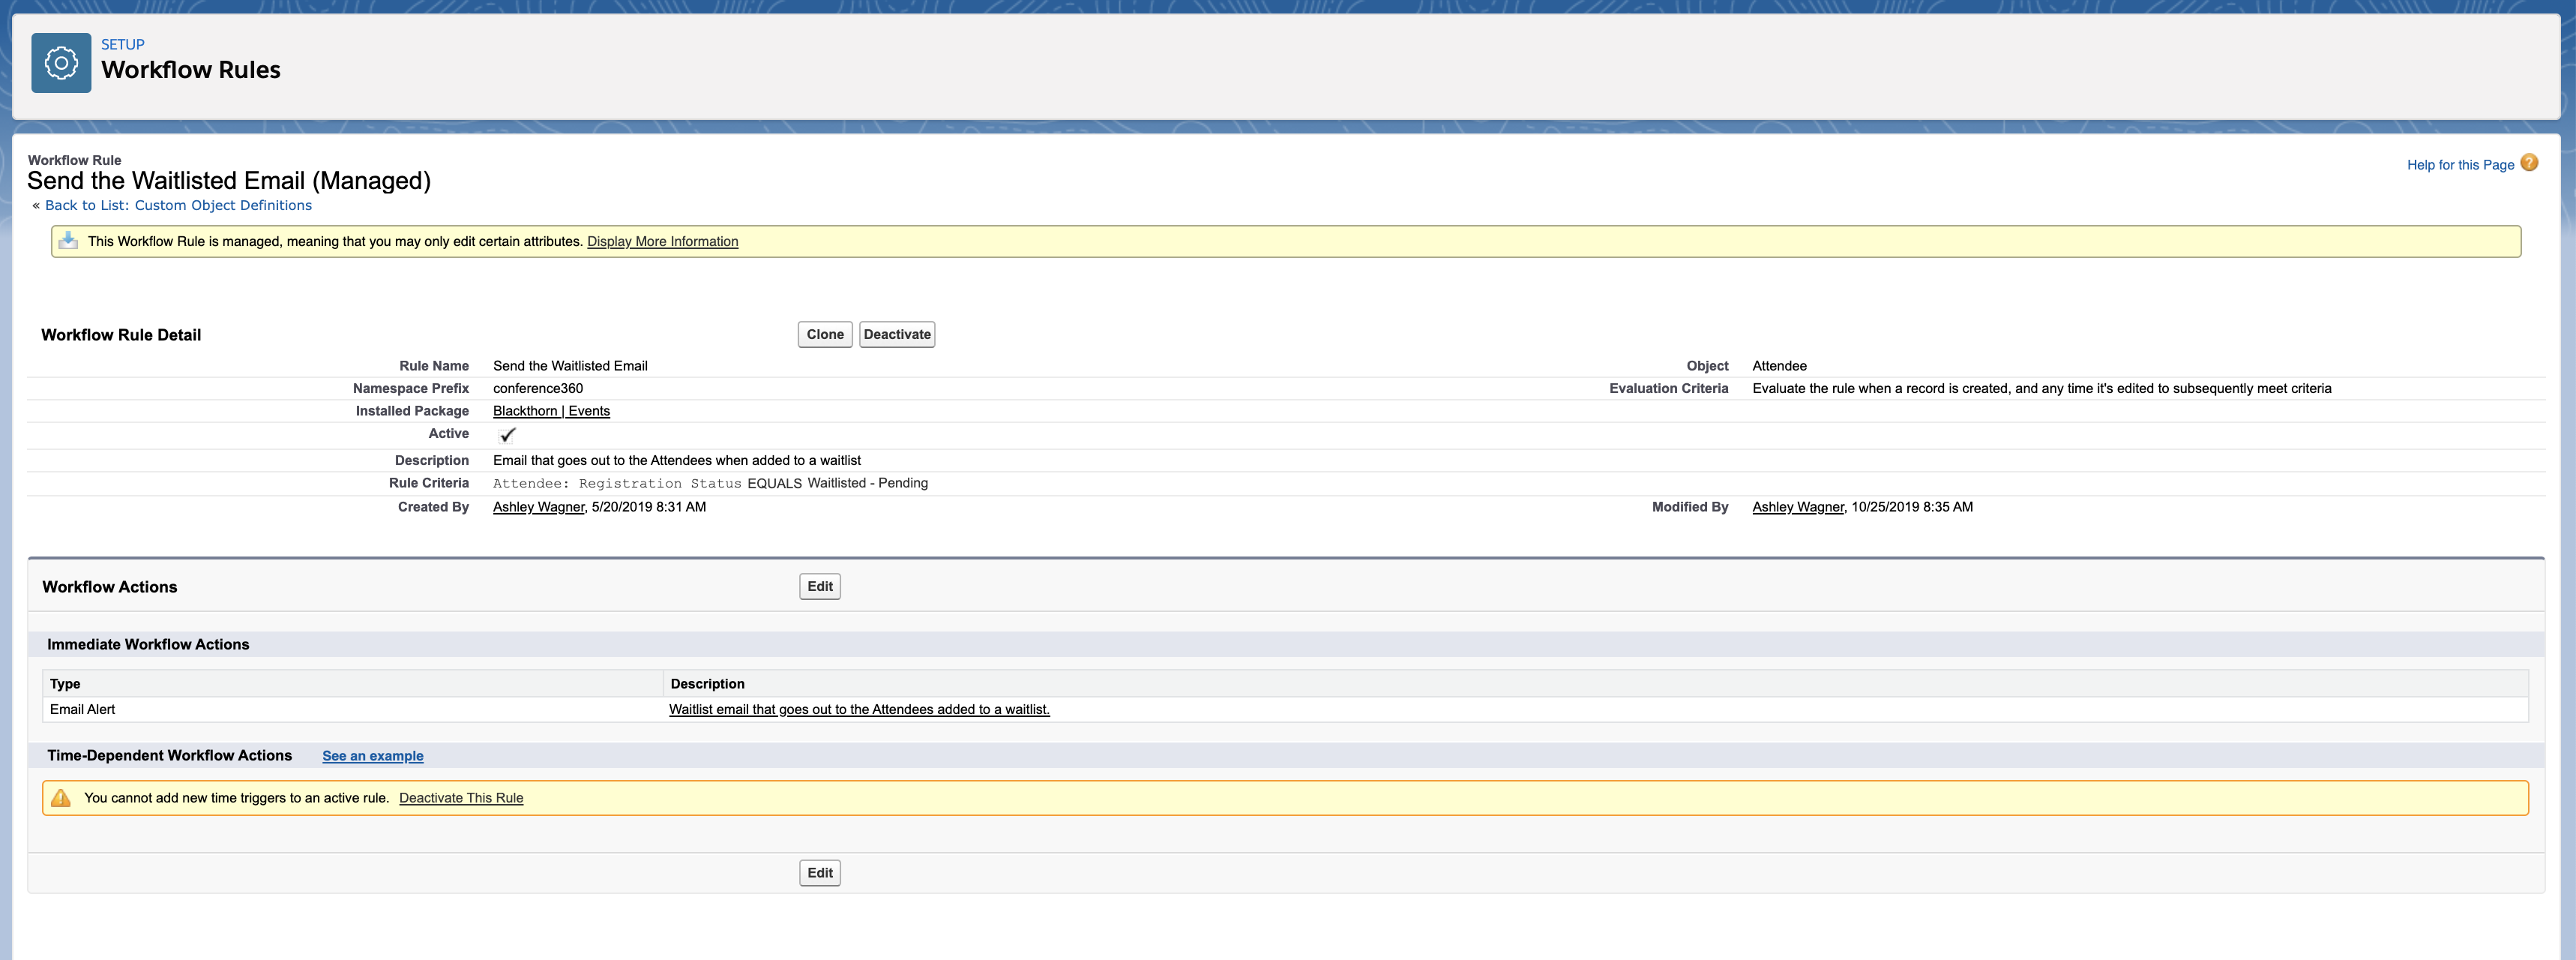
Activate this workflow to send out an automated waitlist email.

Waitlist Sequence
Salesforce tracks when an Attendee joins/registers for an Event’s waitlist.
This distinction is especially important when an Event Organizer manually creates an Attendee record and invites the Attendee to an Event. If the invited Attendee registers for the Event later, causing them to be added to the Event’s waitlist, Salesforce will track the date and time the Attendee joined the waitlist.
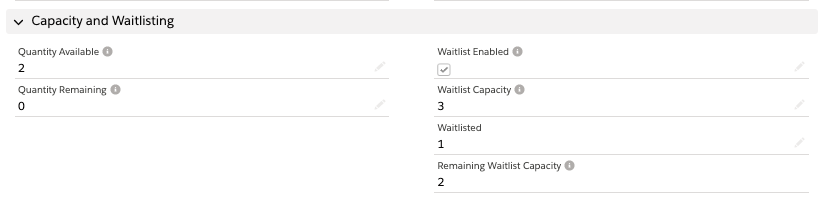
Waitlist Capacity
Define the Waitlist Capacity with the number of Attendees you will allow to waitlist. If you want to set an unlimited amount, simply set the field to "99999".
The Waitlisted and Remaining Waitlist Capacity fields are automatically updated based on the Attendees who are waitlisted.
Make sure the Total Capacity is defined.
Event level waitlist capacities will only be shown once waitlisting is active, not before. The number of Event Items remaining will be shown when Waitlist Enabled is selected on the Event level and the Remaining Waitlist Capacity is "10" or less.
Once the Remaining Waitlist Capacity = "0", then the Event will be marked as Sold Out.
Waitlist Emails
If you have activated our Waitlisted Email flow, when an Attendee's Registration Status is updated to "Waitlisted - Pending," an email is immediately sent to the Attendee.
Event Items and Waitlisting
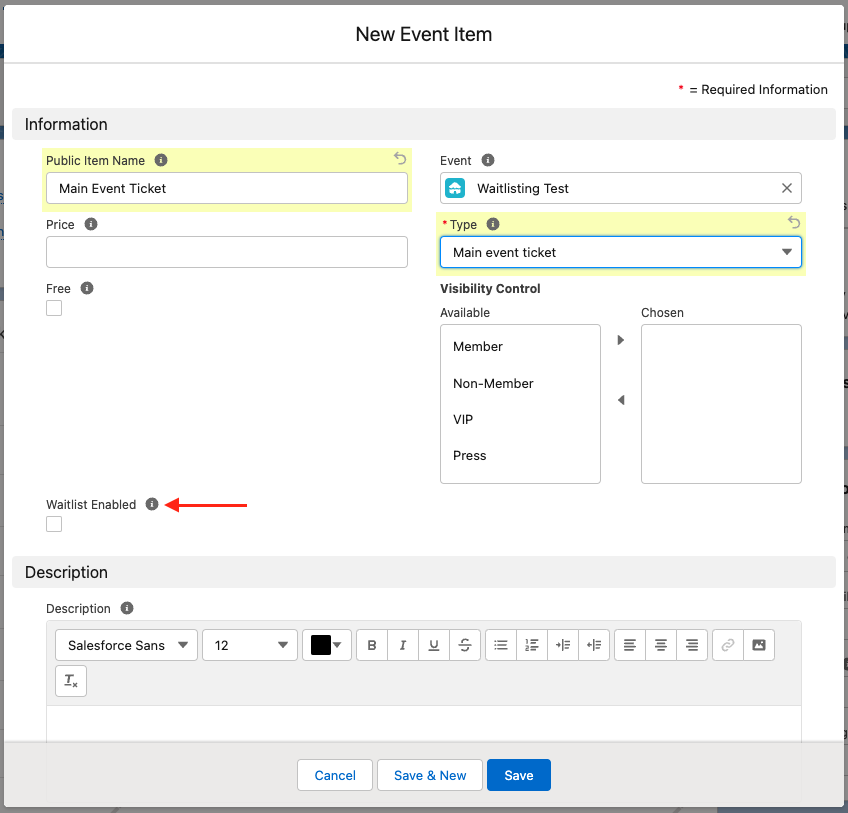
Enable waitlisting on the Event Item by checking the Waitlist Enabled field.
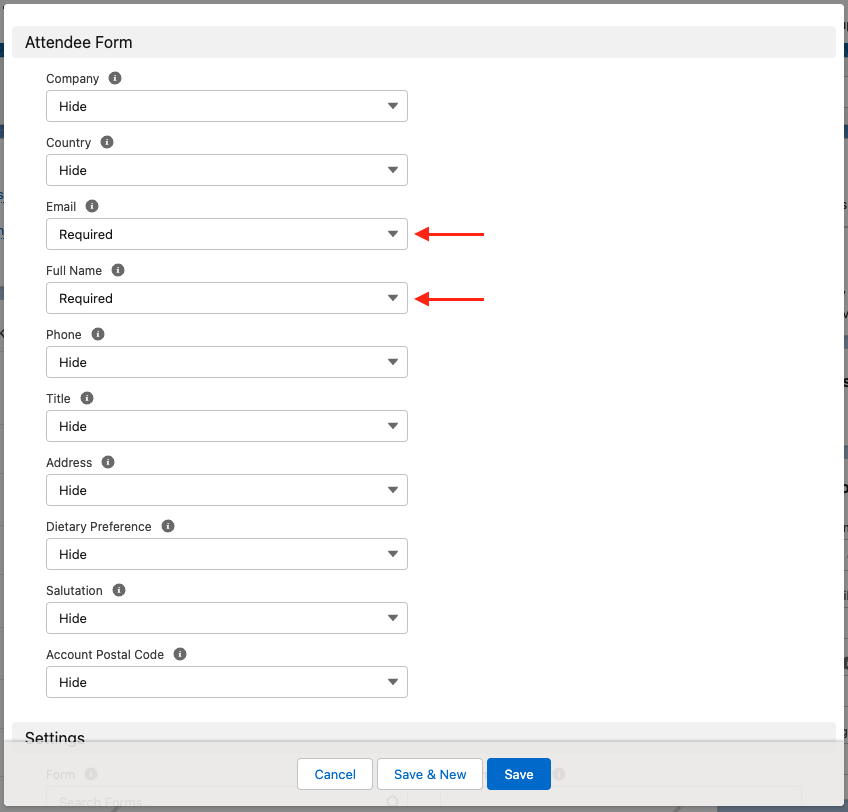
Set the Full Name and Email fields in the Attendee Form section to "Required".
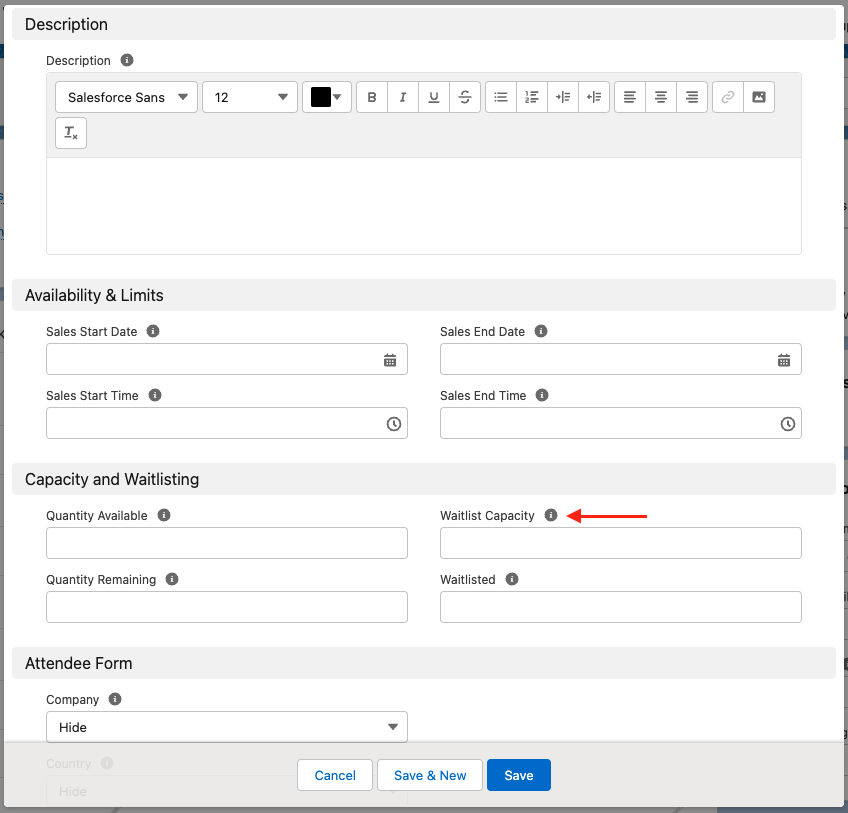
Enter the number of spots available on the waitlist in the Waitlist Capacity field. If you want to set an unlimited amount, enter "99999".
The Waitlisted and Remaining Waitlist Capacity fields are automatically updated based on the number of waitlisted Attendees.
Once the Remaining Waitlist Capacity = "0", then the Event Item will be marked as Sold Out.
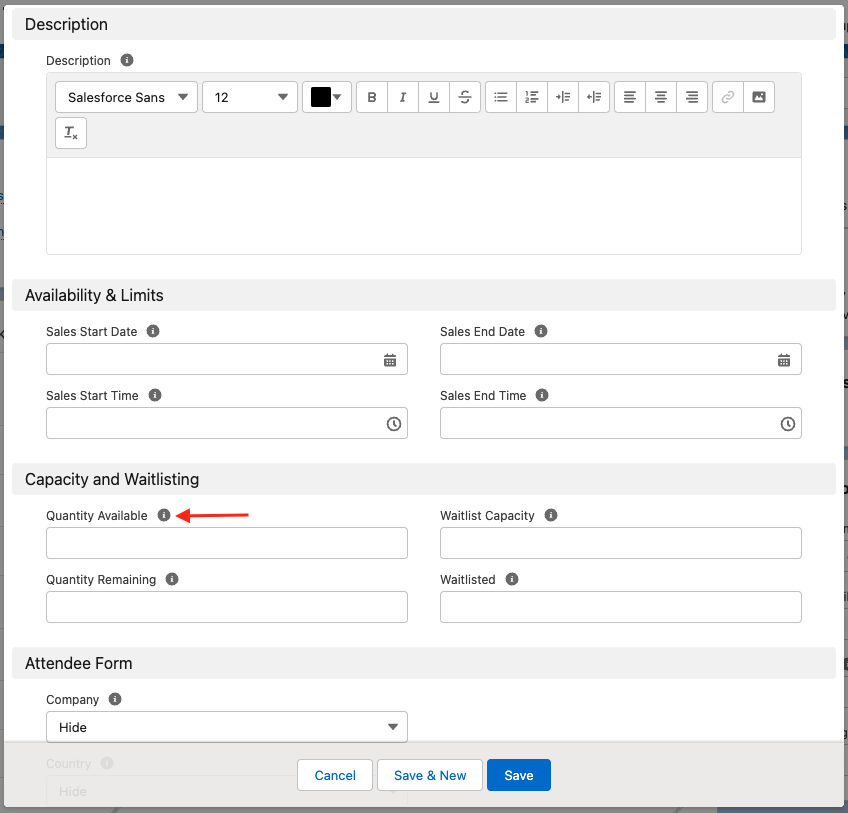
Enter an amount in the Quantity Available field.
The Quantity Available field must be defined. When Quantity Remaining = "0", Attendees will be waitlisted.
Quantity Remaining = "0", all subsequent Attendees will have a Registration Status = "Waitlisted - Pending".
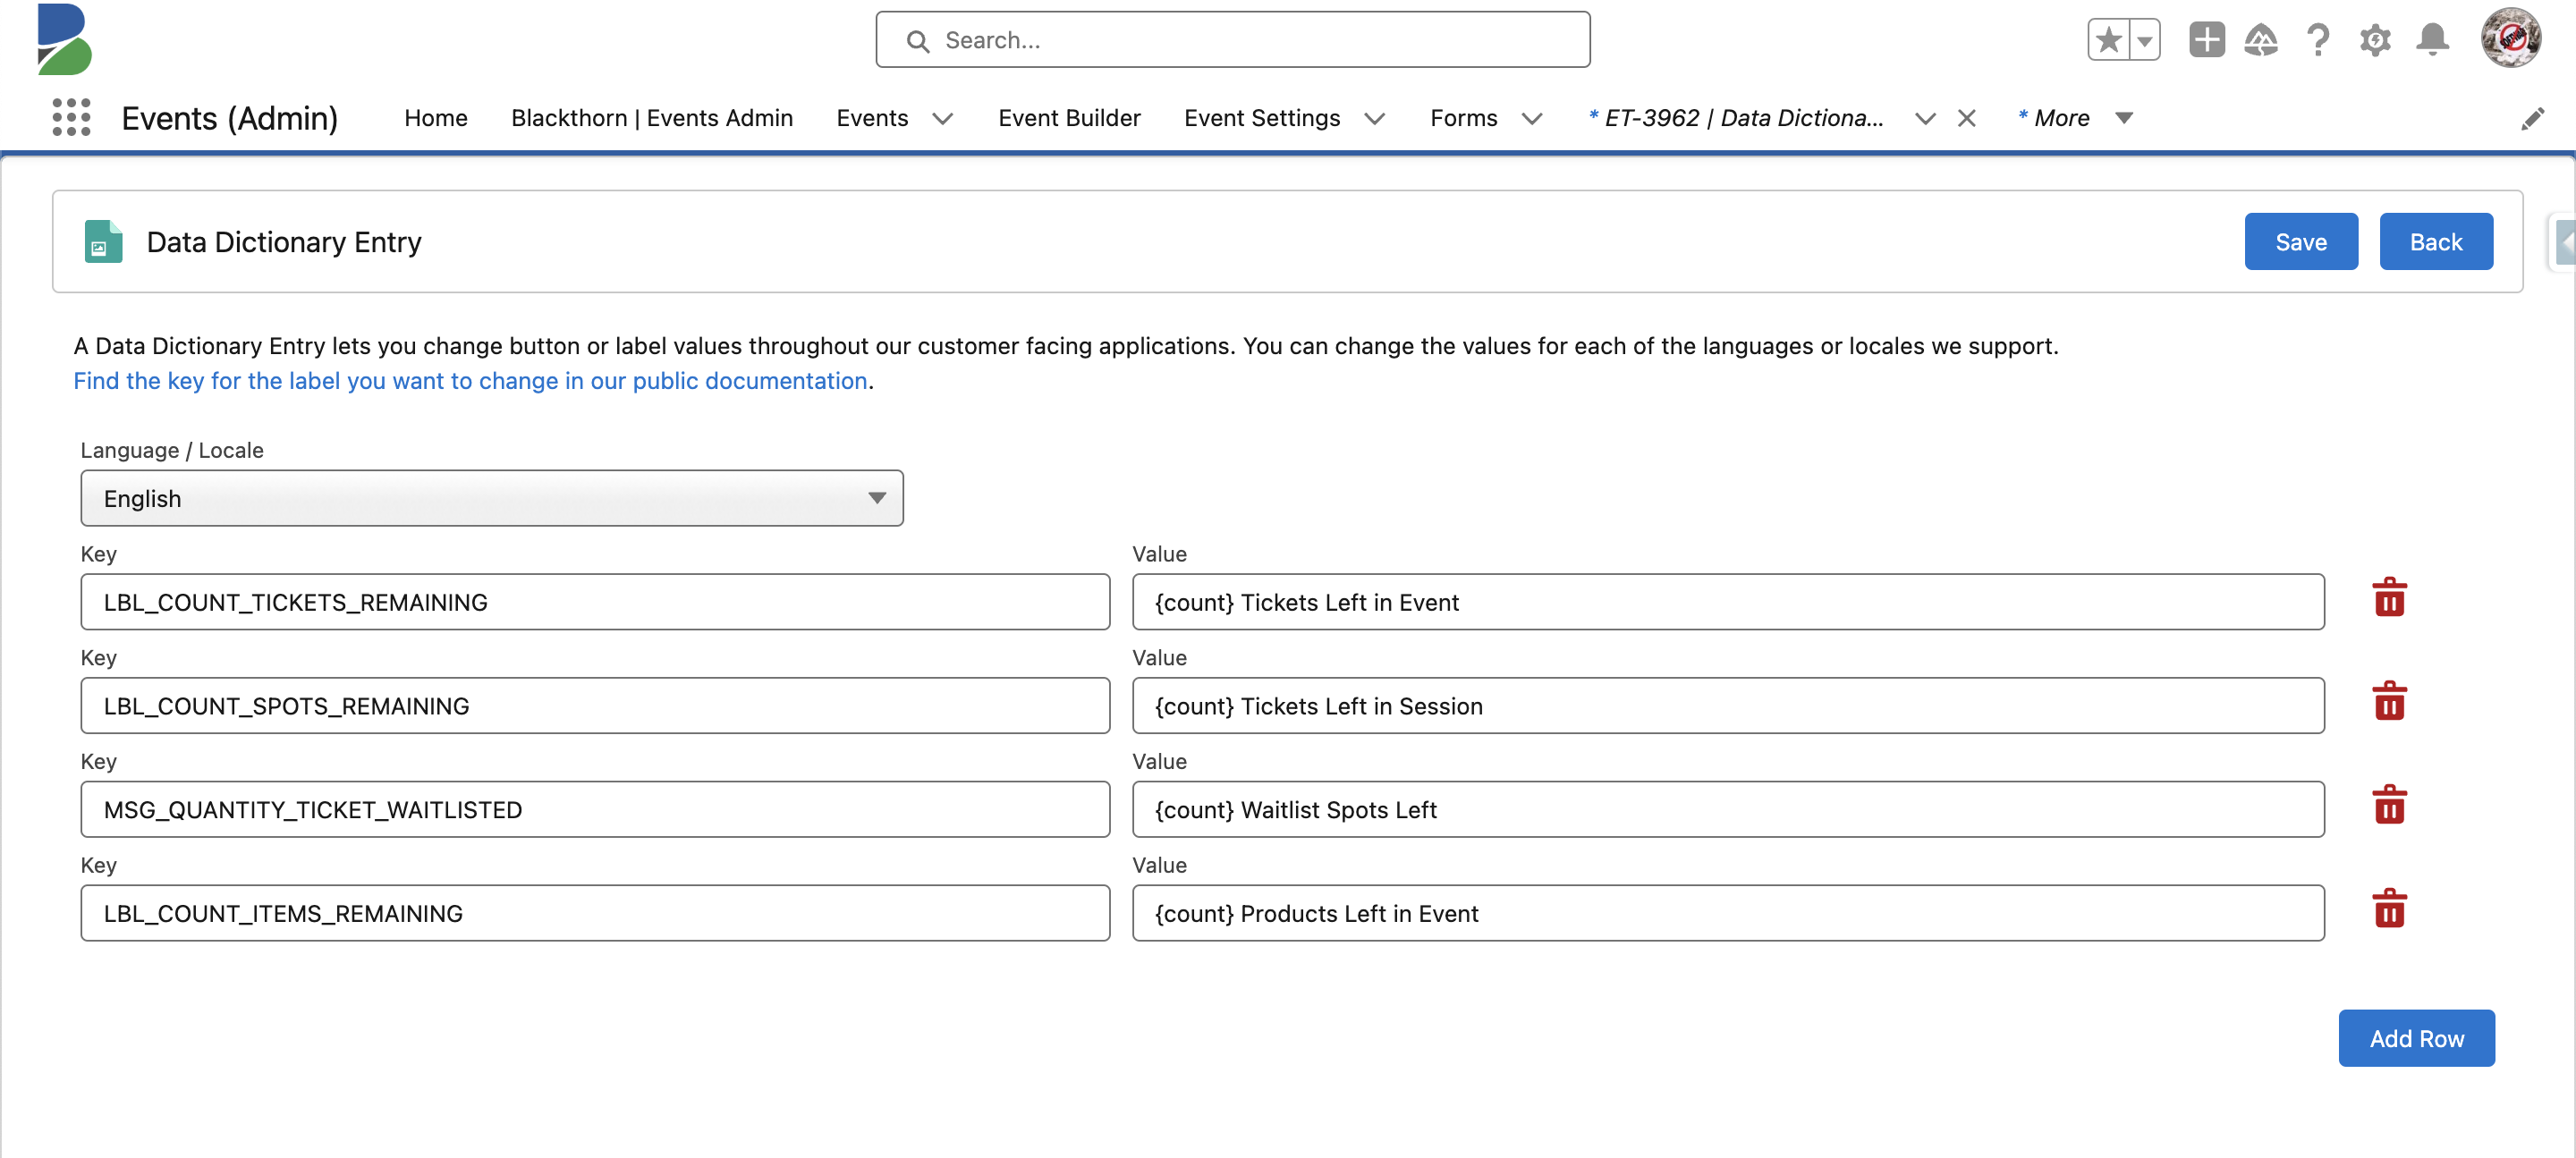
Data Dictionary and Waitlist Counts
The Data Dictionary can help Event Organizers inform potential Attendees of the number of available Tickets, Session spots, and Products using the following Keys.
- Key = “LBL_COUNT_TICKETS_REMAINING”
- Key = “LBL_COUNT_ITEMS_REMAINING”
- Key = “LBL_COUNT_SPOTS_REMAINING”
- Key = “MSG_QUANTITY_TICKET_WAITLISTED”
IMPORTANT NOTE: These Keys do not work for Donations.
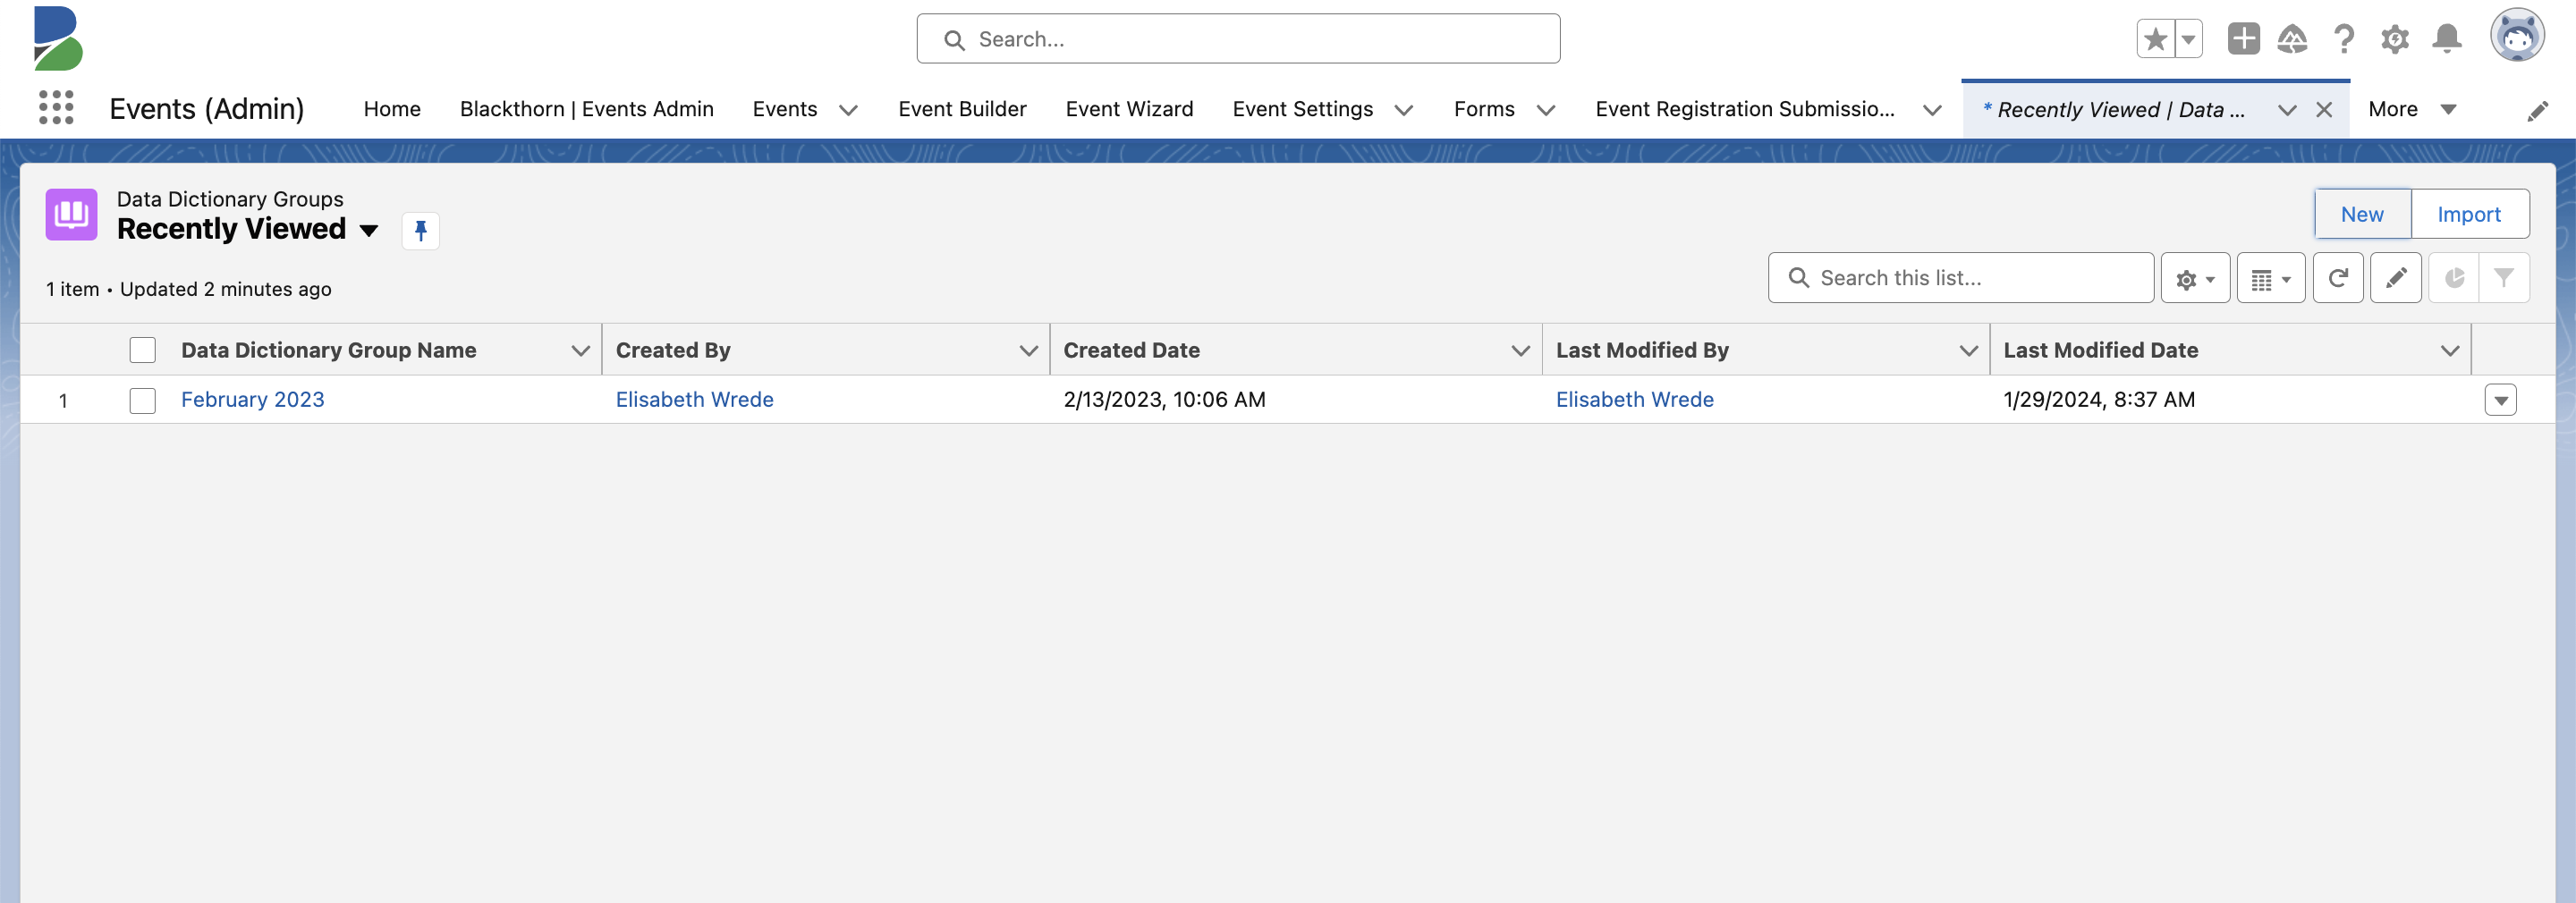
Create a Data Dictionary Group
- In the App Launcher, enter and click "Data Dictionary Group".
- Click New.
- Enter a Data Dictionary Group Name.
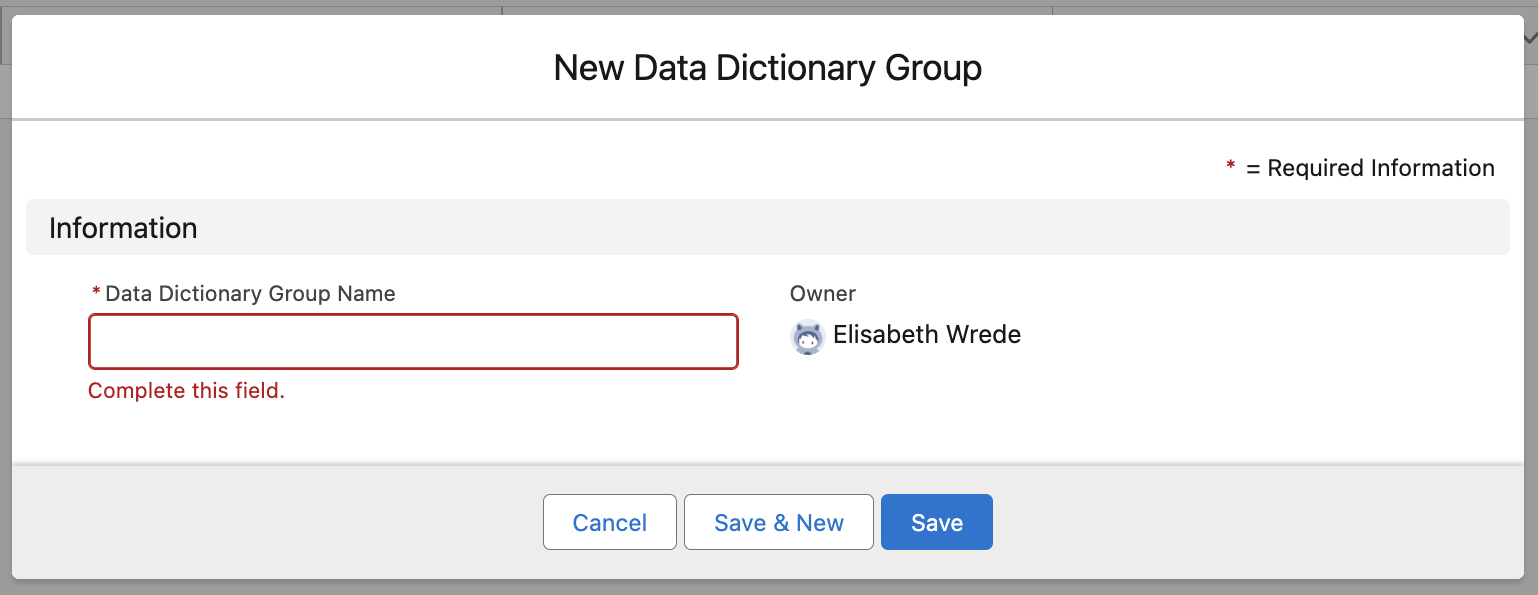
- Click Save.
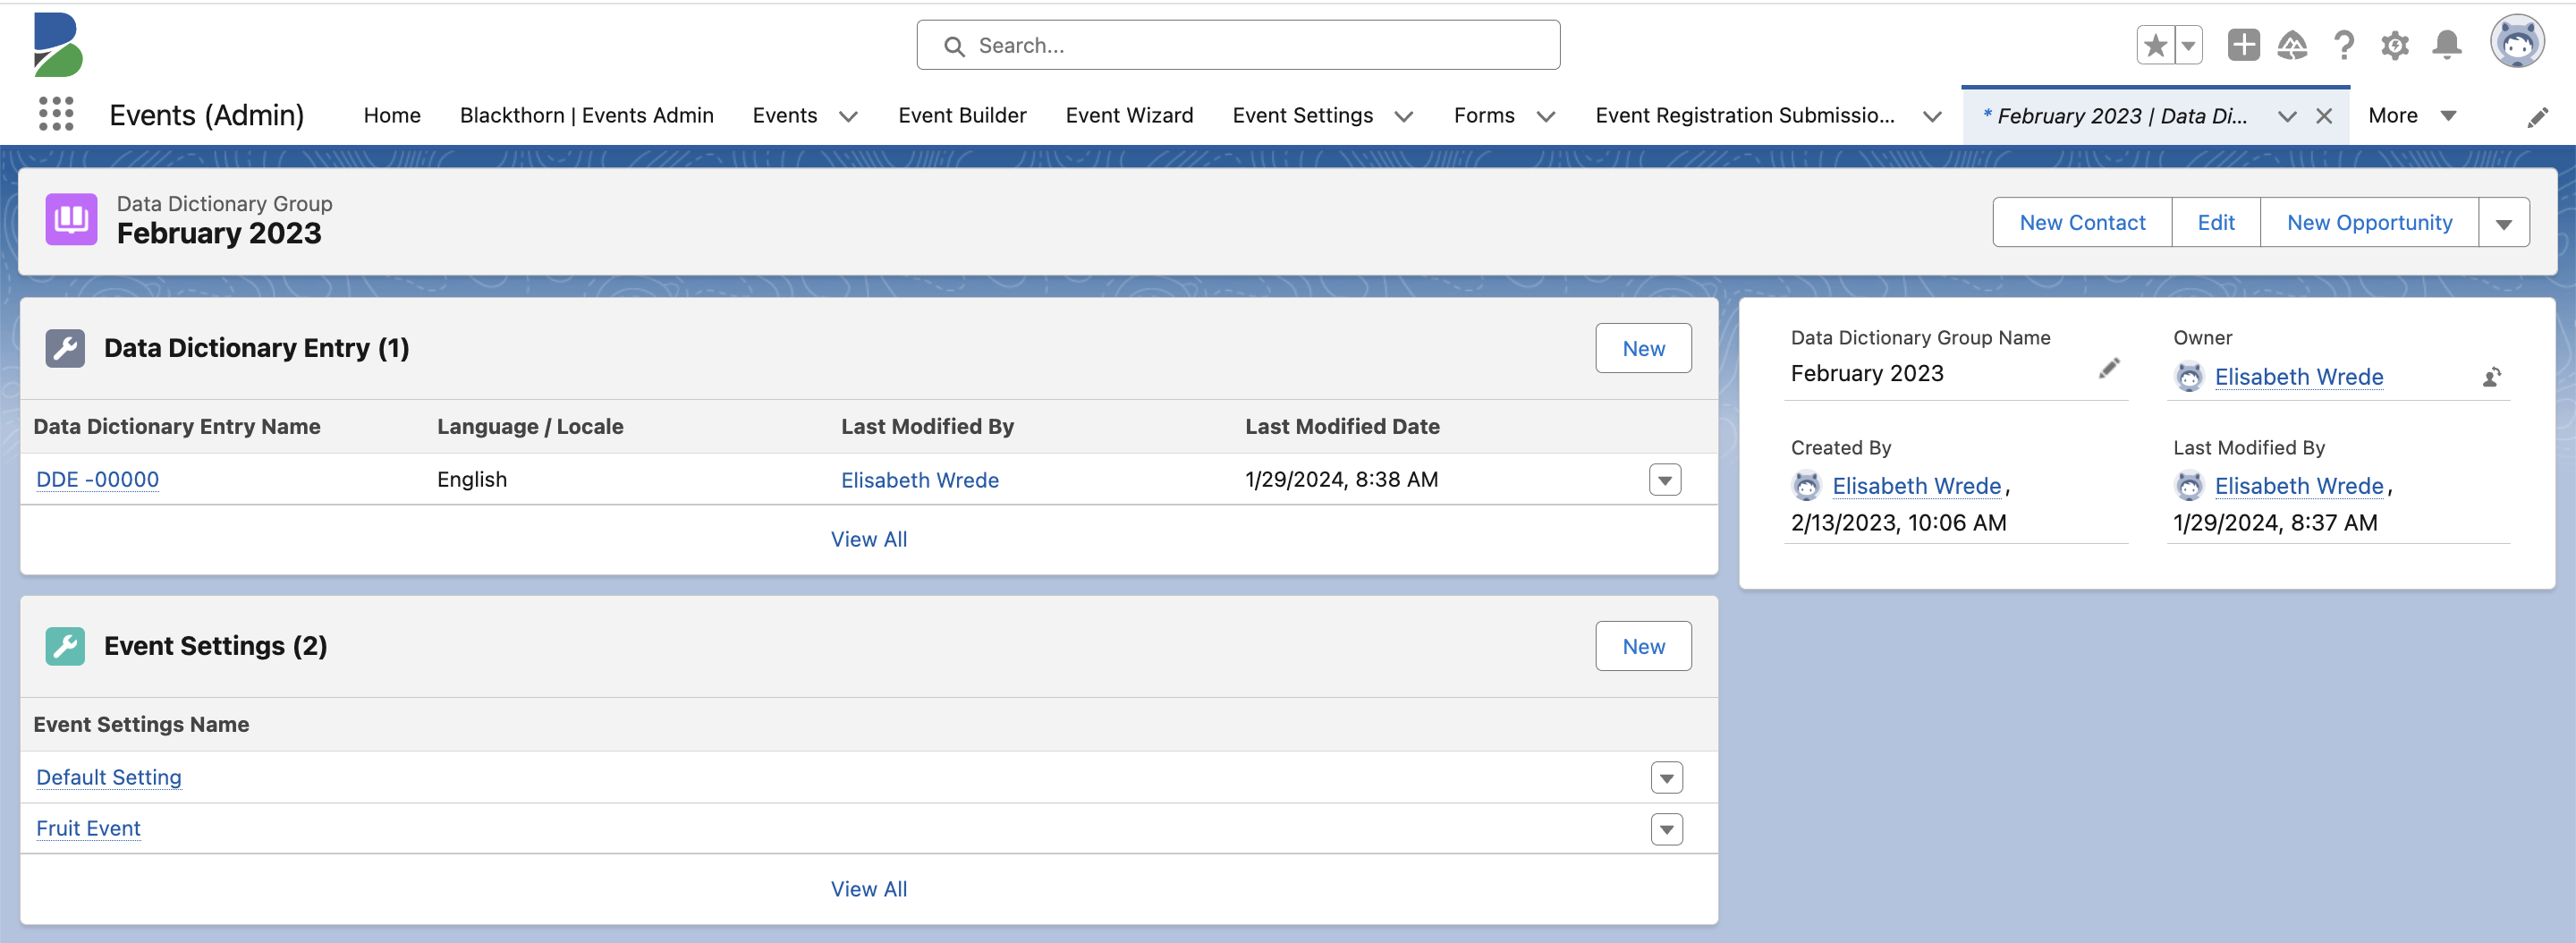
Create Data Dictionary Entries
To show the amount of available Tickets, Sessions, or Products, you must include "{count}" in the Value field.
- Click New next to the Data Dictionary Entry. In a Data Dictionary Group, each Data Dictionary Entry can only support one language.
- In this example, we’ll set Language / Locale to “English.”
- For Event Items with Typeset to “Main event ticket” or “Guest,”
- Set Key = “LBL_COUNT_TICKETS_REMAINING”
- Set Value = “{count} Tickets Left in Event”
- Click Add Row.
- For Event Items with Typeset to “Other” (Products),
- Set Key = “LBL_COUNT_ITEMS_REMAINING”
- Set Value = “{count} Products. Left in Event"
- Click Add Row.
- For Sessions,
- Set Key = “LBL_COUNT_SPOTS_REMAINING”
- Set Value = “{count} Tickets Left in Session”
- Click Add Row.
- For waitlisted Tickets (Event Items with `Type` set to “Main event ticket” or “Guest”),
- Set Key = “MSG_QUANTITY_TICKET_WAITLISTED”
- Set Value = “[count] Waitlist Spots Left”
- Click Save.
- Click Back to return to the Data Dictionary Group record.
Click here for the full Events Data Dictionary list.
Session Waitlisting
Enable waitlisting on Sessions by checking the Waitlist Enabled field.
Define the Waitlist Capacity if there is one. If there is unlimited capacity, leave that field blank.
The Waitlisted and Remaining Waitlist Capacity fields are automatically updated based on the Attendees who are waitlisted.
Define the Quantity Available field. The Quantity Available field needs to be defined so that when the Quantity Remaining = "0", Attendees will be waitlisted.
Once the Quantity Remaining = "0", then all the subsequent SessionAttendees will have a Registration Status = "Waitlisted - Pending".
Once the Remaining Waitlist Capacity = "0", the Session will be Sold Out.
A waitlisted Attendee will NOT be removed automatically from a Session waitlist once a spot becomes available. If you haven’t enabled waitlist automation, your organization must define its own process to promote and notify (or use the workflow rule for email send) waitlisted Session Attendees.
Automate the Waitlist
Automating the waitlist means Event Organizers no longer need to manage it manually. Instead, Attendees are added to the waitlist automatically. The process uses the date and time of the Attendee record’s creation to determine the Attendee’s place in line.
To activate automatic waitlisting, use the Event Settings’ Waitlisting: Automate field. (If the Waitlisting: Automate field isn’t on the Event Settings page layout, use the steps below to add it.)
To explain how waitlisting works, we’ll use an example with Attendee A and Attendee B.
Set Waitlisting: Automate to "Yes" to turn on the automation. (The default setting is “Yes.”)
Attendee A’s Registration Status is set to "Registered." Attendee B’s Registration Status is set to "Waitlisted – Pending." Attendee A updates their Registration Status to “Declined” or “Canceled.”
This change causes Attendee B’s Registration Status to change to “Pending.” Attendee B will receive an email with their AttendeeLink to complete their registration.
While Attendee B's Registration Status is set to "Pending," no other Attendees can register for the Event until Attendee B accepts or declines the invitation.
At the same time, if Attendee C, who is registered for the Event, cancels their registration, Attendee D, who is on the waitlist, will have their Registration Status updated to "Pending."
If you want to manage the waitlist manually or if the automated waitlist sequence based on the Attendee record’s creation date and time does not meet your requirements, set the Event Settings’ Waitlisting: Automate to “No.”
Limitation: Attendee Groups
When a primary Attendee is created or invited, and additional Attendees are added during registration, the automated waitlist may behave unexpectedly. For example, members of an Attendee Group may not receive the next available waitlist spot(s) together.
Add the Waitlisting: Automate Field
Click the Gear icon.
Click Setup.
Click the Object Manager tab.
In the Quick Find box, enter and click “Event Settings”.
Click the Page Layout tab.
Click Event Settings Layout.
Drag and drop the Waitlisting: Automate field on to the page layout.
Click Save.
Remove an Attendee from the Waitlist
Complete the following steps to remove an Attendee from an Event or Event Item waitlist. Once that is done, the Attendee will be able to complete the registration process.
Enable the workflow/email template that notifies the Attendee that they are off the waitlist.
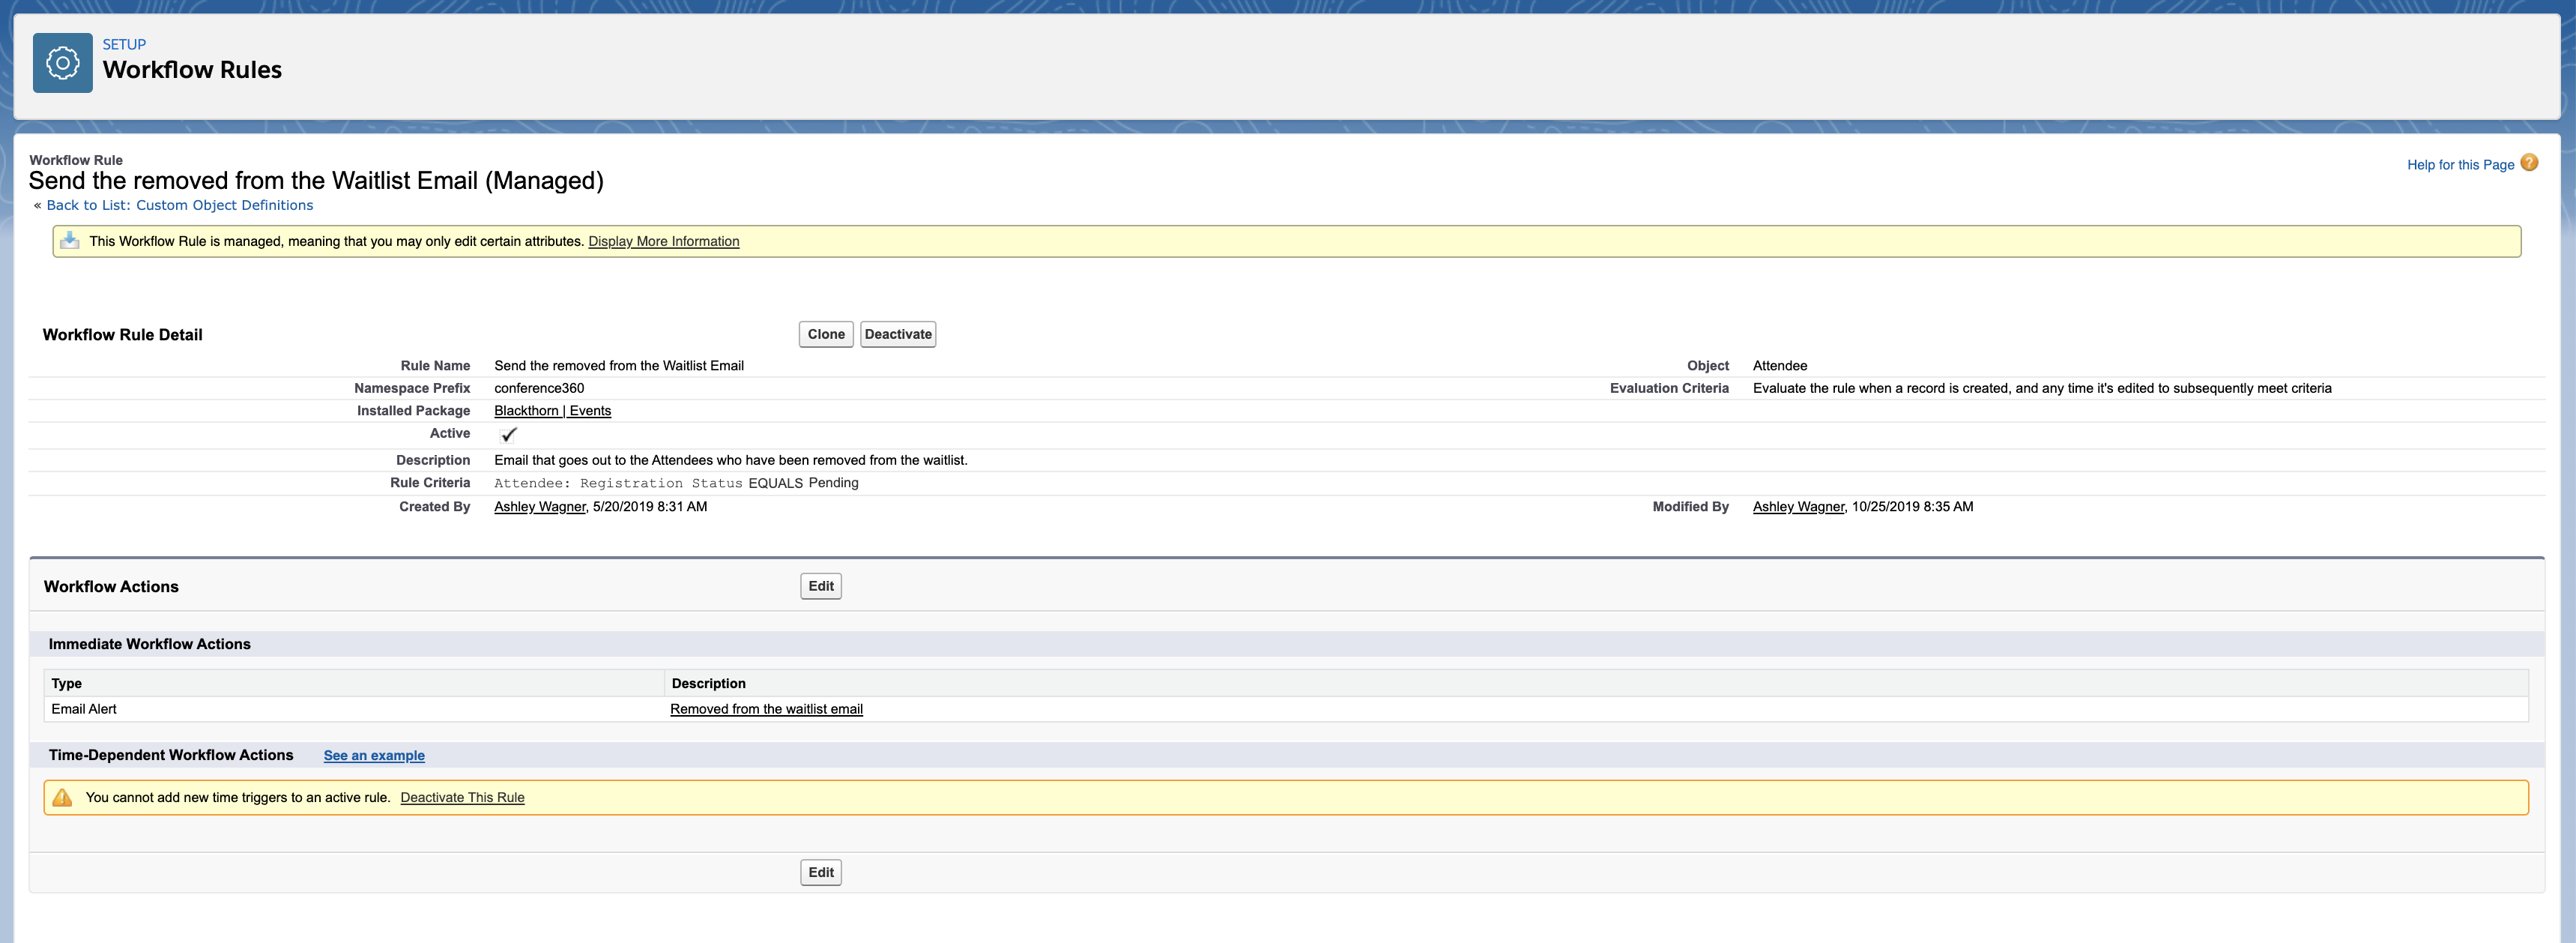
Update the Attendee's Registration Status to "Pending". This will trigger the workflow rule to send an email to the Attendee, inviting them to complete their registration through the AttendeeLink.
Since the Attendee's Registration Status is "Pending" and an Event Item was already selected, they only need to answer any custom questions and pay for the Event Item. (Attendees cannot add additional Event Items or change their Event Item type.)
Waitlisted Attendees can also remove themselves from an Event's waitlist via their AttendeeLink if the Event Settings' Enable Cancel Registration field is set to "Yes."
What happens when a registered Attendee is deleted?
When a spot becomes available by an Attendee canceling their registration or an Event Organizer deleting the Attendee record or increasing the capacity, the waitlist automation will perform the following steps.
The Registration Status of the person at the top of the waitlist will automatically be updated to “Pending”.
A waitlist pending email will be sent to that individual.
Note: The deleted Attendee will NOT receive an email letting them know they are no longer registered since the email can’t be tied to the Attendee once the Attendee record is deleted.