Each tab/section and feature of our listing, overview, and pre-checkout is configurable. On the Event Settings page, you can set each tab to “Always” or “Hide”. Some of the tabs can also be set to “Post-Registration”. If you leave a tab blank, the tab setting will default to "Hide."
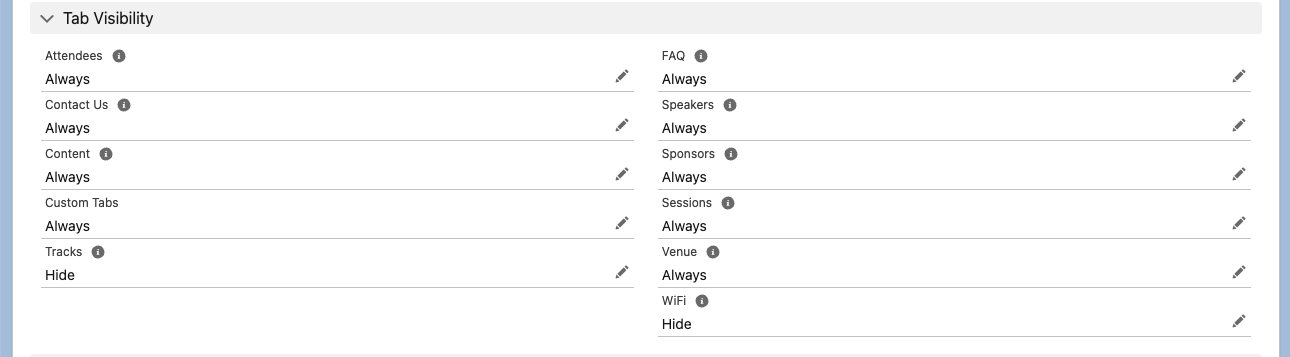
While the visibility can be adjusted, the order or placement of the tabs on the Event webpage cannot be changed.
If you would like to configure other labels, check out our Data Dictionary / Translations, which allows you to override almost any text.
Attendees
Always
Anyone can see the list of Attendees who have registered for an Event on the Attendees tab.
Go to the Event Settings record.
Click the Pencil icon.
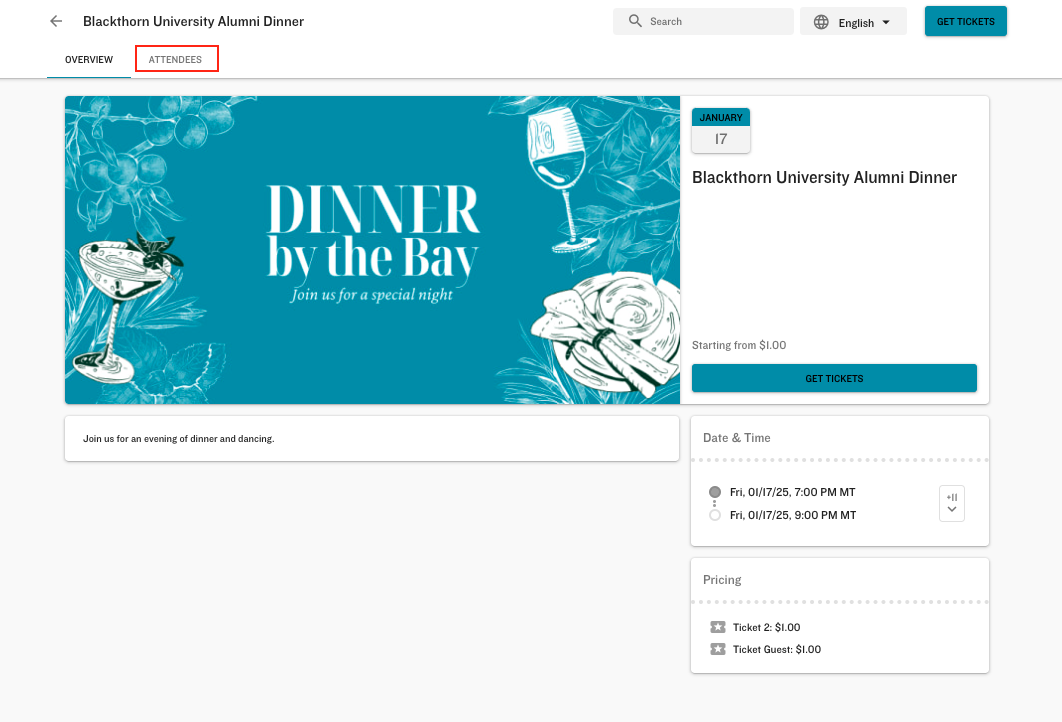
Set Attendees to “Always.”
Click Save.
Go to the related Event record.
Click Update.
The Attendees tab will be located at the top of the Event’s webpage. The Attendee’s Attendee Full Name and company name (Contact Account Name) will be visible.
Post Registration
Only registered Attendees can see other Attendees who have registered for the Event.
Go to the Event Settings record.
Click the Pencil icon.
Set Attendees to “Post-Registration.”
Click Save.
Go to the related Event record.
Click Update.
To see the Attendees tab, Attendees must go to their AttendeeLink and click Done.
Hide
No one will see the Attendees tab.
Go to the Event Settings record.
Click the Pencil icon.
Set Attendees to “Hide.”
Click Save.
Go to the related Event record.
Click Update.
Contact Us
Before you can make the Contact Us tab visible, you must enter an email address in the Contact Us Email field on the Event record. Click here for more information about the Contact Us feature.
Always
Anyone can see the Contact Us tab and the email address in the Event’s Contact Us Email field.
Go to the Event Settings record.
Click the Pencil icon.
Set Contact Us to “Always.”
Click Save.
Go to the related Event record.
Click the Pencil icon next to the Contact Us Email field and enter an email address.
Click Save.
Click Update.
The Contact Us tab will be located at the top of the Event’s webpage.
Post-Registration
Only registered Attendees can see the Contact Us tab and the email address in the Event’s Contact Us Email field.
Go to the Event Settings record.
Click the Pencil icon.
Set Contact Us to “Post-Registration.”
Click Save.
Go to the related Event record.
Click the Pencil icon next to the Contact Us Email field and enter an email address.
Click Save.
Click Update.
To see the Contact Us tab, Attendees must go to their AttendeeLink and click Done.
Hide
No one can see the Contact Us tab.
Go to the Event Settings record.
Click the Pencil icon.
Set Contact Us to “Hide.”
Click Save.
Go to the related Event record.
Click Update.
Content
Before you can make the Content tab visible, you must create an Event Content record and attach it to the Event. Click here for more information about the Event Content record.
Always
Anyone can see the Content tab on the Event webpage.
Go to the Event Settings record.
Click the Pencil icon.
Set Content to “Always.”
Click Save.
Go to the related Event record.
Click New next to the Event Content Related List.
Complete the following fields.
Content Name (required)
URL (required)
Type
Description
Click Save.
Click Update on the Event record.
The Content tab will be located at the top of the Event’s webpage. NOTE: The Content tab will be hidden by default if no Event Content records are related to the Event.
Post-Registration
Only registered Attendees can see the Content tab.
Go to the Event Settings record.
Click the Pencil icon.
Set Content to “Post-Registration.”
Click Save.
Go to the related Event record.
Click New next to the Event Content Related List.
Complete the following fields.
Content Name (required)
URL (required)
Type
Description
Click Save.
Click Update on the Event record.
To see the Content tab, Attendees must go to their AttendeeLink and click Done.
Hide
No one can see the Content tab.
Go to the Event Settings record.
Click the Pencil icon.
Set Content to “Hide.”
Click Save.
Go to the related Event record.
Click Update.
Custom Tabs
Before you can make a Custom tab visible, you must create a Custom Content record from the Event record. Click here for more information about Custom Content.
Always
Anyone can see the Custom Tab on the Event webpage.
Go to the Event Settings record.
Click the Pencil icon.
Set Custom Tabs to “Always.”
Click Save.
Go to the related Event record.
Click New next to the Custom Content Related List.
Complete the following fields.
Custom Content (required)
Content
Click Save.
Click Update on the Event record.
The custom tab (Custom Content) will be located at the top of the Event webpage.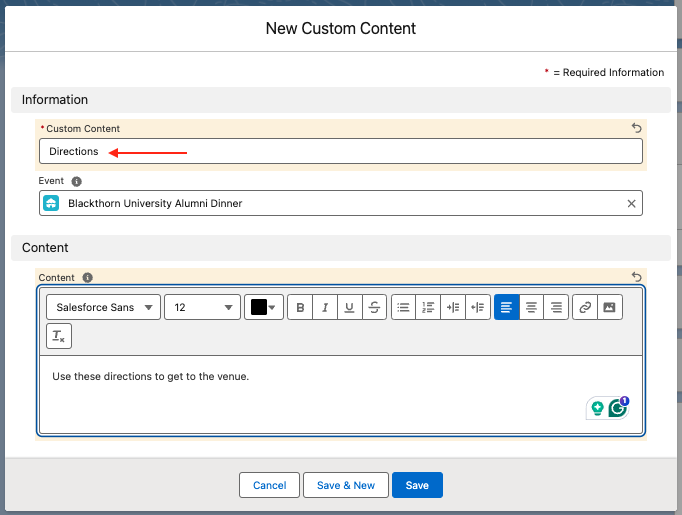

Hide
No one can see the Custom tab (Custom Content) even though a Custom Content record is related to an Event.
Go to the Event Settings record.
Click the Pencil icon.
Set Custom Tabs to “Hide.”
Click Save.
Go to the related Event record.
Click Update.
FAQ
From the Event record, create an Event FAQ record.
Always
Anyone can see the FAQ Tab on the Event webpage.
Go to the Event Settings record.
Click the Pencil icon.
Set FAQ to “Always.”
Click Save.
Go to the related Event record.
Click New next to the Event FAQs Related List.
Complete the following fields.
Category
Sort Order
Question
Answer
Click Save.
Click Update on the Event record.
The FAQ tab will be located at the top of the Event webpage. NOTE: Even if FAQ = “Always,” the FAQ tab won’t be visible on the Event webpage until you create Event FAQ records and relate them to the Event.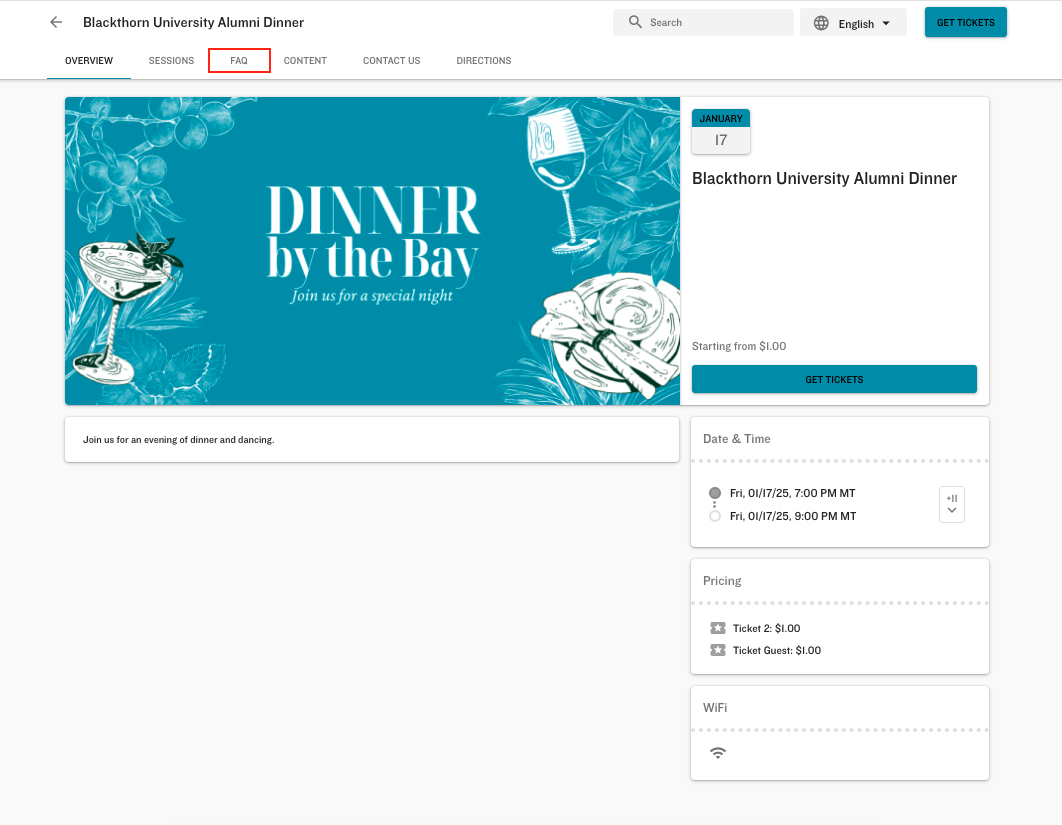
Post-Registration
Only registered Attendees can see the FAQ tab.
Go to the Event Settings record.
Click the Pencil icon.
Set FAQ to “Post-Registration.”
Click Save.
Go to the related Event record.
Click New next to the Event FAQs Related List.
Complete the following fields.
Category
Sort Order
Question
Answer
Click Save.
Click Update.
To see the FAQ tab, Attendees must go to their AttendeeLink and click Done.
Hide
No one can see the FAQ tab.
Go to the Event Settings record.
Click the Pencil icon.
Set FAQ to “Hide.”
Click Save.
Go to the related Event record.
Click Update.
Sessions
Before you can make the Sessions tab visible, you must create a Session record and attach it to the Event. Click here for more information about creating Session records.
Always
Anyone can see the Sessions tab on the Event webpage.
Go to the Event Settings record.
Click the Pencil icon.
Set Sessions to “Always.”
Click Save.
Go to the related Event record.
Click New next to the Sessions Related List and follow these steps to create a new Session.
Go back to the related Event record.
Click Update.
The Sessions tab will be located at the top of the Event webpage. NOTE: The Sessions tab will only be visible if the Session’s Status = “Active.”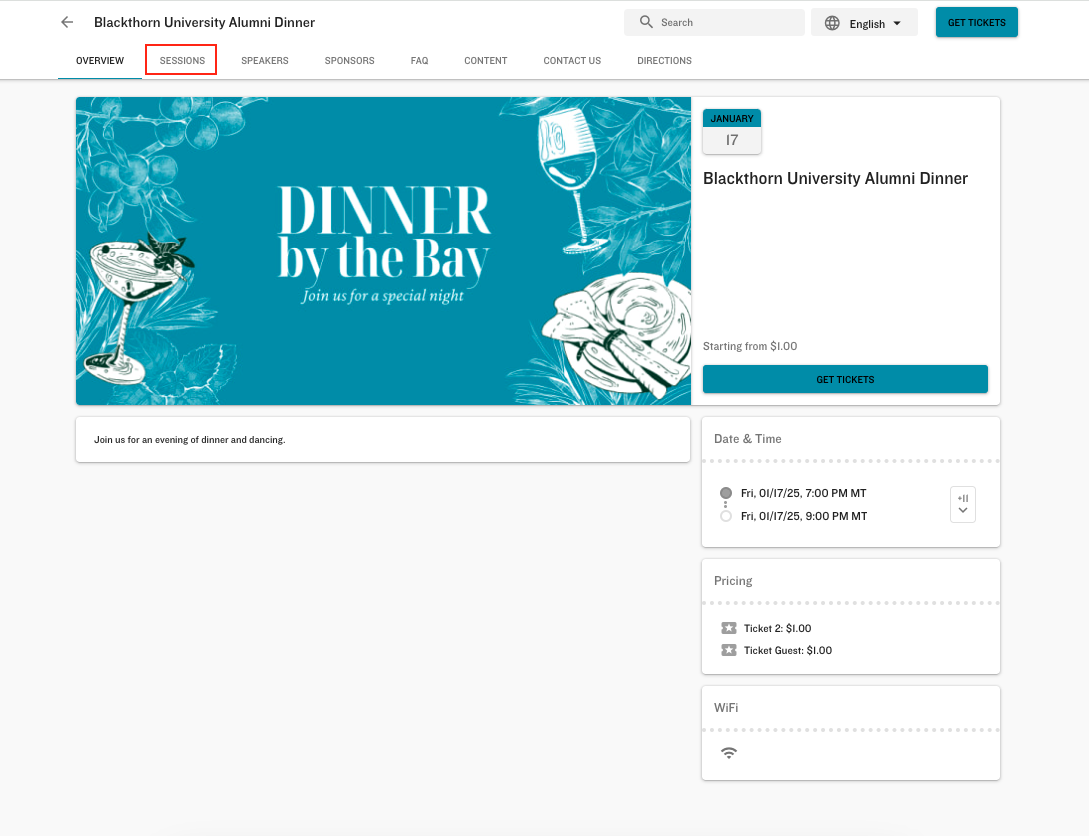
Post-Registration
Only registered Attendees can see the Sessions tab.
Go to the Event Settings record.
Click the Pencil icon.
Set Sessions to “Post-Registration.”
Click Save.
Go to the related Event record.
Click New next to the Sessions Related List and follow these steps to create a new Session.
Go back to the related Event record.
Click Update.
To see the Sessions tab, Attendees must go to their AttendeeLink and click Done.
Hide
No one can see the Sessions tab.
Go to the Event Settings record.
Click the Pencil icon.
Set Sessions to “Hide.”
Click Save.
Go to the related Event record.
Click Update.
Speakers
Before you can make the Speakers tab visible, you must create a Speaker record and attach it to the Event. Click here for more information about creating Speaker records.
Always
Anyone can see the Speakers tab on the Event webpage.
Go to the Event Settings record.
Click the Pencil icon.
Set Speakers to “Always.”
Click Save.
Go to the related Event record.
Click New next to the Speakers Related List and follow the steps here to create a new Speaker.
Go back to the related Event record.
Click Update.
The Speakers tab will be located at the top of the Event webpage. NOTE: The Speakers tab will not be visible until the Speaker’s Status = “Confirmed” or “Attended.”
Post-Registration
Only registered Attendees can see the Speakers tab.
Go to the Event Settings record.
Click the Pencil icon.
Set Speakers to “Post-Registration.”
Click Save.
Go to the related Event record.
Click New next to the Speakers Related List and follow the steps here to create a new Speaker.
Go back to the related Event record.
Click Update.
To see the Speakers tab, Attendees must go to their AttendeeLink and click Done.
Hide
No one can see the Speakers tab.
Go to the Event Settings record.
Click the Pencil icon.
Set Speakers to “Hide.”
Click Save.
Go to the related Event record.
Click Update.
Sponsors
Before you can make the Sponsors tab visible, you must create a Sponsor record and attach it to the Event. Click here for more information about creating Sponsor records.
Always
Anyone can see the Sponsors tab on the Event webpage.
Go to the Event Settings record.
Click the Pencil icon.
Set Sponsors to “Always.”
Click Save.
Go to the related Event record.
Click New next to the Sponsors Related List and follow the steps here to create a new Sponsor.
Go back to the related Event record.
Click Update.
The Sponsors tab will be located at the top of the Event webpage. NOTE: The Sponsors tab will not be visible until the Sponsor’s Status = “Confirmed.” (There is a known bug that allows the Sponsors tab to be visible if the Status is set to “Planned” or “Invited.”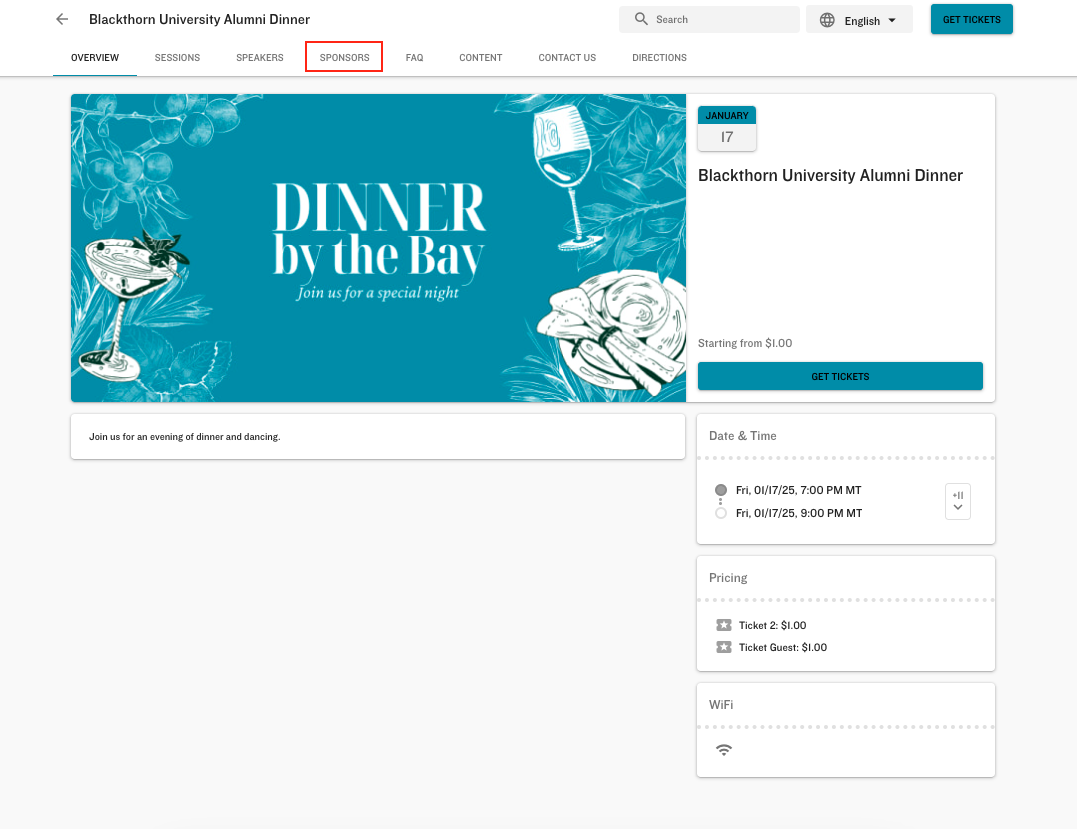
Post Registration
Only registered Attendees can see the Sponsors tab.
Go to the Event Settings record.
Click the Pencil icon.
Set Sponsors to “Post-Registration.”
Click Save.
Go to the related Event record.
Click New next to the Sponsors Related List and create a new Sponsor.
Go back to the related Event record.
Click Update.
To see the Sponsors tab, Attendees must go to their AttendeeLink and click Done.
Hide
No one can see the Sponsors tab.
Go to the Event Settings record.
Click the Pencil icon.
Set Sponsors to “Hide.”
Click Save.
Go to the related Event record.
Click Update.
Tracks
Before you can make the Tracks tab visible, you must create Tracks and relate them to Sessions. Click here for more information about creating Tracks.
Always
Anyone can see the Tracks Tab on the Session selection page during checkout.
Go to the Event Settings record.
Click the Pencil icon.
Set Tracks to “Always.”
Click Save.
Go to the related Event record.
Follow the steps here to create a new Track and relate it to Sessions.
Go to the related Event record.
Click Update.
The Track options will be available on the Session selection page during checkout.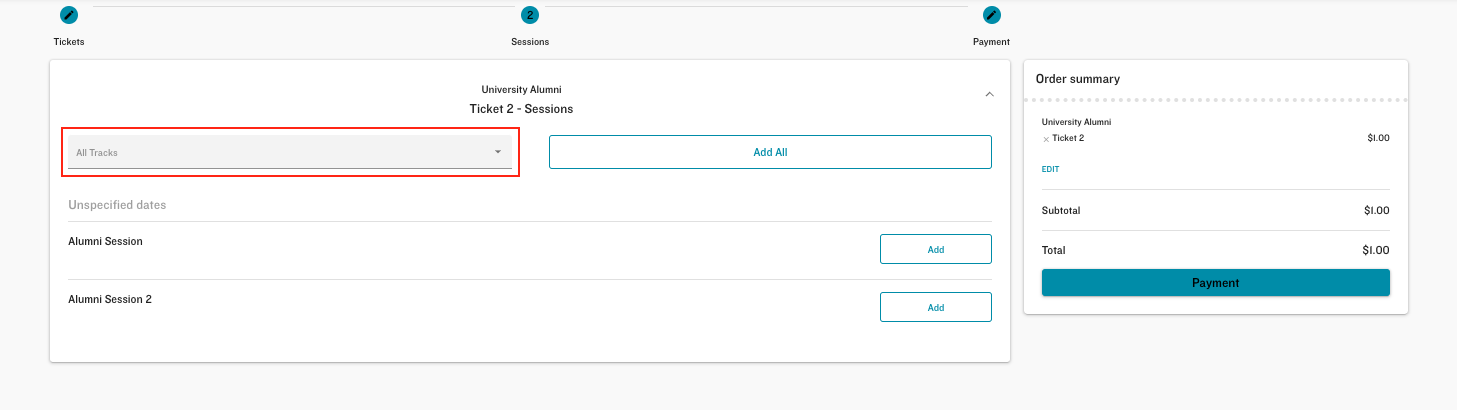
Hide
No one can see the Track options even if a Track record is related to an Event.
Go to the Event Settings record.
Click the Pencil icon.
Set Tracks to “Hide.”
Click Save.
Go to the related Event record.
Click Update.
Venue
Before you can make the venue information visible, you must enter it in the Event record. Either select an Account record in the Venue field or fill in the following Venue Name, Venue Street, Venue City, Venue State/Province, Venue Country, and Venue Postal Code fields.
Always
Anyone can see the venue’s information on the Event webpage.
Go to the Event Settings record.
Click the Pencil icon.
Set Venue to “Always.”
Click Save.
Go to the related Event record.
Enter information in the venue fields and click Save.
Click Update.
The venue’s information will be on the Event’s Overview tab.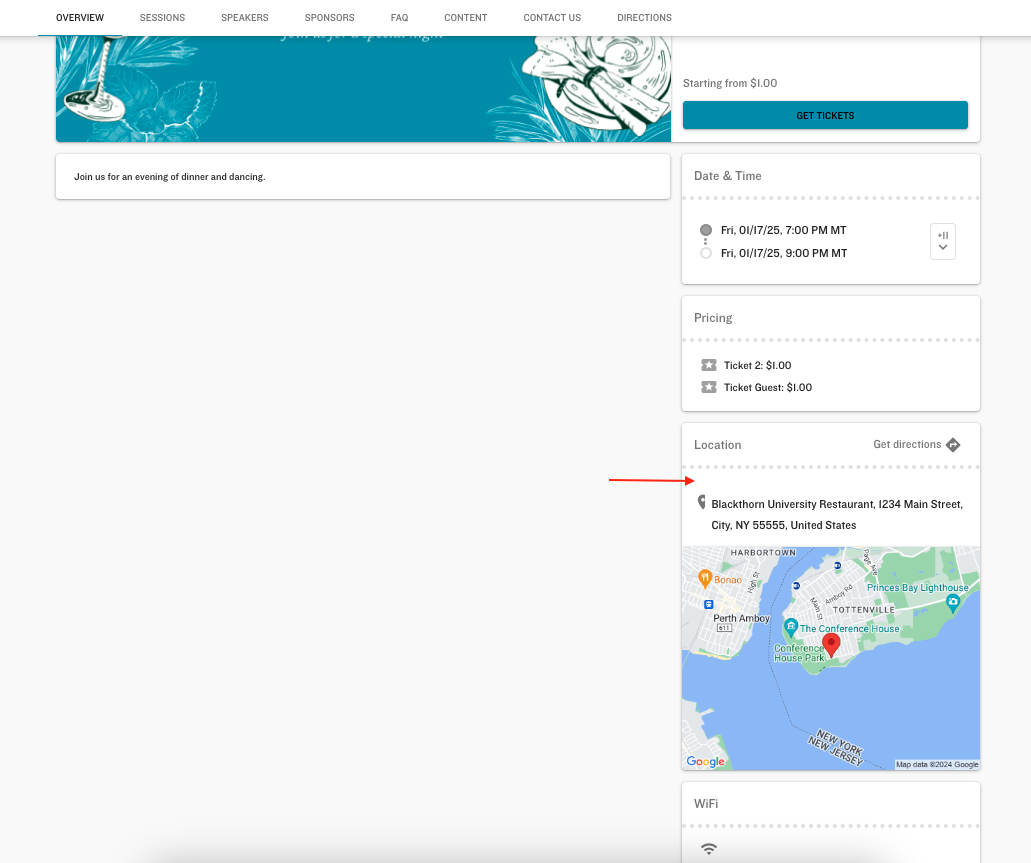
Post-Registration
Only registered Attendees can see the venue's information.
Go to the Event Settings record.
Click the Pencil icon.
Set Venue to “Post-Registration.”
Click Save.
Go to the related Event record.
Enter information in the venue fields.
Click Update.
To see the venue's information, Attendees must go to their AttendeeLink and click Done.
Hide
No one can see the venue information.
Go to the Event Settings record.
Click the Pencil icon.
Set Venue to “Hide.”
Click Save.
Go to the related Event record.
Click Update.
WiFi
Before you can make the WiFi information visible, you must enter the WiFi information in the following Event fields: WiFi Password, WiFi Network, and WiFi Message.
Always
Anyone can see the WiFi information on the Event webpage.
Go to the Event Settings record.
Click the Pencil icon.
Set WiFi to “Always.”
Click Save.
Go to the related Event record.
Enter information in the WiFi fields.
Click Save.
Click Update.
The WiFi information will be on the Event’s Overview tab.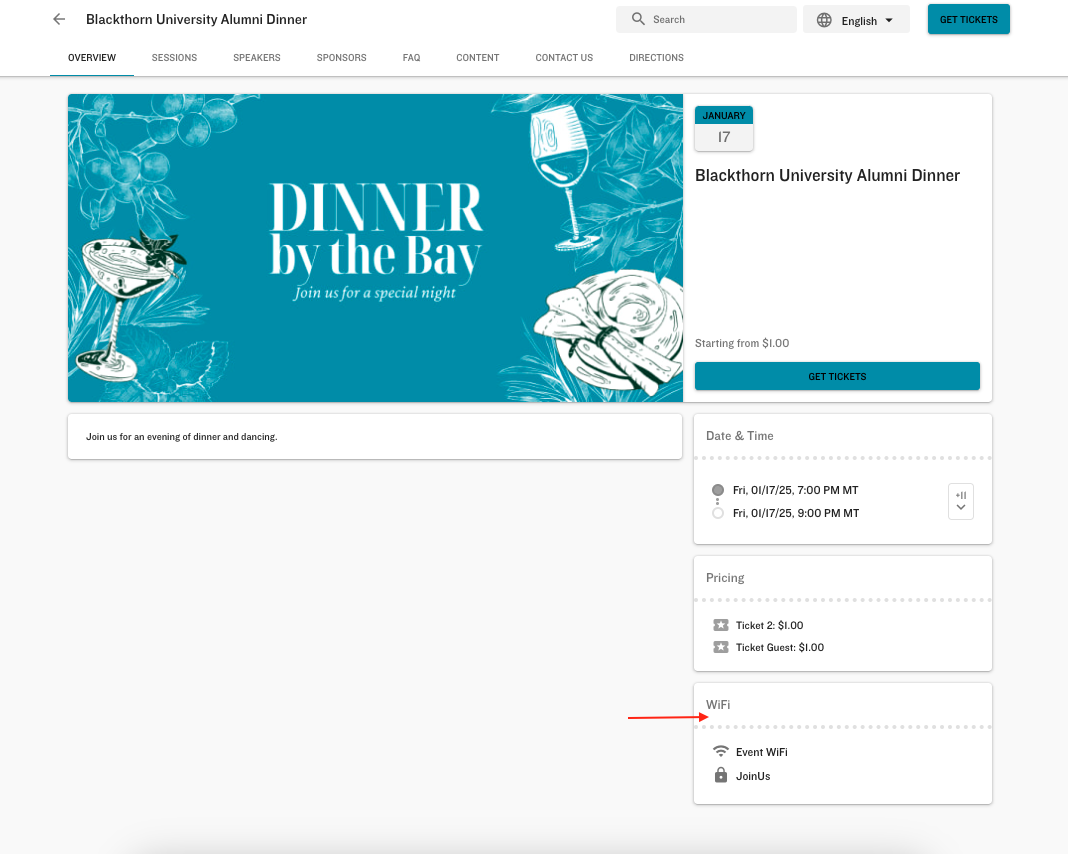
Post-Registration
Only registered Attendees can see the WiFi information.
Go to the Event Settings record.
Click the Pencil icon.
Set WiFi to “Post-Registration.”
Click Save.
Go to the related Event record.
Enter information in the WiFi fields.
Click Save.
Click Update.
To see the WiFi information, Attendees must go to their AttendeeLink and click Done.
Hide
No one can see the WiFi information.
Go to the Event Settings record.
Click the Pencil icon.
Set WiFi to “Hide.”
Click Save.
Go to the related Event record.
Click Update.