Breaking Change
To use a custom Event Item, users must create a new, unique custom picklist value in the Type field on the Event Item. A custom Event Item behaves like an Event Item with Type = "Main event ticket". This will resolve the “ticket type is not supported for registration” error.
The Event Item Type = "Other" should only be used for Products.
The Event Items section of the Event Wizard allows users to add different types of Event Items to an Event. There are three primary types of Event Items that can be added to an Event:
Tickets: "Main event ticket" and "Guest" ticket
Donations
Products
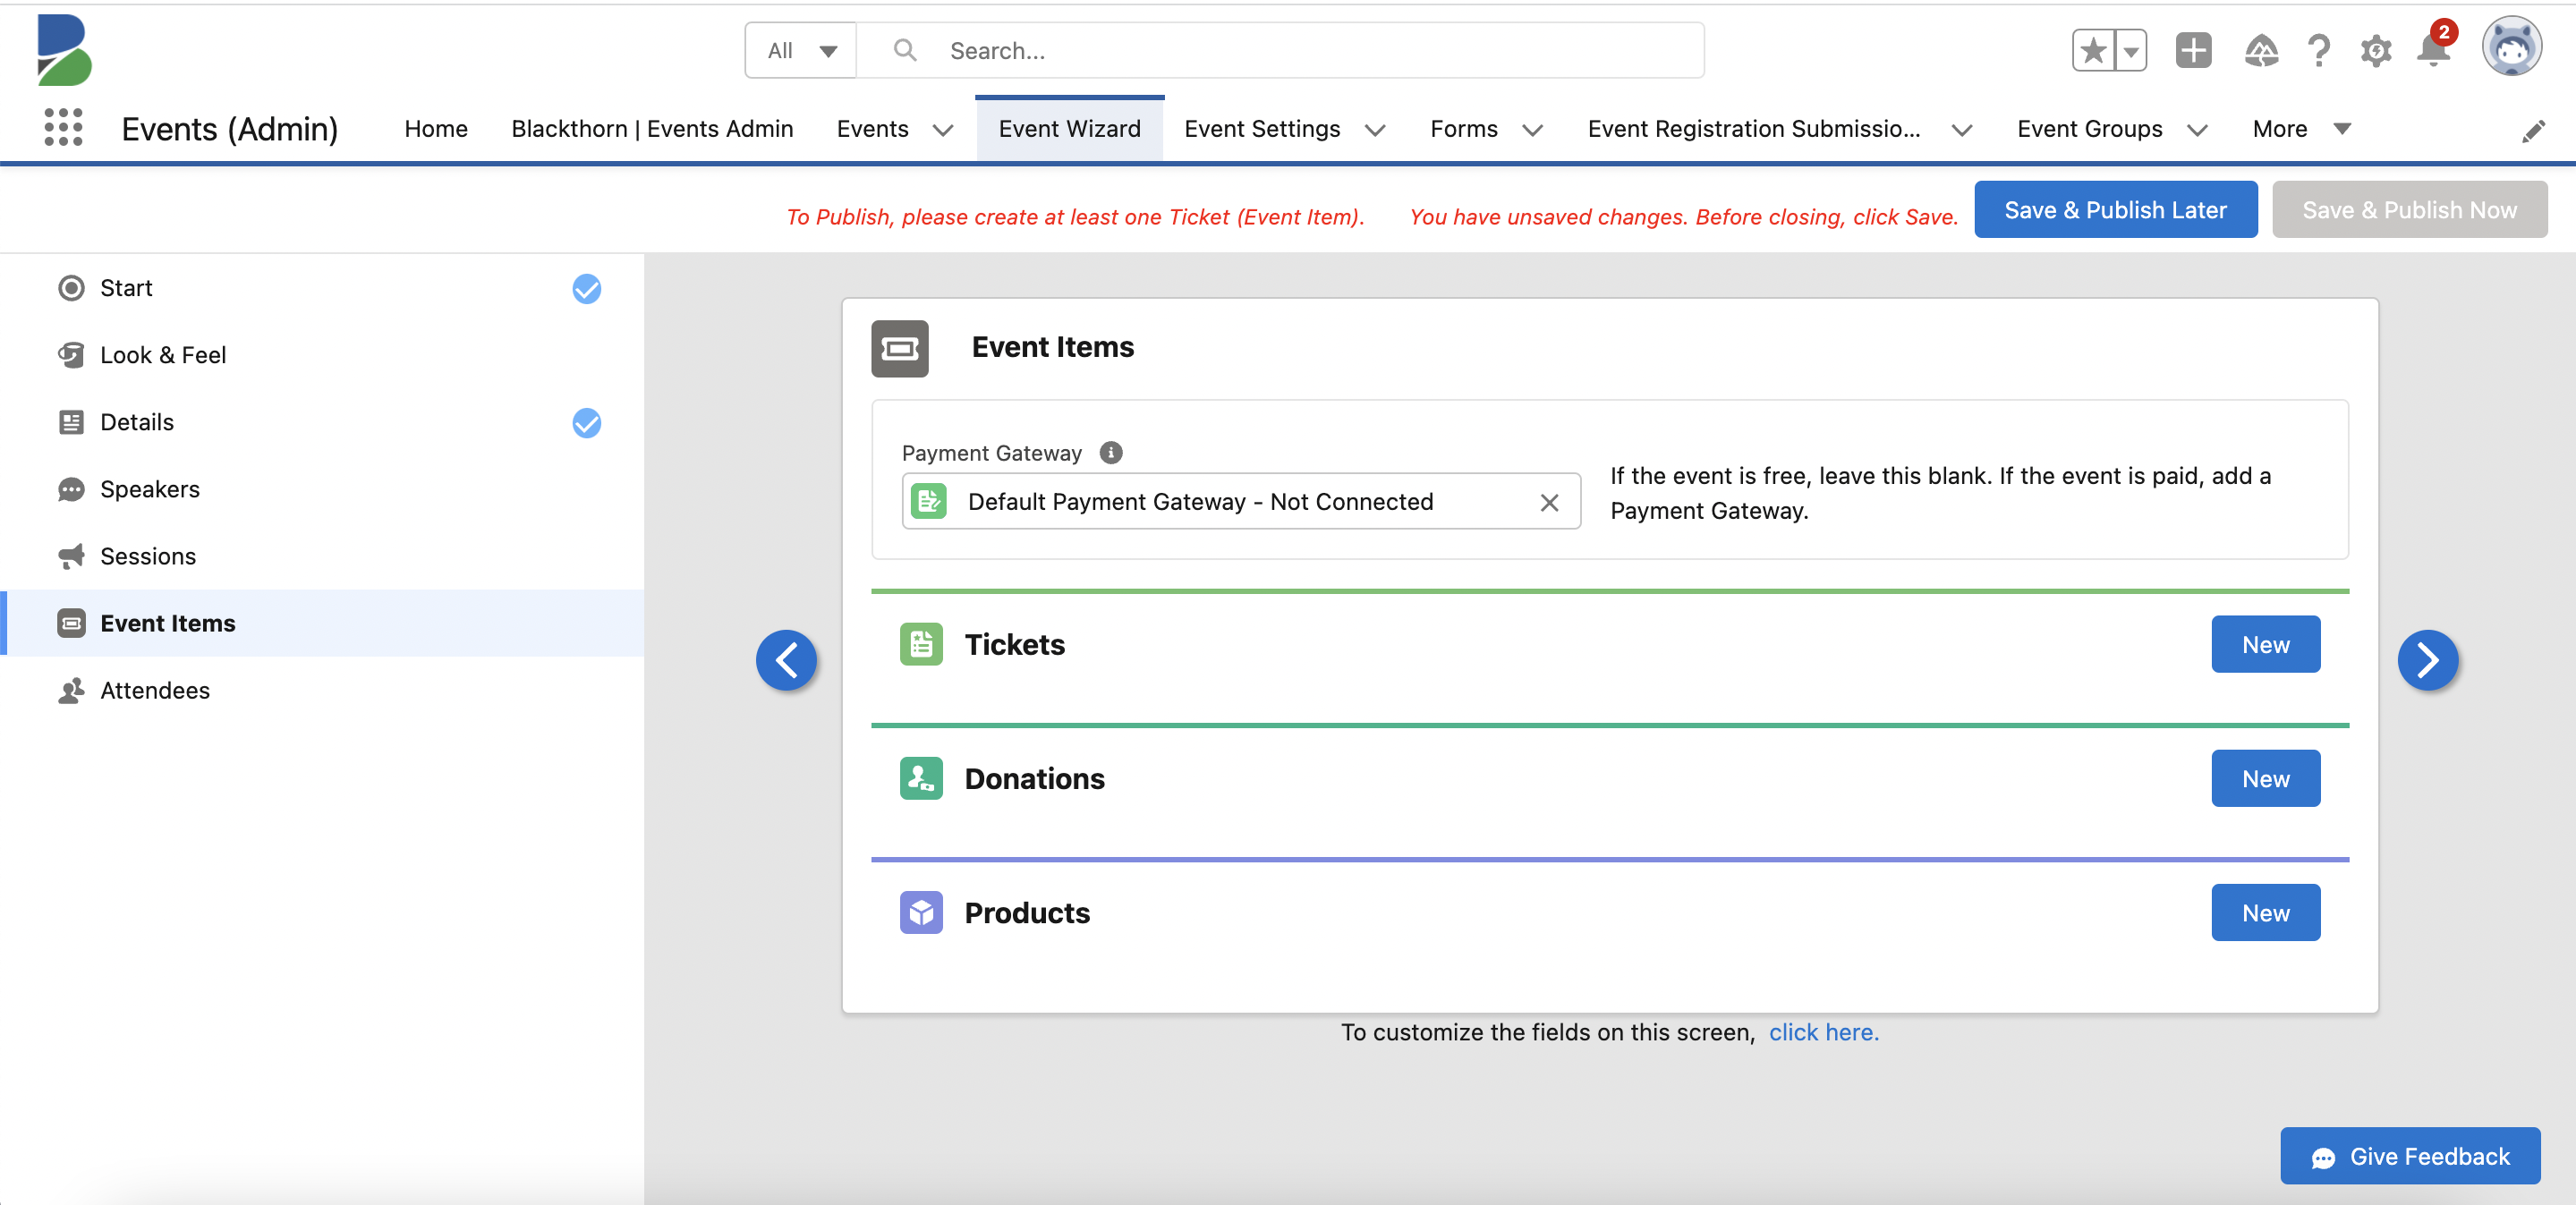
Tickets
Main Event Ticket
A Main event ticket is a required Event Item, meaning that every Event must offer at least one Main event ticket. This ticket type also has the following characteristics.
Primary ticket type for an Event.
Use it for the target audience of the Event.
It can be a free or paid ticket.
Guest Ticket
The Guest ticket is a secondary or alternate ticket that is used when there is a difference in price compared to the Main event ticket or to differentiate attendee populations (Ex. student vs parent). This ticket type also has the following characteristics.
Not required for an Event.
Can be a free or paid ticket.
Used to identify Attendees that belong to separate populations, opportunities, or campaigns.
Main Event Tickets
The Tickets page is where you can define any Tickets to be added to your Event. This is where an Attendee can choose the Ticket they want to register for. Complete the steps below to add one or more Tickets to your Event.
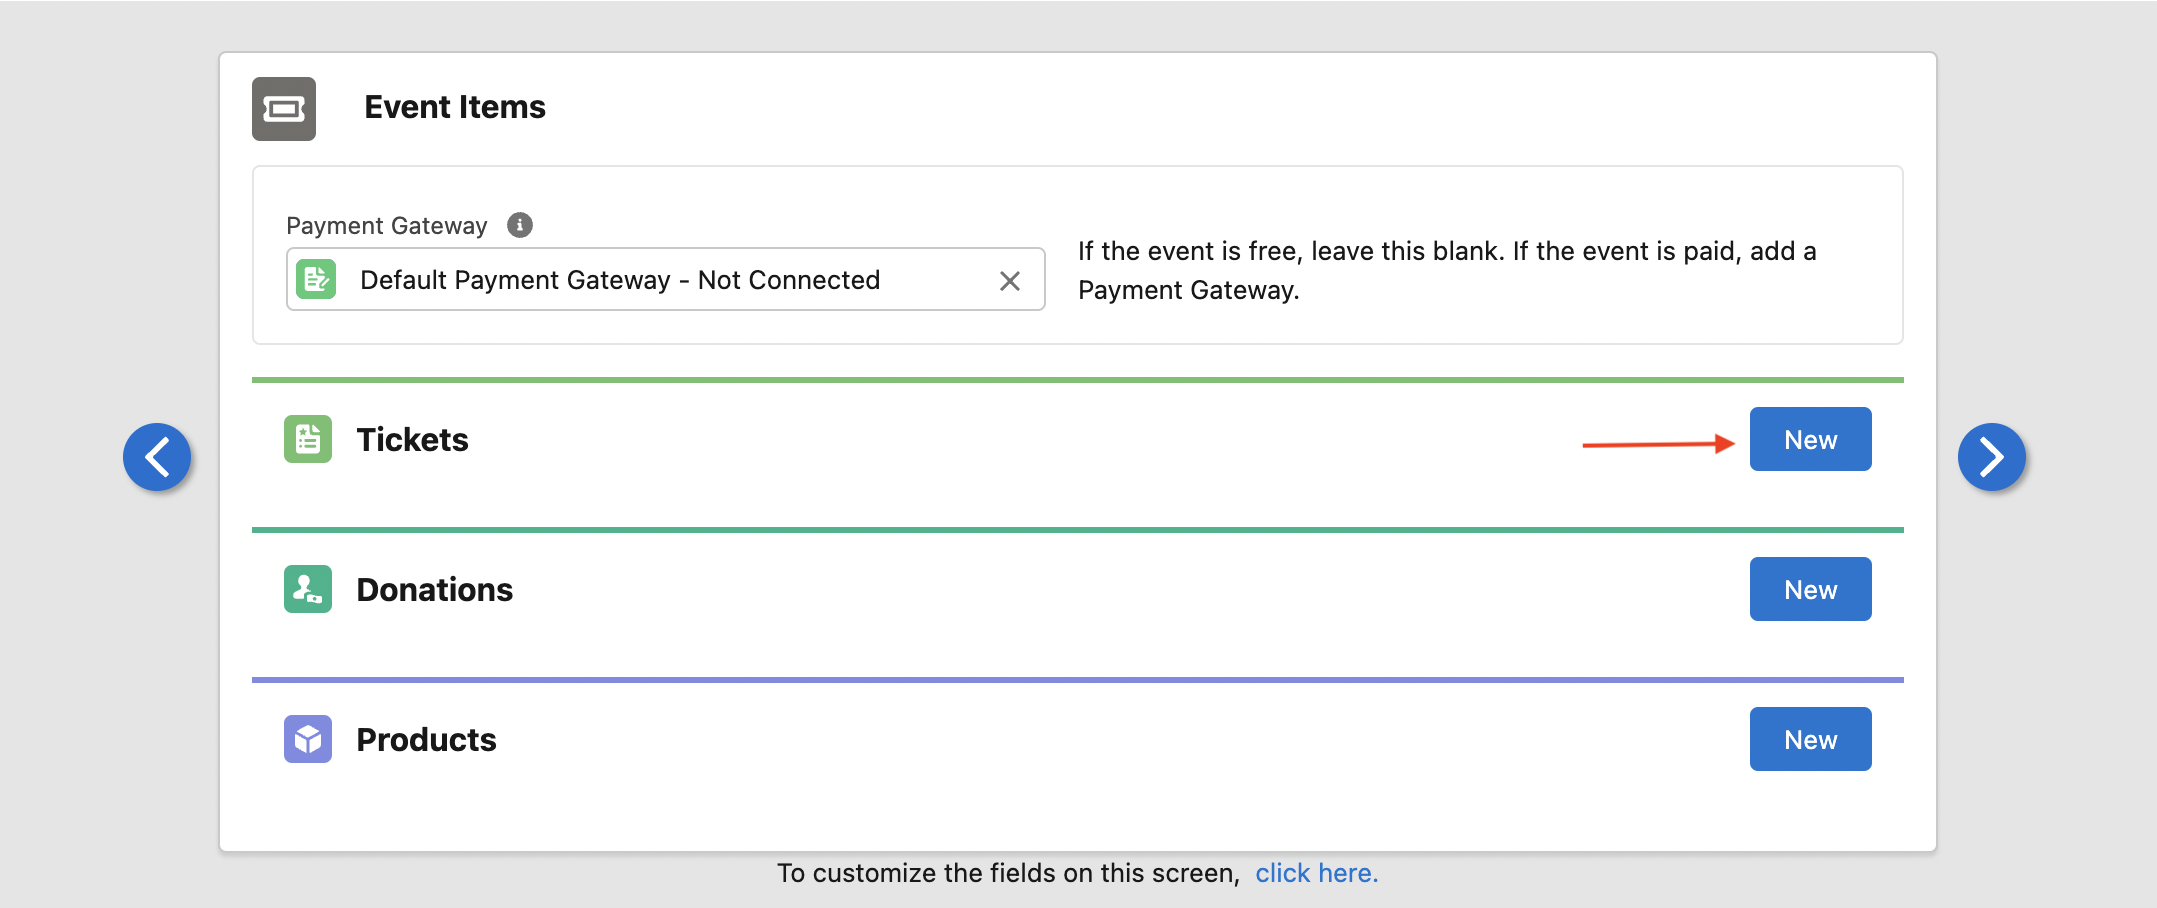
Click New next to Tickets.
In the New Ticket window, add the following information.
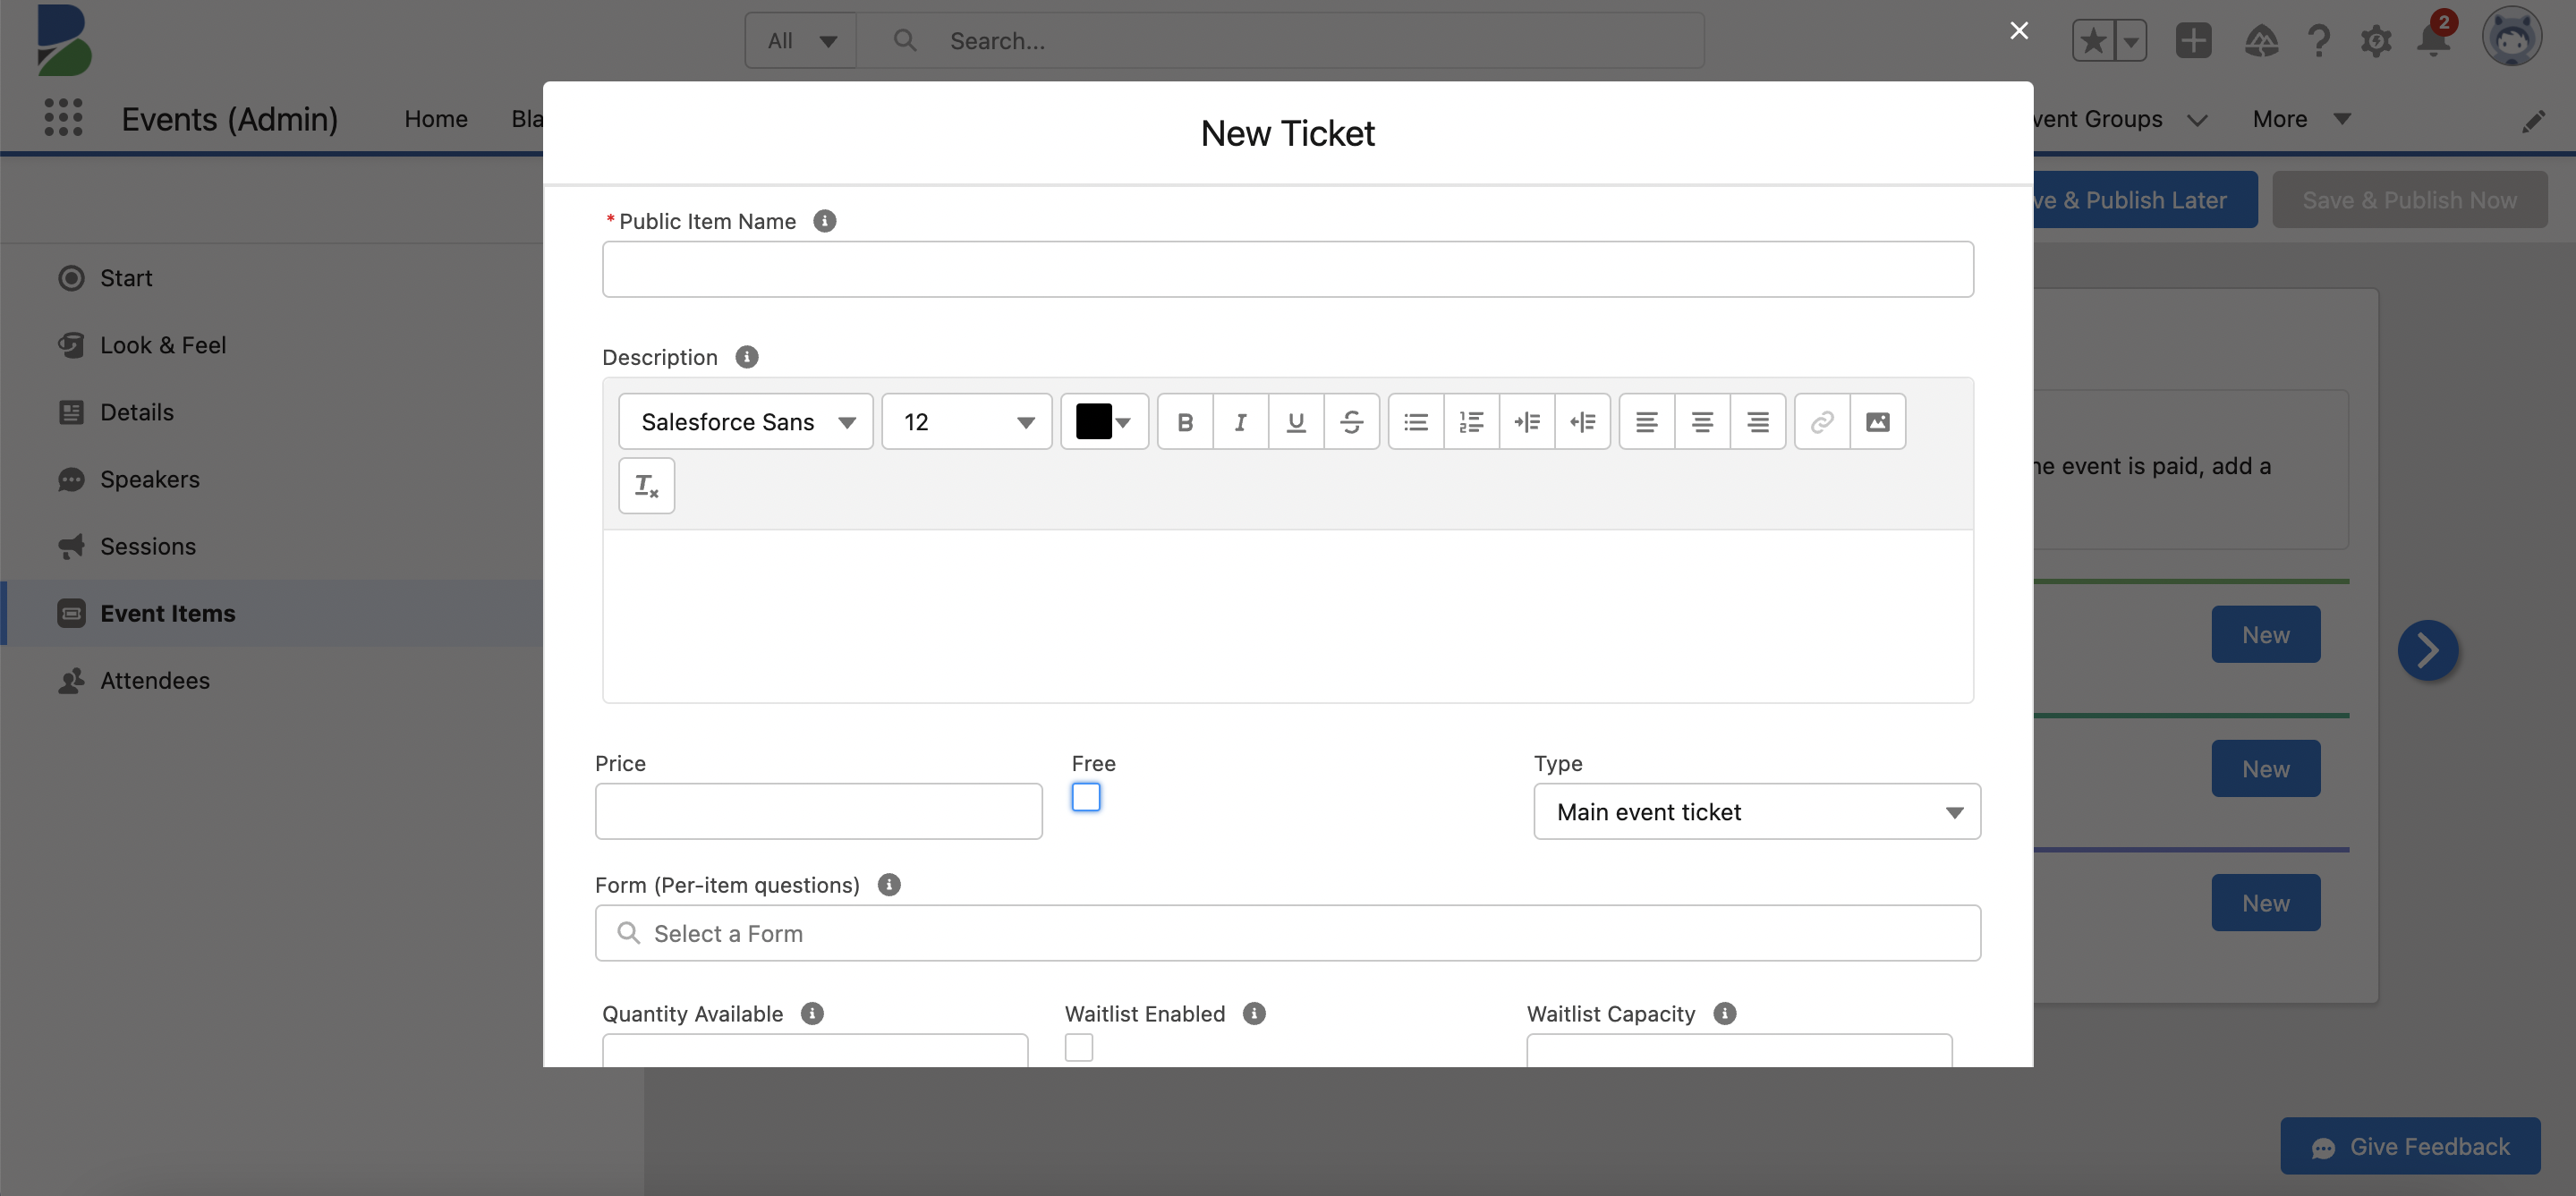
Enter a Public Item Name (required).
Enter a Description.
Is the Ticket free or paid? If the Ticket is paid, enter the amount in the Price field. If the Ticket is free, check Free.
Set Type = “Main event ticket.”
Select a previously created Form or create a new one. Click here for more information about creating Forms and Form Elements.
Enter the Quantity Available. If the field is left blank, the Quantity Available will say “999,999”.
To set a minimum or a maximum number of Event Items allowed per order, enter the amounts in the Maximum Quantity and/or Minimum Quantity fields. More information is available here.
Check the Waitlist Enabled checkbox to enable waitlisting and enter an amount in the Waitlist Capacity field, if using. For more information about waitlisting, click here.
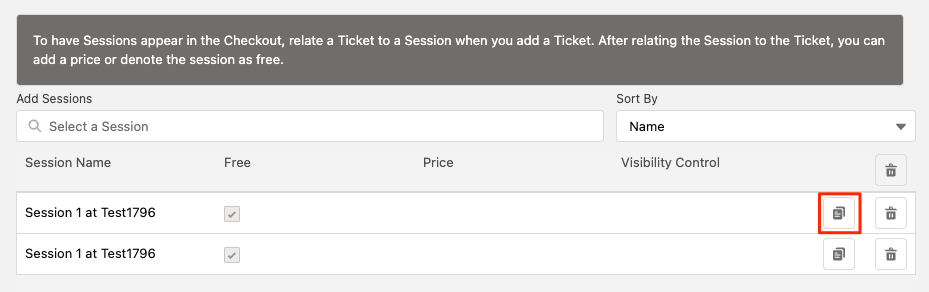
Add Session(s) to a ticket. One or more free or paid Session can be added to a ticket via the Event Wizard. Select an existing Session to add to the ticket from the Add Sessions lookup field OR click Add All Sessions to add all existing Sessions to the ticket in bulk. Once the Session is related to the Event Item, it will be known as the Event Item Session.
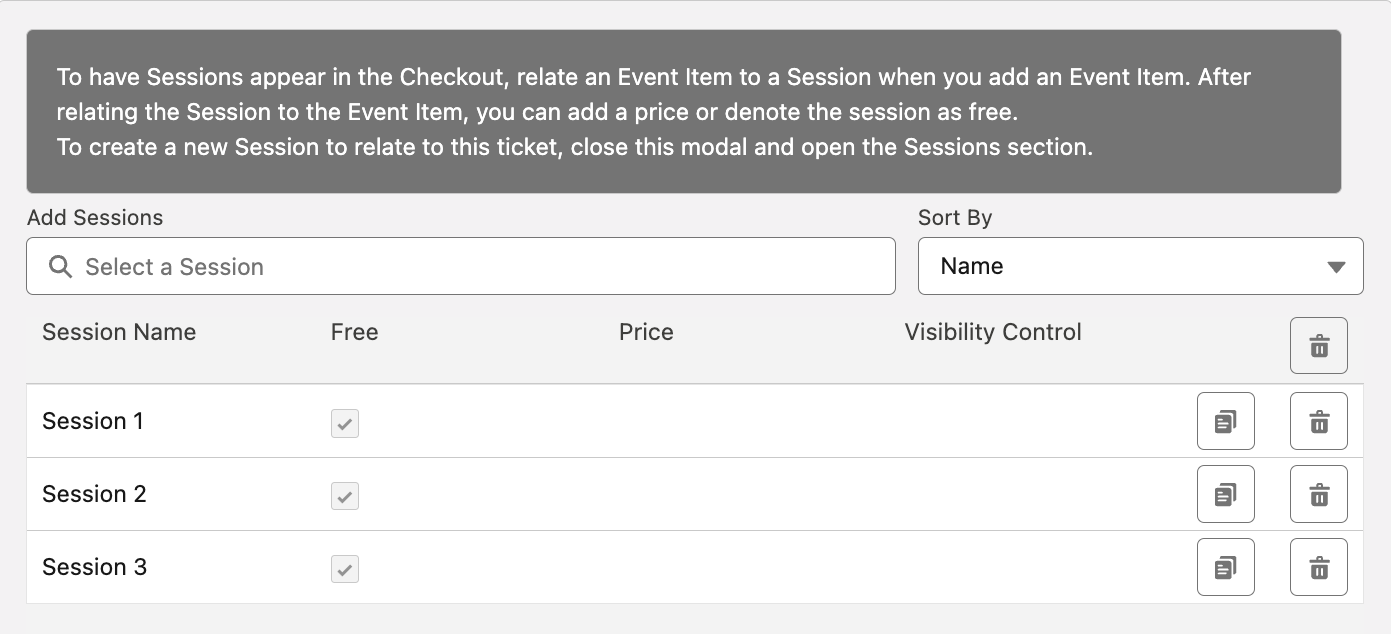
NOTE: Each Session can only be added to each ticket once. However, once a Session has been added, you can duplicate that Session from the “Sessions Table”.
Click Save & Close.
Deprecated Field
The Event Item’s Relationship Settings field has been deprecated. Use the Event Settings Relationship Settings field to attach Relationship Settings to your Event.
Guest Tickets
Configure Guest Tickets
Guest Tickets give Event Organizers flexibility in how they collect and manage guest data. There are three configuration options available:
Create a Contact Record: This option allows you to create Contact records for each guest.
Do Not Create a Contact Record: Select this option if you prefer not to create guest Contact records.
Allow Anonymous Guest Registration: This option enables guests to register without providing their personal information.
Please take a moment to review when to use each option and how it works.
Create Contact Records for Guest Attendees
Creating a Contact record for each guest Attendee ensures that every individual has a corresponding Contact record, even when only minimal information is provided.
When to use this option:
Your organization requires a Contact record for each Attendee.
It is important to maintain relationship tracking between Contacts.
Complete attendance records are essential for accurate reporting.
You plan to collect full guest contact details at some point after the registration process.
How it works:
The Event Organizer checks the Event Settings Create Contacts for Guest Tickets checkbox.
If a guest’s information is incomplete, the system will automatically:
Generate the Last Name value as "[Primary Registrant's Last Name] Guest [Number]" (e.g., "LastName Guest 1, LastName Guest 2").
Use the primary registrant's email if the guest’s email is not provided.
This process prevents REQUIRED_FIELD_MISSING errors while ensuring that Contact records are created.
Skip Contact Creation for Guest Attendees
Not creating a Contact record for guest Attendees creates an Attendee record but doesn't create the corresponding Contact record.
When to use this option:
You don't need relationship tracking for guest Attendees.
Attendee records are sufficient for your Event reporting.
You collect minimal information for guests during registration.
How it works:
The Event Organizer unchecks the Event Settings Create Contacts for Guest Tickets checkbox.
The system will create Attendee records for guests.
The system will NOT
Create Contact records for guests.
Evaluate relationship settings for guests.
Allow Anonymous Guest Attendees
This configuration offers the most flexibility by enabling fully anonymous guest registrations.
When to use this option:
You want to allow "plus one" guest registrations.
You don't need to collect any information from guests.
You want to avoid sending confirmation emails to guests.
How it works:
The Event Organizer unchecks the Event Settings Create Contacts for Guest Tickets checkbox.
They set the Attendee Form fields for the guest Event Item to "Optional" or "Hidden."
If the Email field is hidden or left empty:
No email will be stored on the Attendee record.
A confirmation email will not be sent to the guest.
If the Event Settings One Unique Attendee Email Per Event field is checked, guests will be exempt from this rule, and the duplicate email error will not be triggered.
Tips
Data Needs: Choose a configuration that balances your need for complete Contact data with the desire to avoid creating unnecessary records.
Email Communication: Note that with the first two options, if a guest's email address is the same as the primary registrant's, the confirmation emails for both the primary and guest registrants will be sent to that email address.
Attendee Form Settings: Configure the checkout Attendee Form fields (First Name, Last Name, Email, etc.) on the Event Item based on the information you need to collect from guests.
Required: The field must be filled in.
Optional: The field can be left blank.
Hidden: The field is hidden from the registrant.
Create Guest Tickets
Click New next to Tickets.
In the New Ticket window, add the following information.
Enter a Public Item Name (required).
Enter a Description.
Is the Ticket free or paid? If the Ticket is paid, enter the amount in the Price field. If the Ticket is free, check Free.
Set Type = “Guest.”
Select a previously created Form or create a new one. Click here for more information about creating Forms and Form Elements.
Enter the Quantity Available. If the field is left blank, the Quantity Available will say “999,999”.
To set a minimum or a maximum number of Event Items allowed per order, enter the amounts in the Maximum Quantity and/or Minimum Quantity fields. More information is available here.
Check the Waitlist Enabled checkbox to enable waitlisting and enter an amount in the Waitlist Capacity field, if using. For more information about waitlisting, click here.
Add Session(s) to a ticket. One or more free or paid Session can be added to a ticket via the Event Wizard. Select an existing Session to add to the ticket from the Add Sessions lookup field OR click Add All Sessions to add all existing Sessions to the ticket in bulk. Once the Session is related to the Event Item, it will be known as the Event Item Session.
NOTE: Each Session can only be added to each ticket once. However, once a Session has been added, you can duplicate that Session from the “Sessions Table”.
Click Save & Close.
Important Notes
An Event Item’s Quantity Remaining will appear on the registration page only when there are 10 or fewer available.
The default sort order for the added Sessions is alphabetical. Session can also be sorted by Start Date.
Session fields can be modified in-line or on the "Sessions Table."
Add or remove Session fields by completing the following steps.
Navigate to Salesforce Setup > Object Manager.
Search for and click on the Event Item Session object.
Click "Field Sets."
Click on "Blackthorn | Events Wizard Event Item Session Fields."
Drag and drop fields into the list. To make a field required, hover over the field listed "In the Field Set" and click the wrench.
Click Save.
Sessions will not be displayed during registration when the Event’s UI Experience = "Full-Width", and there is only one free Event Item with Sessions.
Add Custom Fields to the "Ticket" page layout by completing the following steps:
Navigate to Salesforce Setup > Object Manager.
Search for and click on the Event Item object.
Click "Field Sets."
Click on "Blackthorn | Events Wizard Ticket Fields."
Drag and drop a field into the list. To make the field required, hover over the field listed "In the Field Set" and click the wrench.
Click Save.
Add the Sort Order field to the Event Item page layout to be able to re-organize the order of the Event Items on the registration page. Then, select the order for each Event Item.
If you only want Attendees to see Sessions on their AttendeeLink and not on the Event registration page, complete the following steps.
Relate a Session to an Event Item, creating an Event Item Session.
Update the Event Settings tab visibility setting for Sessions to “Post Registration.”
If you want the Donations and Product sections to be on their own pages, set the Event Settings field Display Donations & Products separately to “Yes” (checked). To continue using the current functionality, leave Display Donations & Products separately set to “No” (unchecked).
Note: If a Form is related to a Donation or Product record, the Form will be displayed on the page with the Donation or Product.
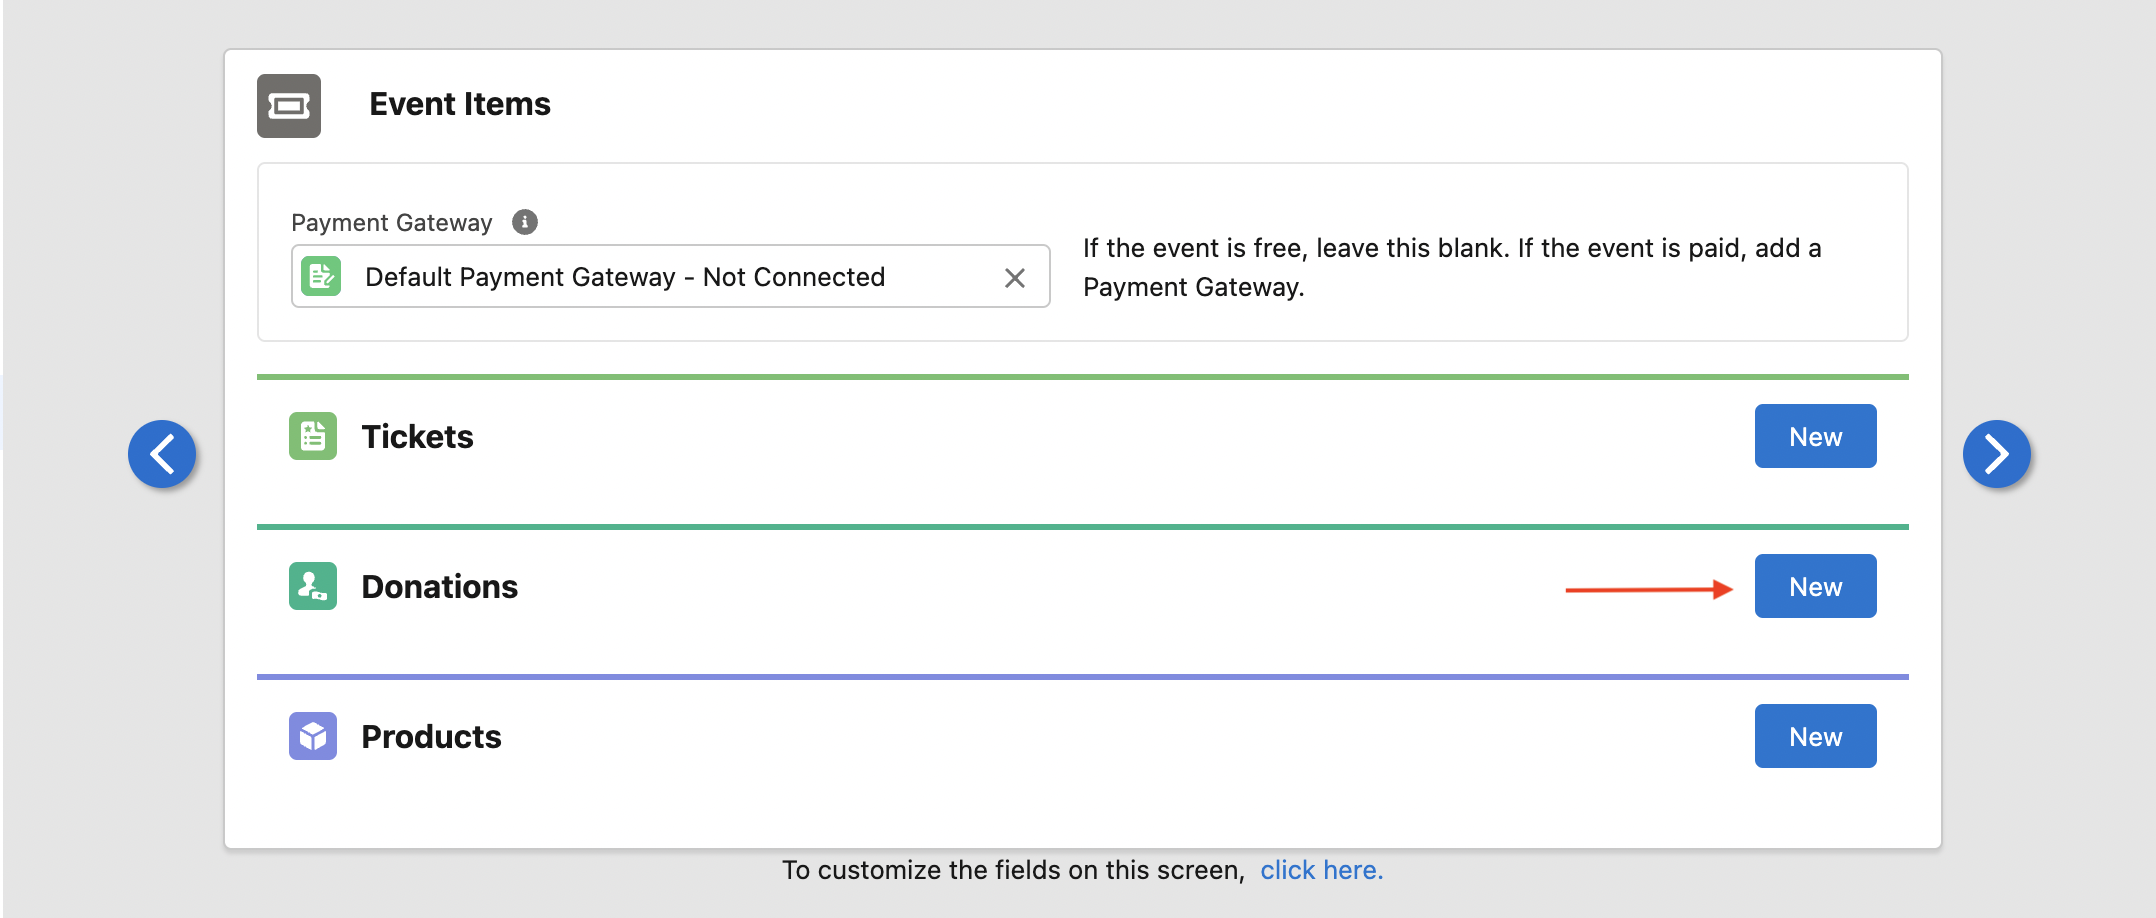
Donations
Users can now add a Donation, a new type of Event Item, to an Event via the Event Wizard.
Prerequisite: If an Event includes a free Event Item (Ticket) and a Donation Event Item, a Payment Gateway is required to publish the Event.
As with Guest tickets, a Type = "Main event ticket" must be included in the Event Item in order to publish an Event with a Donation Event Item.
Click New next to Donations.
In the New Donation window, add the following information.
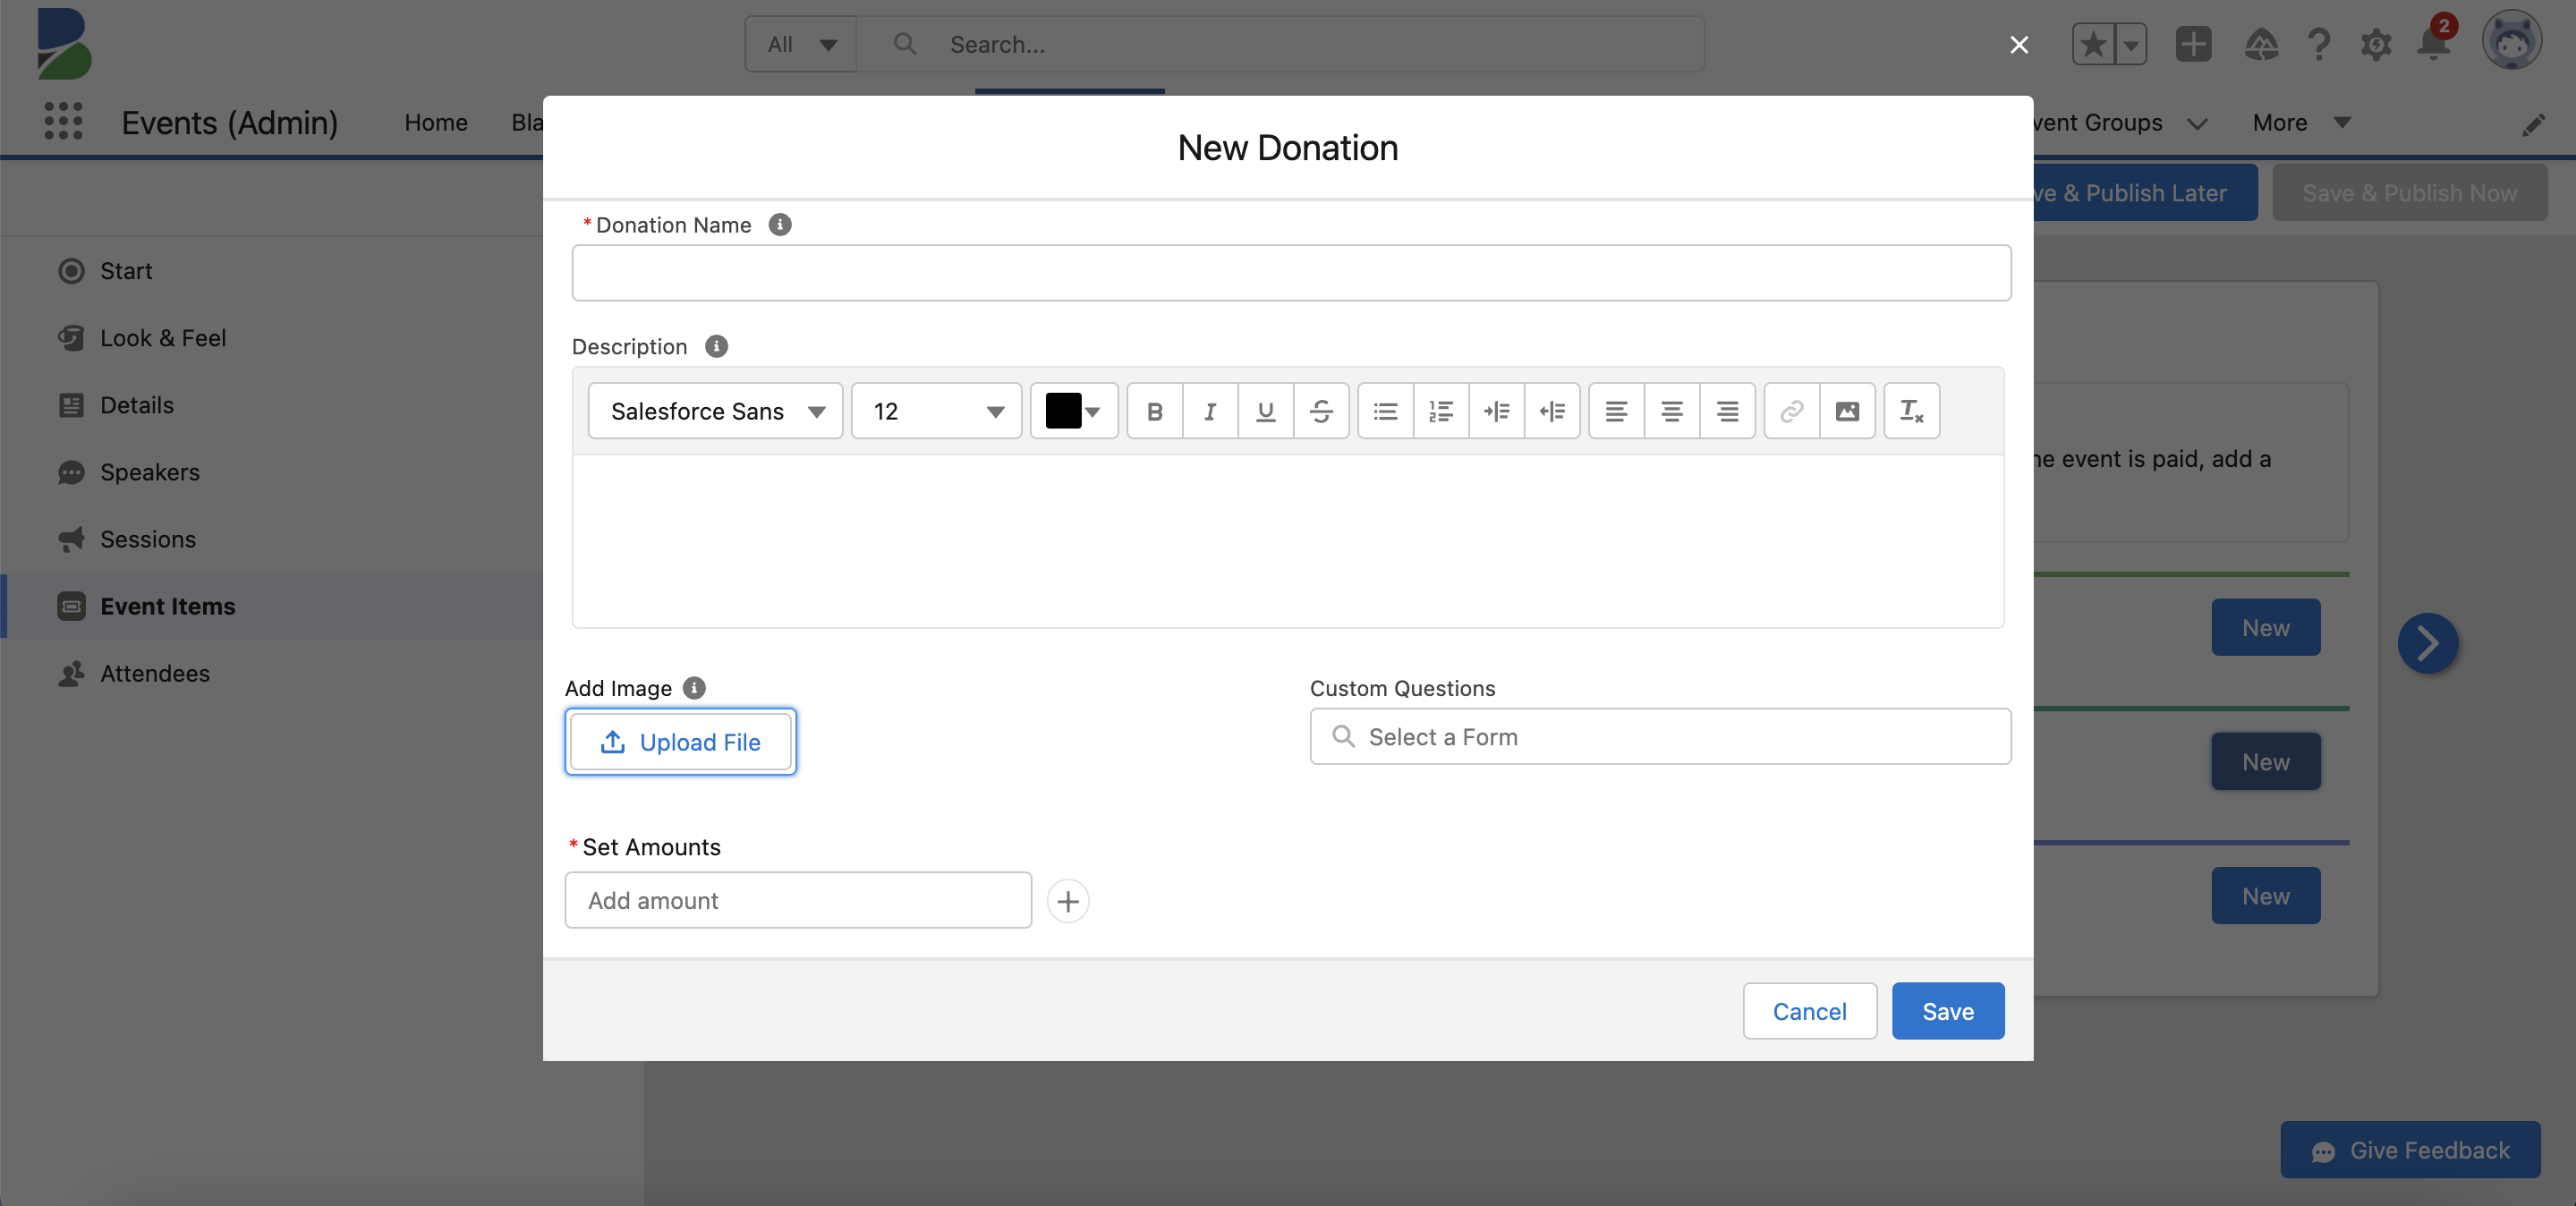
Title (required)
Description
Add Image
Custom Questions
Set Amounts (required) - Donation amounts can include two decimal points. Ex. $22.50
Click Save.
Products
Users can now add Product, a new type of Event Item, to an Event via the Event Wizard.
As with Guest tickets, a Type = "Main event ticket" must be included in the Event Item in order to publish an Event with a Product Event Item.
Click New next to Products.
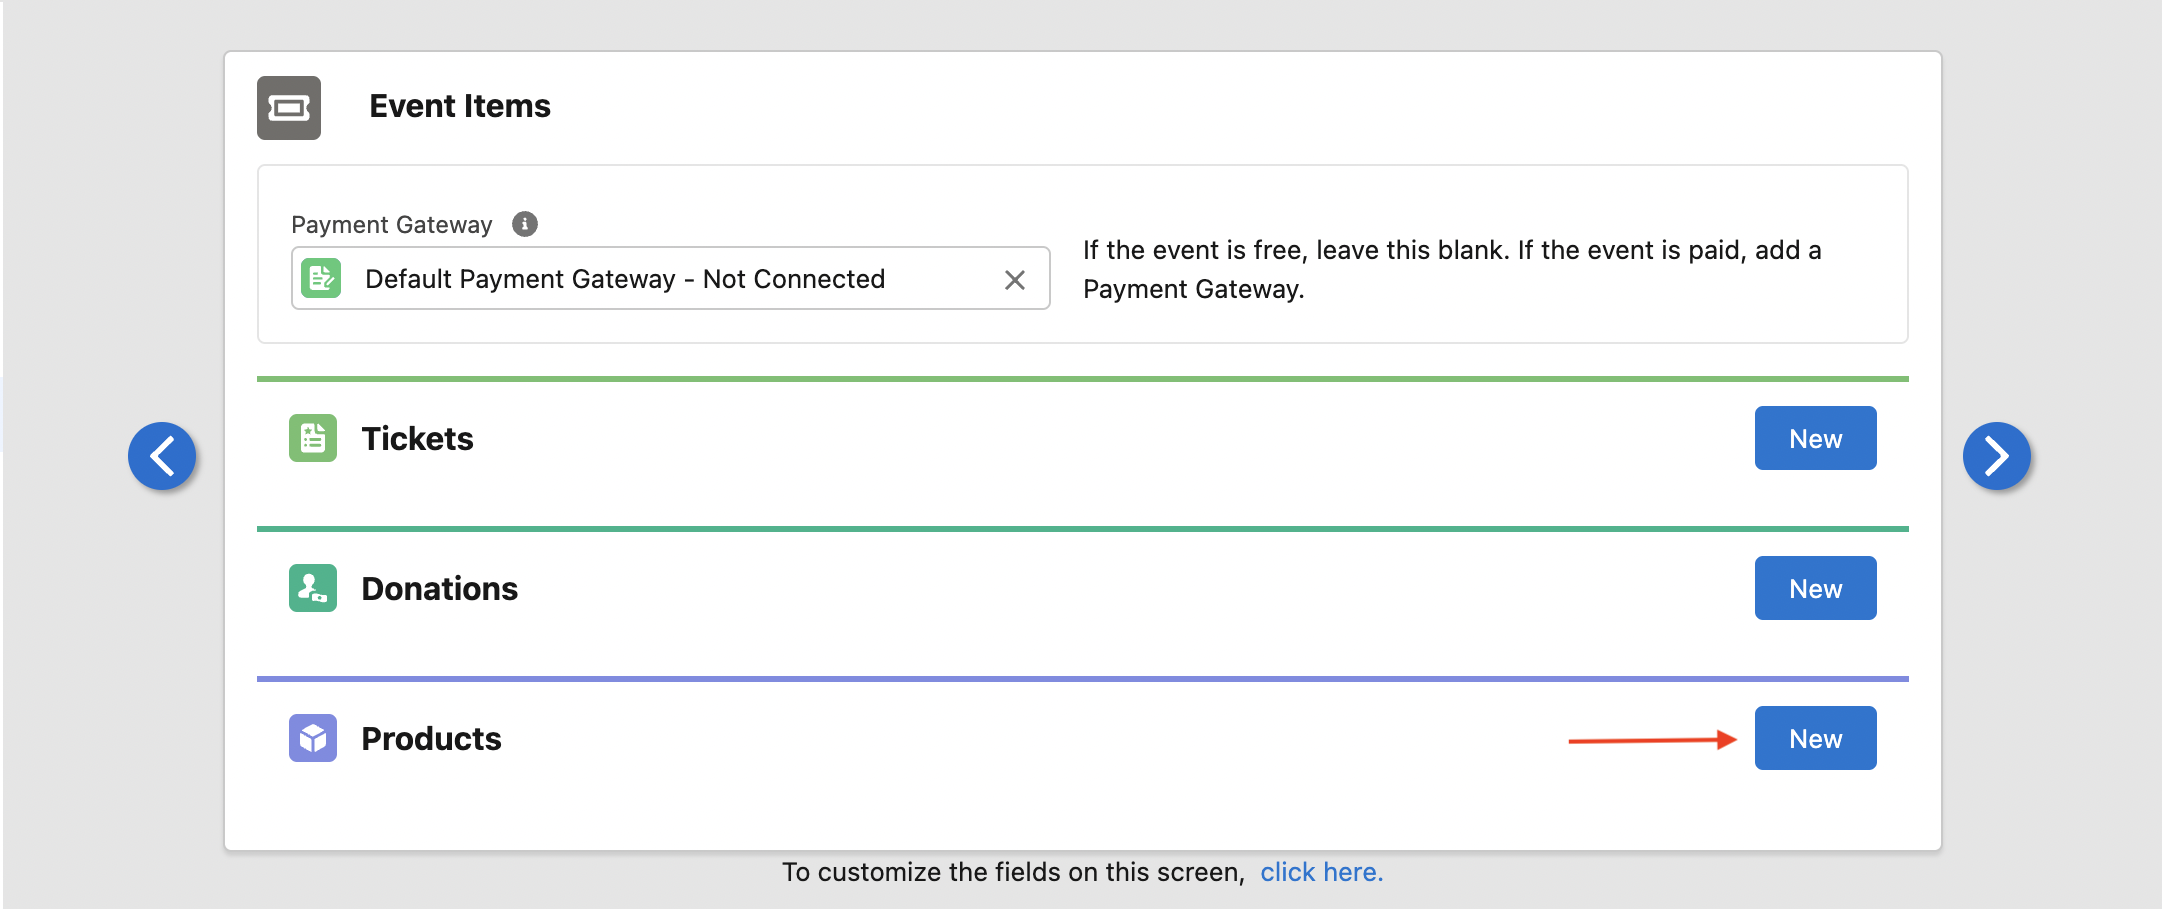
In the New Product window, add the following information.
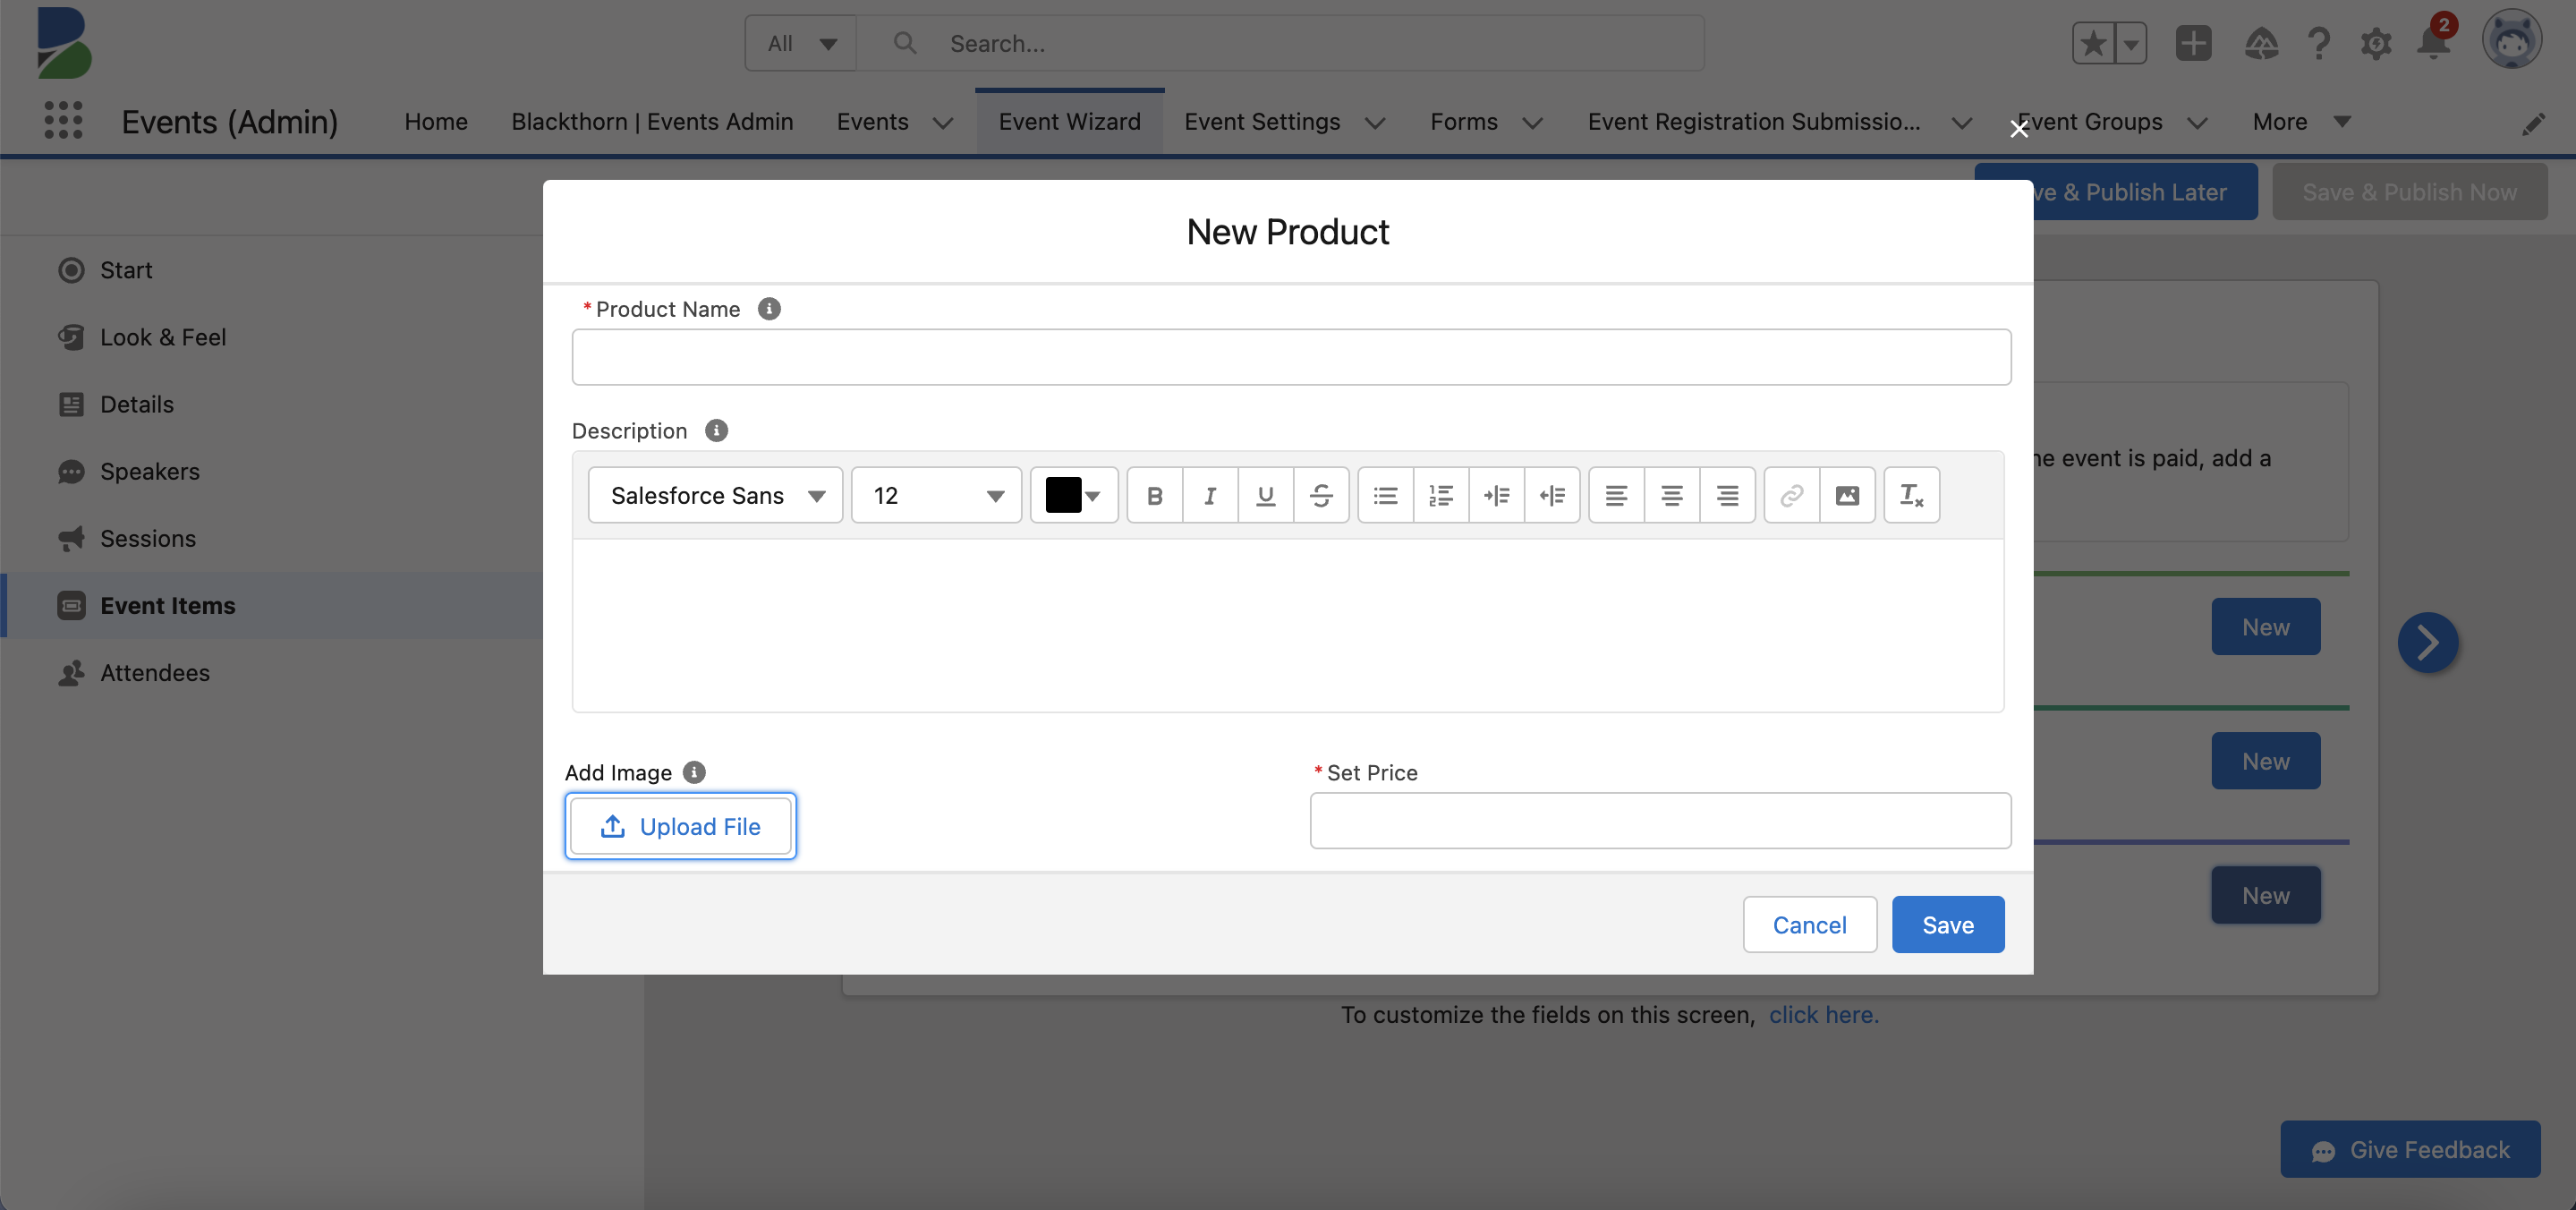
Product Name (required)
Description
Add Image
Set Price
Click Save.
FAQ
Q: How many Tickets can an Attendee purchase at one time?
A: The Maximum Quantity or number of Tickets purchased at one time cannot be larger than 10. Please contact Blackthorn Support if you would like to increase the number to 25.