Action Required: Upcoming Changes to the Email Template Builder
We want to make you aware of an important update regarding our integration with Beefree. Beefree is transitioning away from its legacy authentication system, and this change will affect the Email Template Builder unless action is taken. Please review the attached letter to see the steps you need to take.
On this page, you will learn how to create and send our "out of the box" Email Templates via flows!
If our "out of the box" Email Template doesn't meet your requirements, head over to our Email Template Builder documentation to check out how to create your own templates!
Salesforce Configurations
There are several standard configuration steps that will improve the deliverability and professionalism of emails sent from Salesforce. These configuration steps will impact all emails generated from within Salesforce, not just Blackthorn.
Please work with your Salesforce administrator to complete the following steps.
Enable email security compliance and include Salesforce in your SPF record: Sender Policy Framework
Create a DKIM key: Set Up Secure DKIM Keys
In-Person Event Emails
After an Attendee registers for an in-person Event, they need to get a confirmation email that includes their AttendeeLink. The AttendeeLink is where they will access their QR code and information about the Event, so it’s important that this stands out.
This section will walk through creating a process that sends out an in-person Event email alert.
Setup Guide
Complete the following steps to set up the Email feature.
Prerequisite
Invoices and confirmation emails must be sent to more than the primary contact.
Activate the Flows
Go to Setup.
In the Quick Find box, enter and click "Flows."
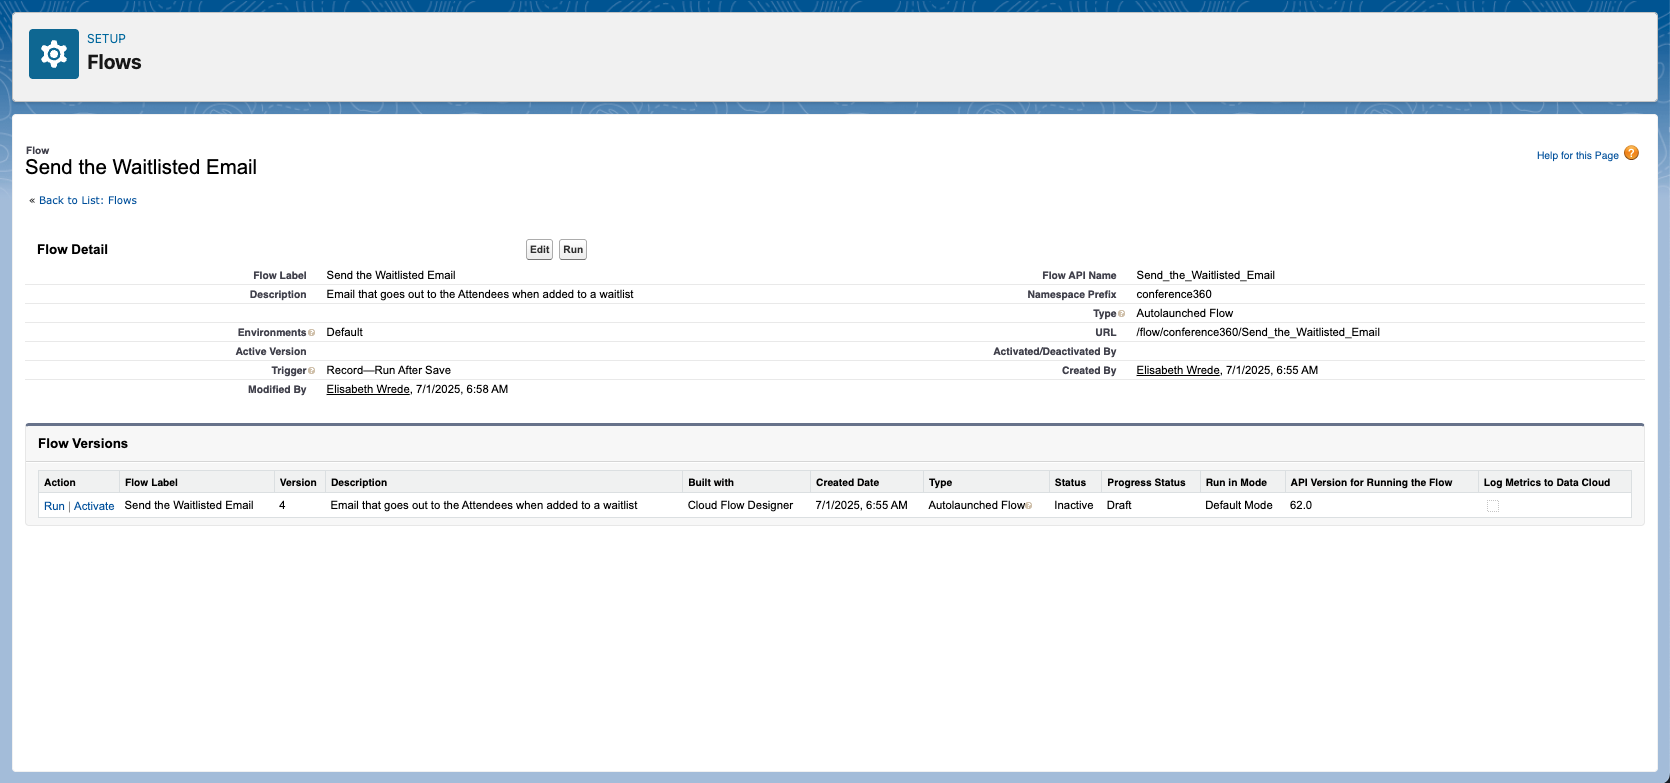
Click View Details and Versions in the drop-down navigation next to the Flow you need to activate.
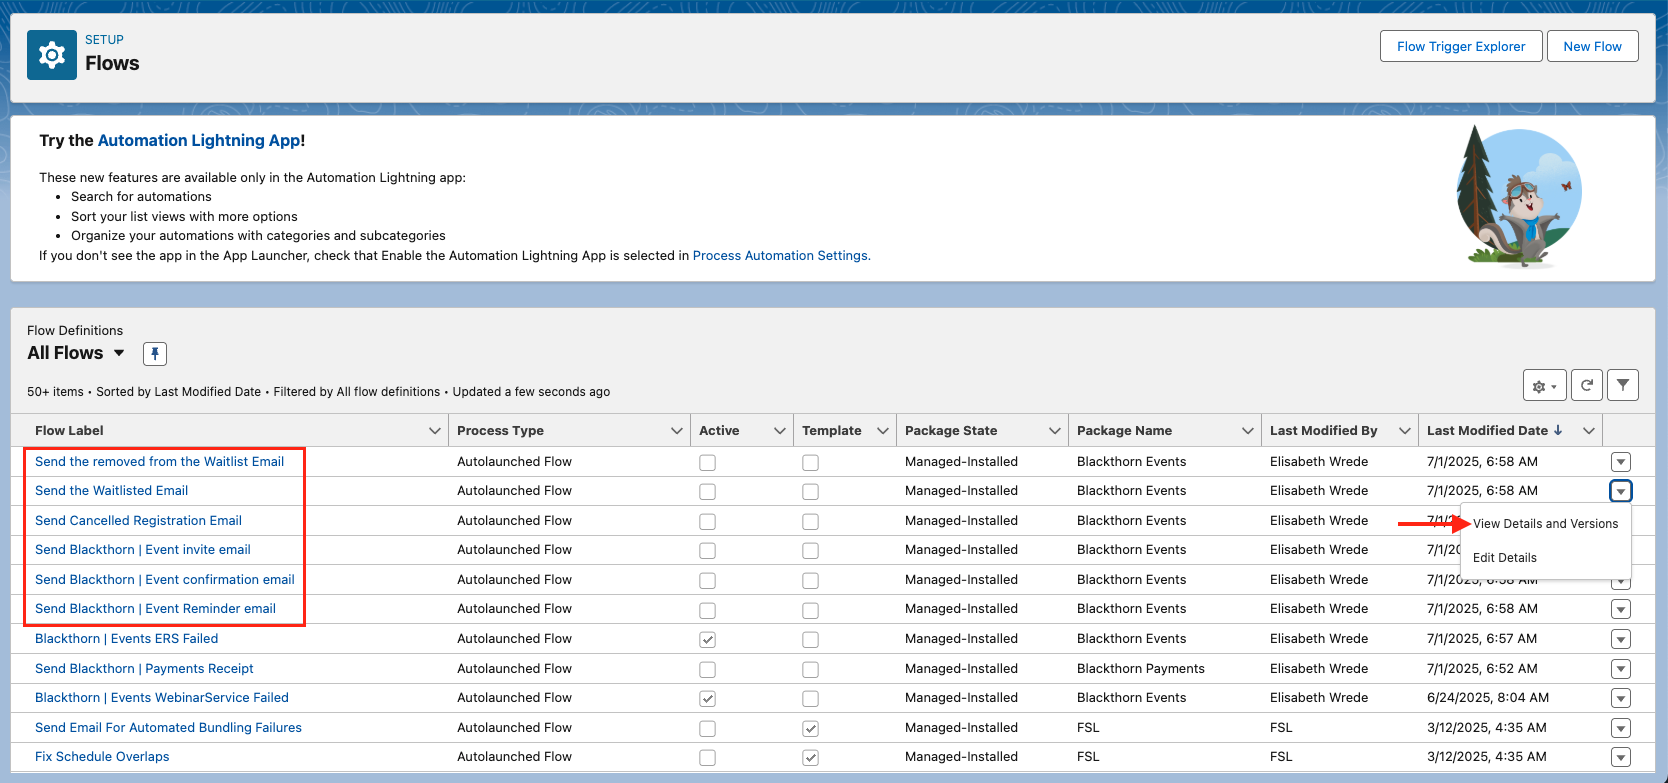
Click Activate.
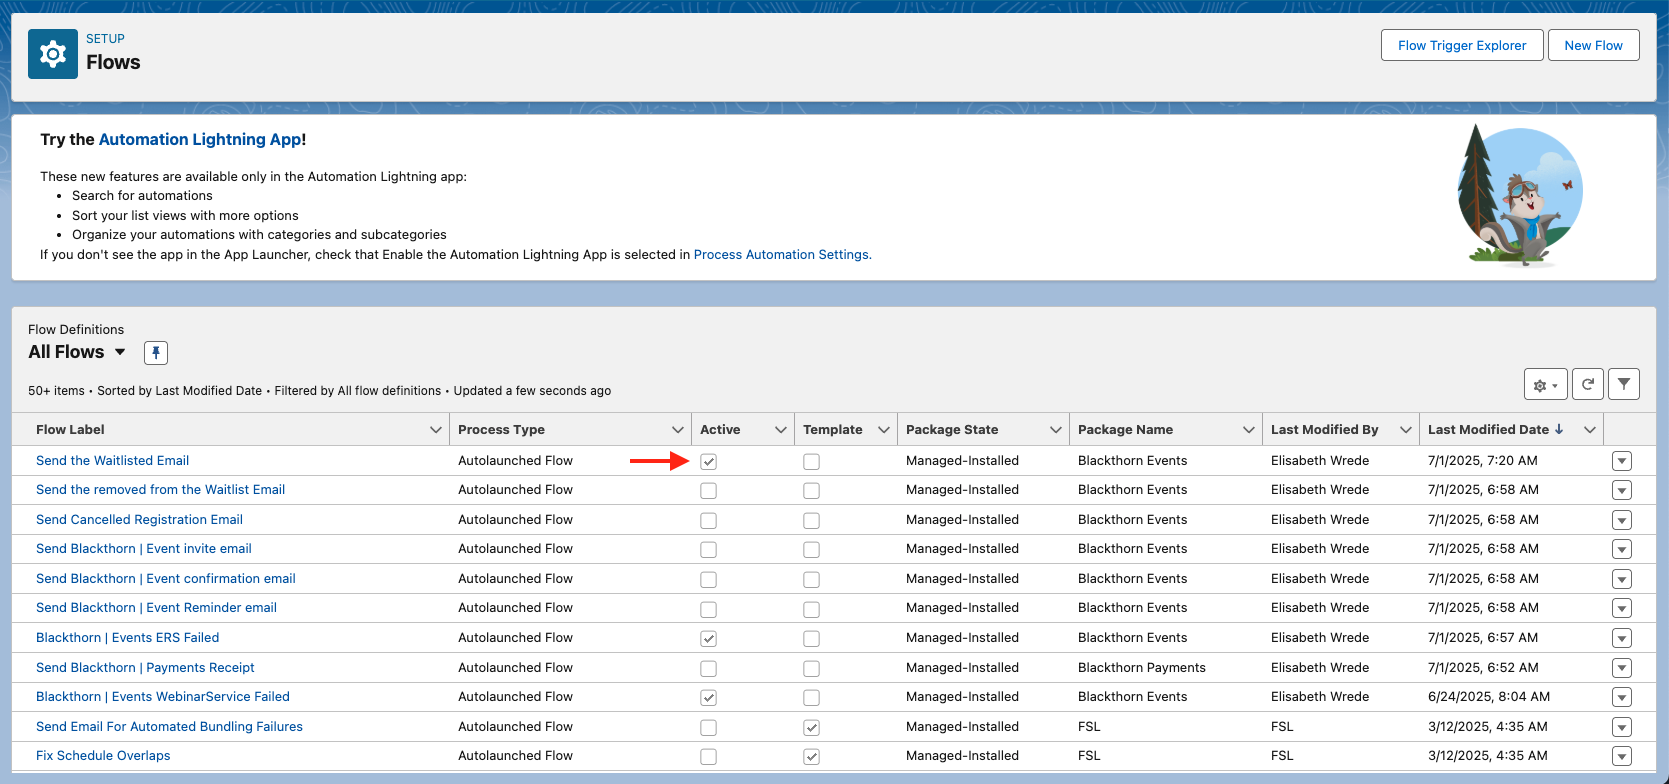
When you go back to the list of Flows, you will see a checkmark next to the Flow you just activated.
We recommend activating the following Flows:
Send Blackthorn | Event confirmation email (Send_Blackthorn_Event_confirmation_email)
Send Blackthorn | Event invite email (Send_Blackthorn_Event_invite_email)
Send Blackthorn | Event Reminder email (Send_Blackthorn_Event_Reminder_email)
Send Cancelled Registration Email (Send_Cancelled_Registration_Email)
Send the Waitlisted Email (Send_the_Waitlisted_Email)
Send the removed from the Waitlist Email (Send_the_removed_from_the_Waitlist_Email)
Note: The workflows of the same name were recently converted to flows.
Alternative Flow Option
Or you can override the following flows and update the Email Template used in the flow to provide greater customization.
Blackthorn | Events ERS Failed (Blackthorn_Events_ERS_Failed)
Blackthorn | Events WebinarService Failed (Blackthorn_Events_WebinarService_Failed)
Send Blackthorn | Event Reminder email (Send_Blackthorn_Event_Reminder_email)
Send Blackthorn | Event confirmation email (Send_Blackthorn_Event_confirmation_email)
Send Blackthorn | Event invite email (Send_Blackthorn_Event_invite_email)
Send Cancelled Registration Email (Send_Cancelled_Registration_Email)
Send the Waitlisted Email (Send_the_Waitlisted_Email
Send the removed from the Waitlist Email (Send_the_removed_from_the_Waitlist_Email)
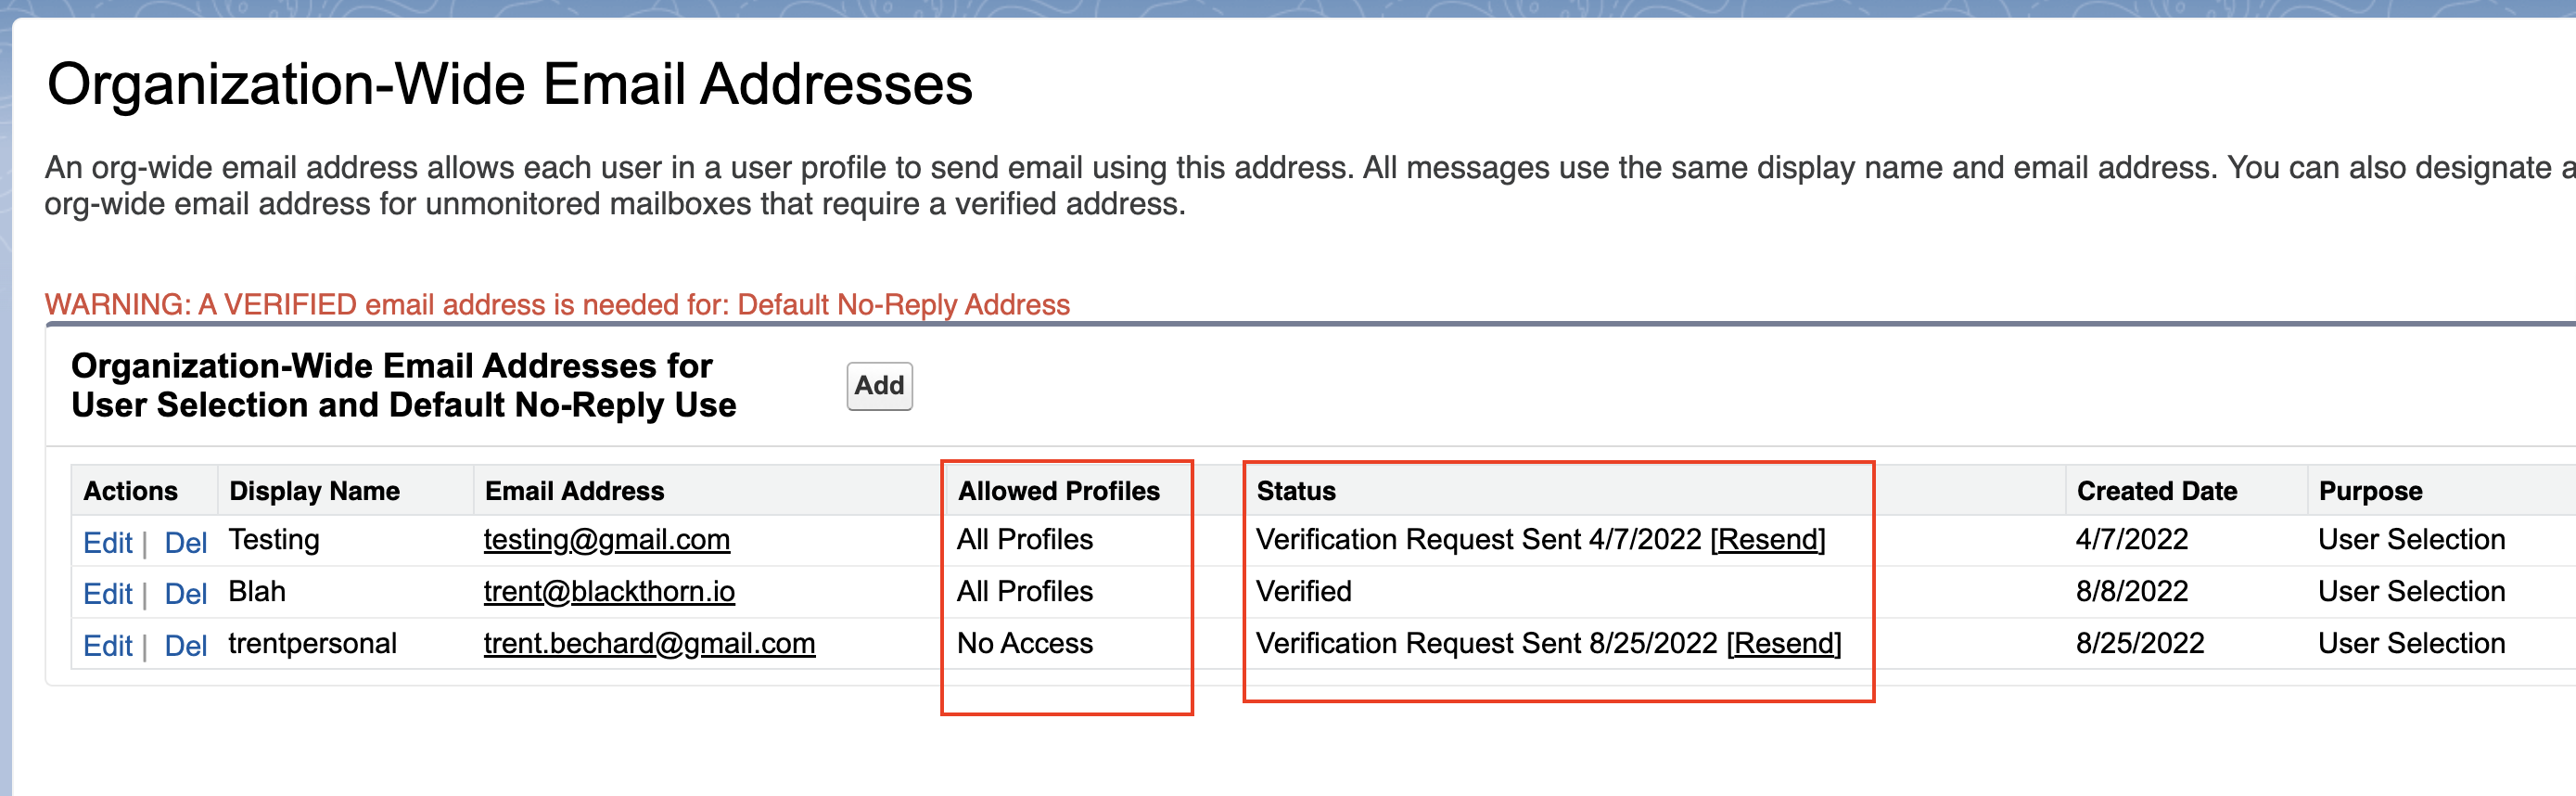
Add an Org-Wide Email Address
Go to Setup.
In the Quick Find box, enter and click "Organization-Wide Addresses."
Click Add.
Fill in the following fields.
Display Name (required)
Email Address (required)
Select a Purpose
Check either “Allow All Profiles to Use this From Address” or “Allow Only Selected Profiles to Use the From Address.”
Select one or more Profiles.
Click Save.
Open the email program for the email address that was entered.
Click the link to verify the email address.
The organization-wide email address’s Status will now be “Verified.”
Set a Default From Email
Event Organizers can configure a default email address for the Email configuration component by using the Event Settings Send Email From (conference360__Send_Email_From__c) field.
The new field lets users set the default email address to an org-wide email address, ensuring emails are sent from monitored, authorized addresses. Now, when sending emails, the Send Emails From dropdown will default to the email address configured in the Send Email From field.
From Email Address Requirements
Only Org-wide email addresses that have also been verified are can be used. This includes current users and created by users. If a NON-org-wide email address is added to this field, the default selection will be the current user.
Create the Out-of-the-Box Email Templates
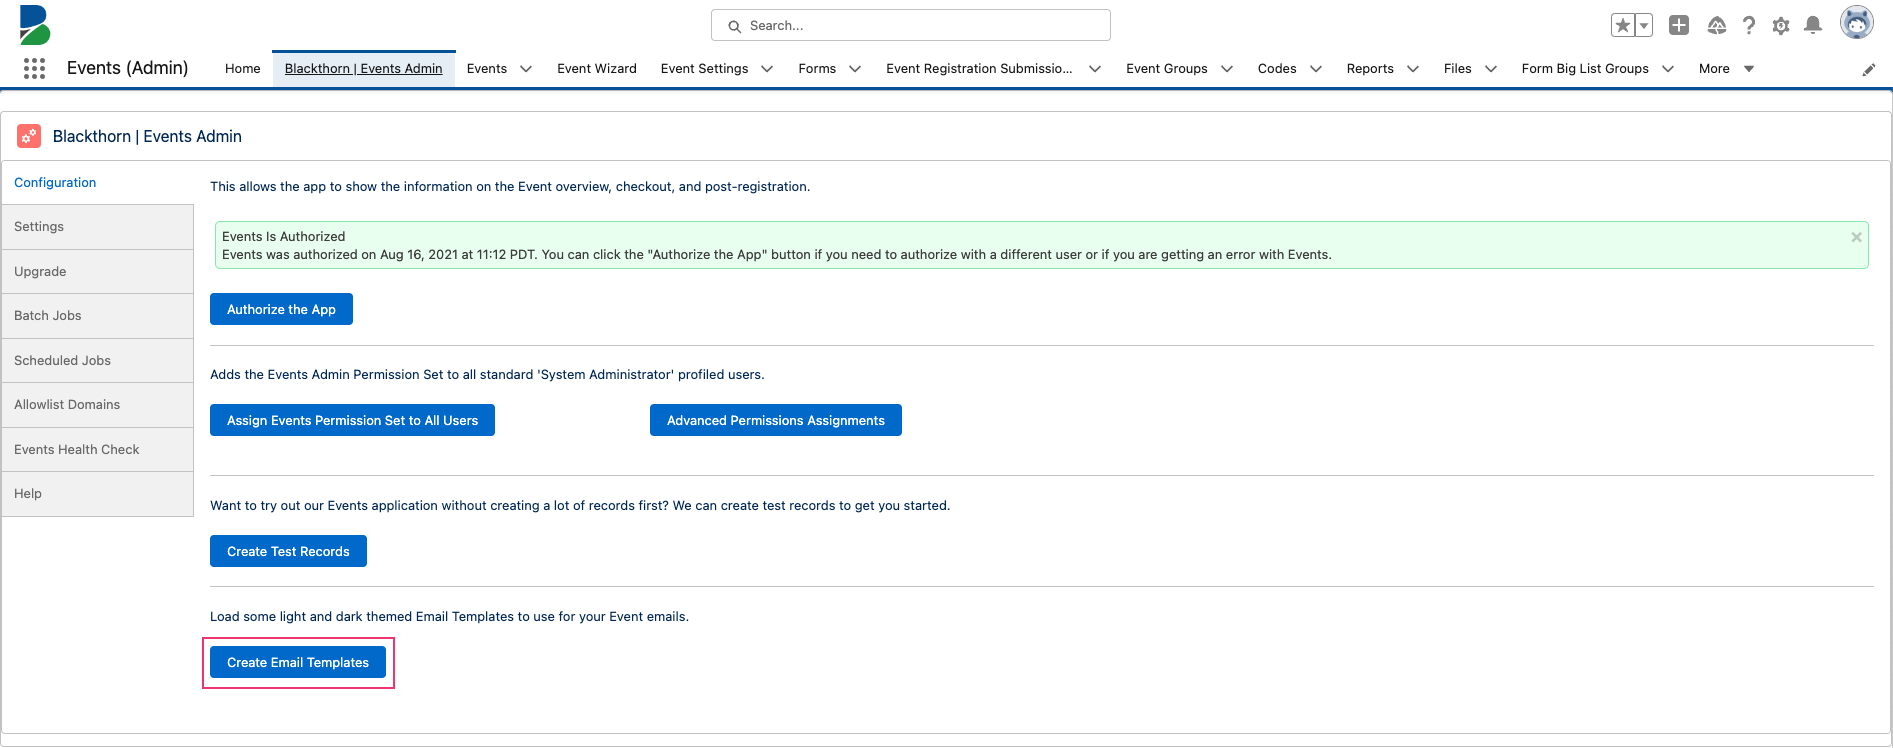
Go to the Blackthorn | Events Admin tab.
Click the Create Email Templates button on the Configuration tab.
Review the Templates section to learn more about the available Email Templates.
Templates
Invite Email
We provide a basic HTML Email Template with a Flow from the Attendee object to get you started.
Invites are sent when an Attendee's Registration Status = "Invited"..png)
Your invited Attendees will receive a custom experience through our AttendeeLink feature, including a personal welcome message, preselected ticket type, RSVP option, and more!
In addition to your customers receiving an amazing experience, you will receive information about Event invite open rates, if the Attendee has declined your RSVP, and the ability to check-in Attendees through a QR code!
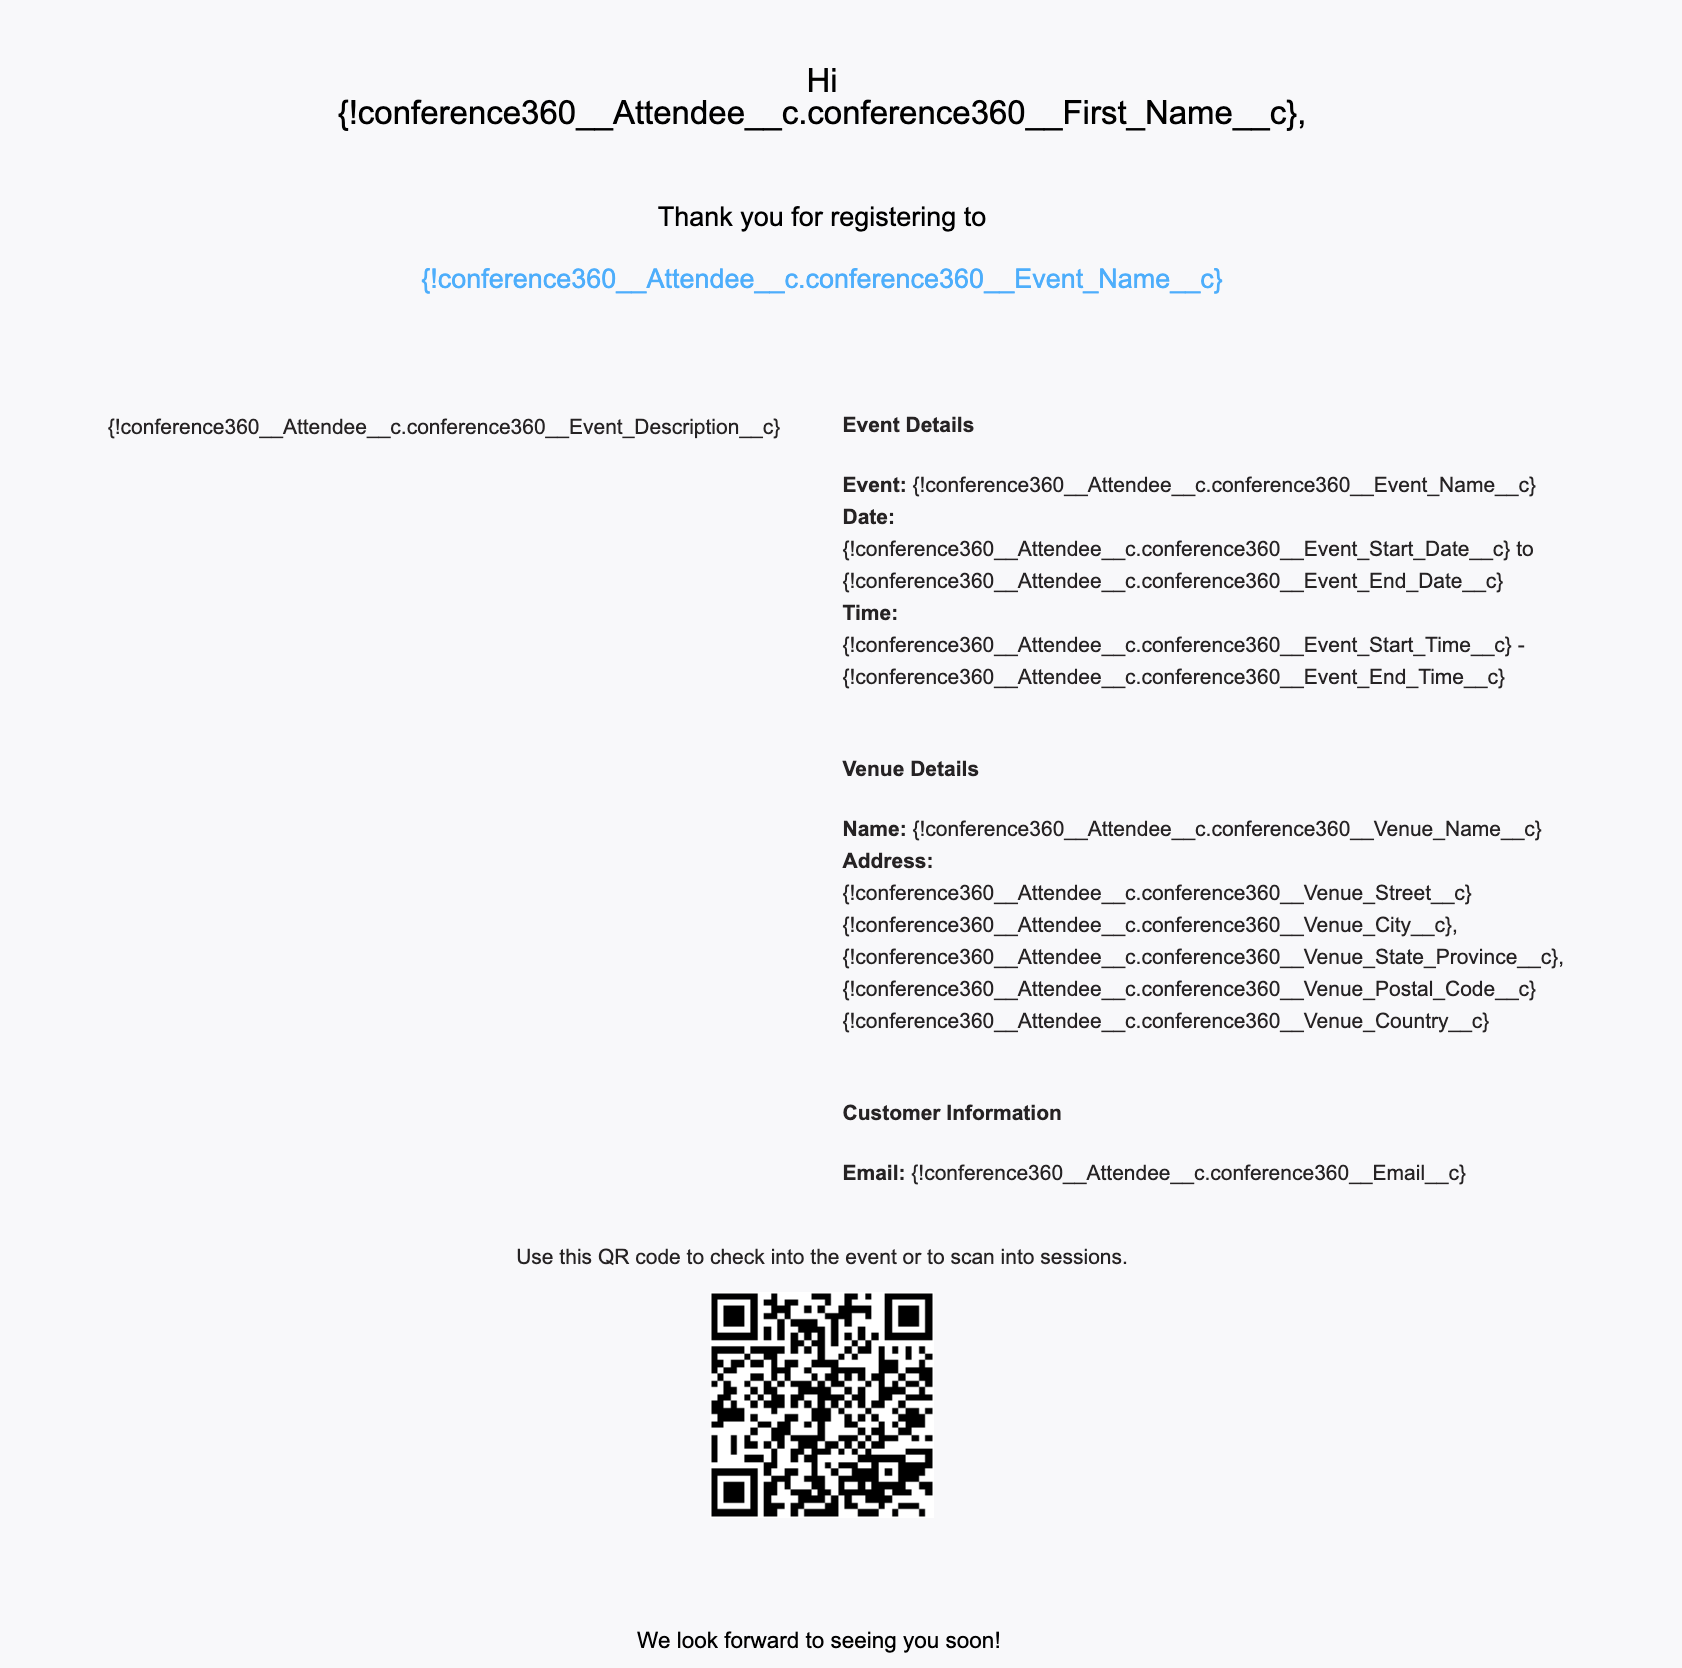
Confirmation Email
You can customize the registration confirmation email your Attendees receive when they register for your Event. We provide a basic HTML Email Template with a Flow from the Attendee object that can be cloned and updated for specific Events.
Confirmation is sent when an Attendee's Registration Status = "Registered".
.png)
Sending Reminders
After you make your Event live, you can customize the reminder email you send to Attendees that were invited previously. We provide a basic HTML Email Template with a Flow from the Attendee object to get you started.
Send to Multiple Attendees
Reminders are sent when an Attendee's Send Reminder = "True".
You can also send reminders from the Event record to all invited Attendees:
Navigate to Setup.
Go to the Events Object.
Click Page Layouts.
Click the "Event Layout" link.
Click Buttons in the Event Layout menu.
Add the Send Reminder button to the layout.
Clicking the Send Reminder button will select and send an email to all the Attendees with a Registration Status = "Invited".
Send to a Specific Attendee
Navigate to Setup
Go to Attendee Object.
Click Page Layouts.
Click the "Attendee Layout" link.
In the "Fields" section, add the Send Reminder checkbox.
Go to the specific Attendee record.
Check the Send Reminder checkbox.
Click Save.
Waitlist Emails
Once an Event reaches capacity, you can send a waitlisting email. This will let the Attendee know the Event is at capacity, but if a slot becomes available, they'll be invited to the Event via email. We provided a basic HTML Email Template with a Flow from the Attendee object to get you started.
Added to Waitlist Email
This email will let the Attendee know they have been added to the Waitlist for the Event.
The Waitlist notification is sent when an Attendee's Registration Status = "Waitlisted - Pending".
Removed from Waitlist Email
This email will let the Attendee know they have been removed from the Waitlist for the Event. The Attendee will then receive an invite email.
The waitlist notification is sent when an Attendee's Registration Status = "Pending".
QR Code
If you do not see the QR code in the Attendee's confirmation email, use one of the following methods to add it.
Use a dynamic image to add a QR code.
Open an existing Email Template or create a new one.
Determine where you want to place the QR code.
Drag and drop the Image icon in the Content navigation to the spot where you want to add the QR code.
Toggle on the Dynamic image.
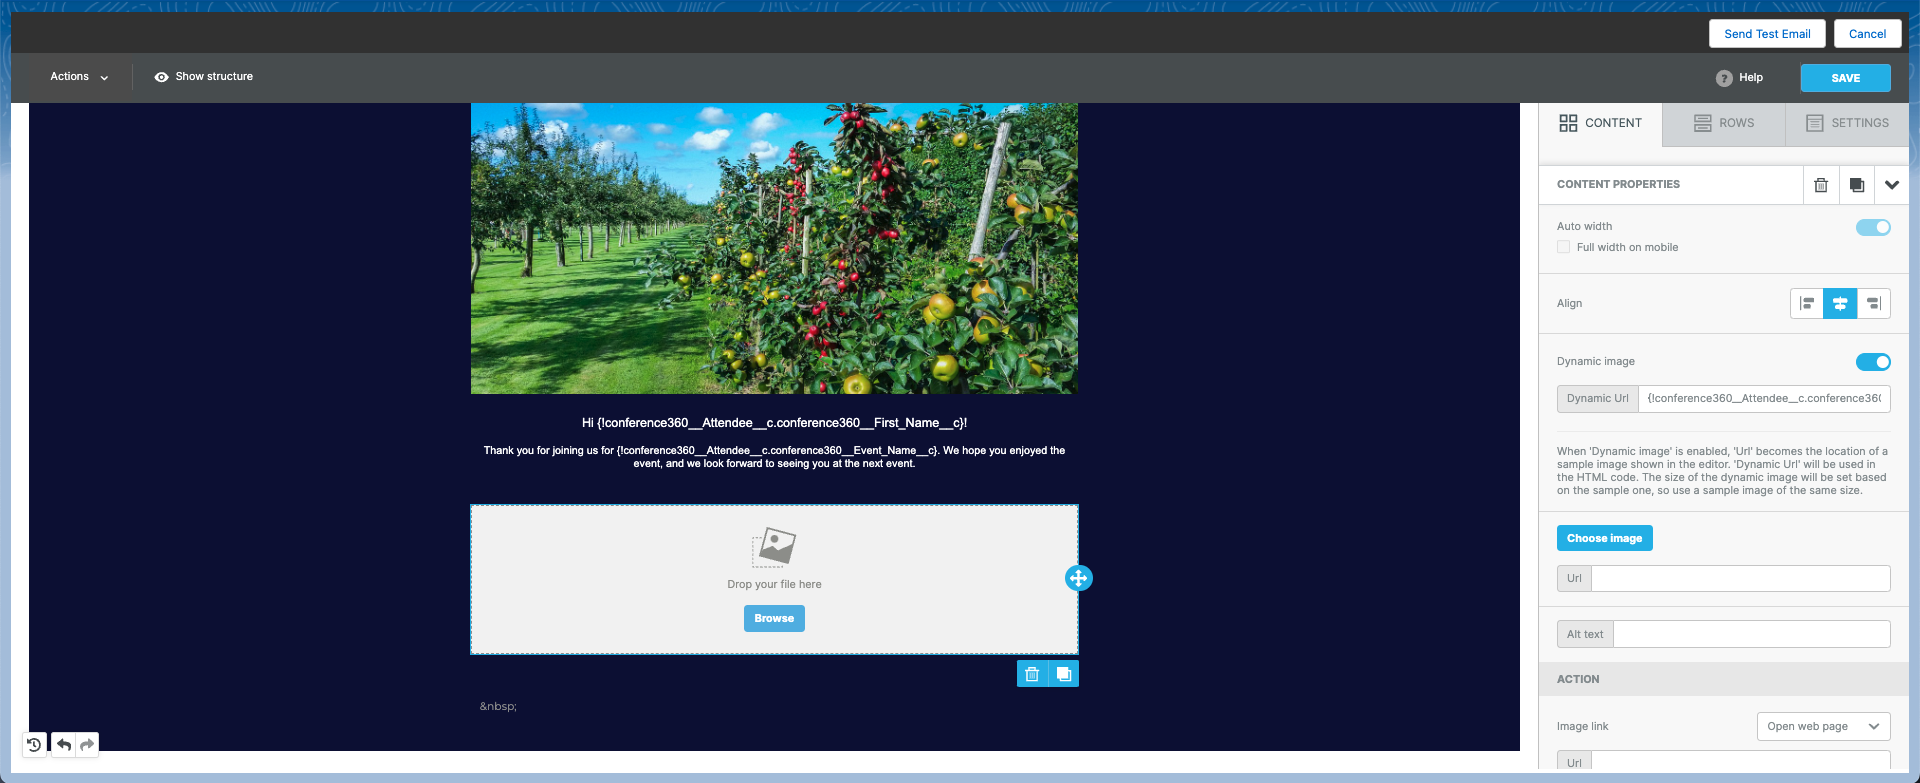
Place the merge tag “Attendee -> QR Code” in any other text block.
Cut the merge tag and paste it into the Image’s Dynamic URL field.
Click Save.
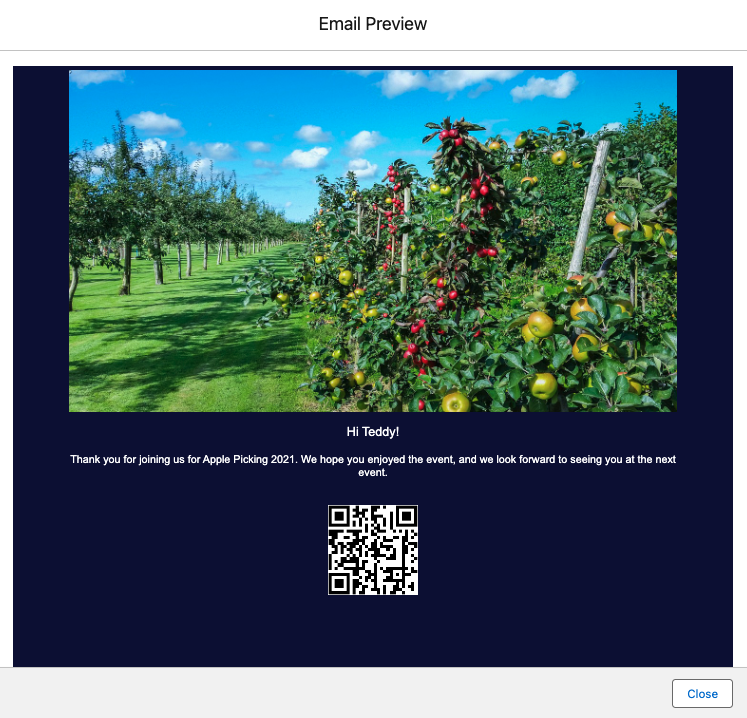
The QR code will now be visible at the bottom of the email.
Update the confirmation Email Template with the HTML code below.
Payment Emails
Payment Receipt Email
A payment receipt is sent when the Invoice's Payment Status = "Paid" and the Record Type = "Invoice" and if the Invoice is created from an Event registration.
Payment Request Email
A payment request notification is sent when the Invoice's Payment Status = "Unpaid" and the Record Type = "Invoice" and if the Invoice is created from an Event registration.
Basic Workflow and Event Receipt Email Template
A payment received notification is sent when an Invoice's Payment Status = "Paid" and the Record Type = "Invoice" and if the Invoice is created from an Event registration.
This workflow and Email Template can be enabled when you are ready to use it.
Navigate to Setup.
Type in and select "Workflow Rules".
Click the related workflow rule.
Activate the workflow to start using the rule and email.
Webinar Emails
Overview
After an Attendee registers for a webinar, they need to receive a confirmation email that includes their AttendeeLink. The AttendeeLink is where they will access the webinar, so it’s important that this stands out.
This section will walk through the process of creating a webinar email alert.
Setup Guide
In Setup, search for "Classic Email Templates".
Click the "New Template" option and select "Custom (without using Classic Letterhead)".
Name your Email Template; for this example, we've used "Blackthorn | Events Webinar Confirmation Email".
Mark "Available for Use".
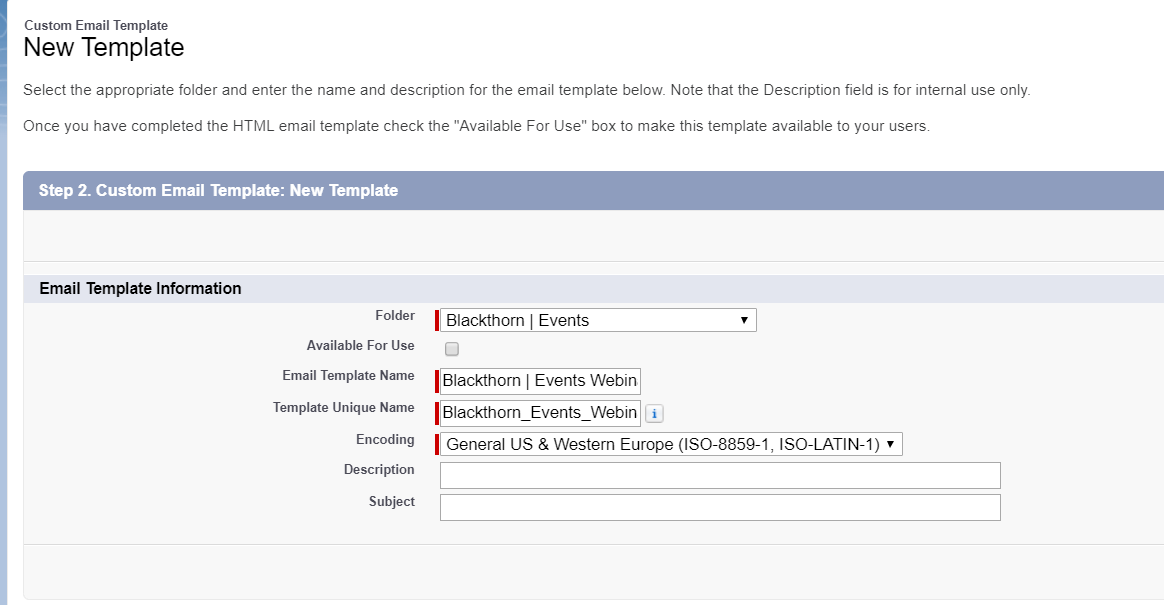
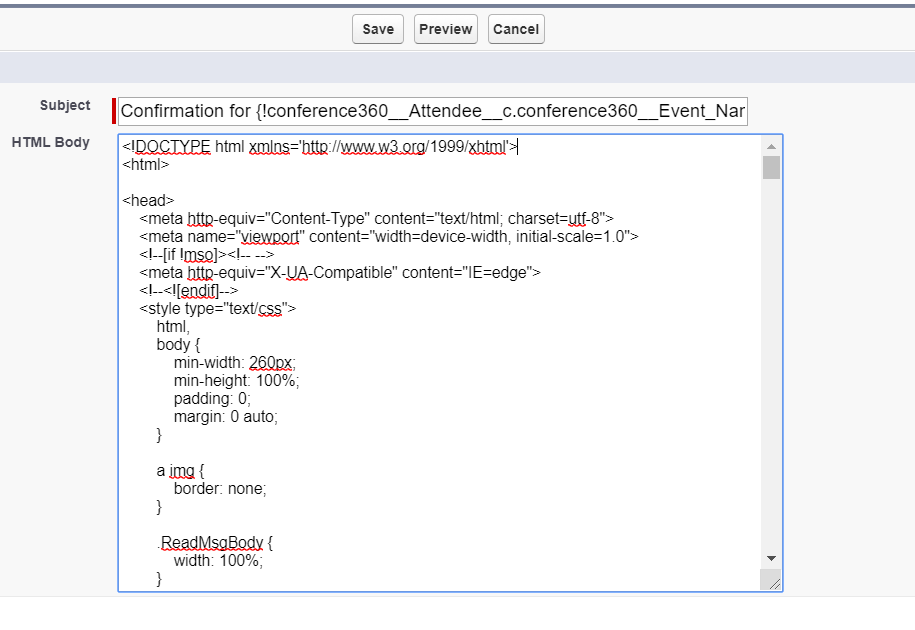
Enter a subject line. We've used "Confirmation for {!conference360__Attendee__c.conference360__Event_Name__c}" as our subject line, feel free to change it up!
Copy the HTML code into the body. You can use the HTML codes below as a template to get started.
(Optional) Give it a test by clicking Send Test and Verify Merge Fields.
Define a Contact and Attendee record.
Send it to your email.
Setup an Email Alert to send from our Process Builder.
Click Setup.
Search for "Email Alerts" in the Quick Find box.
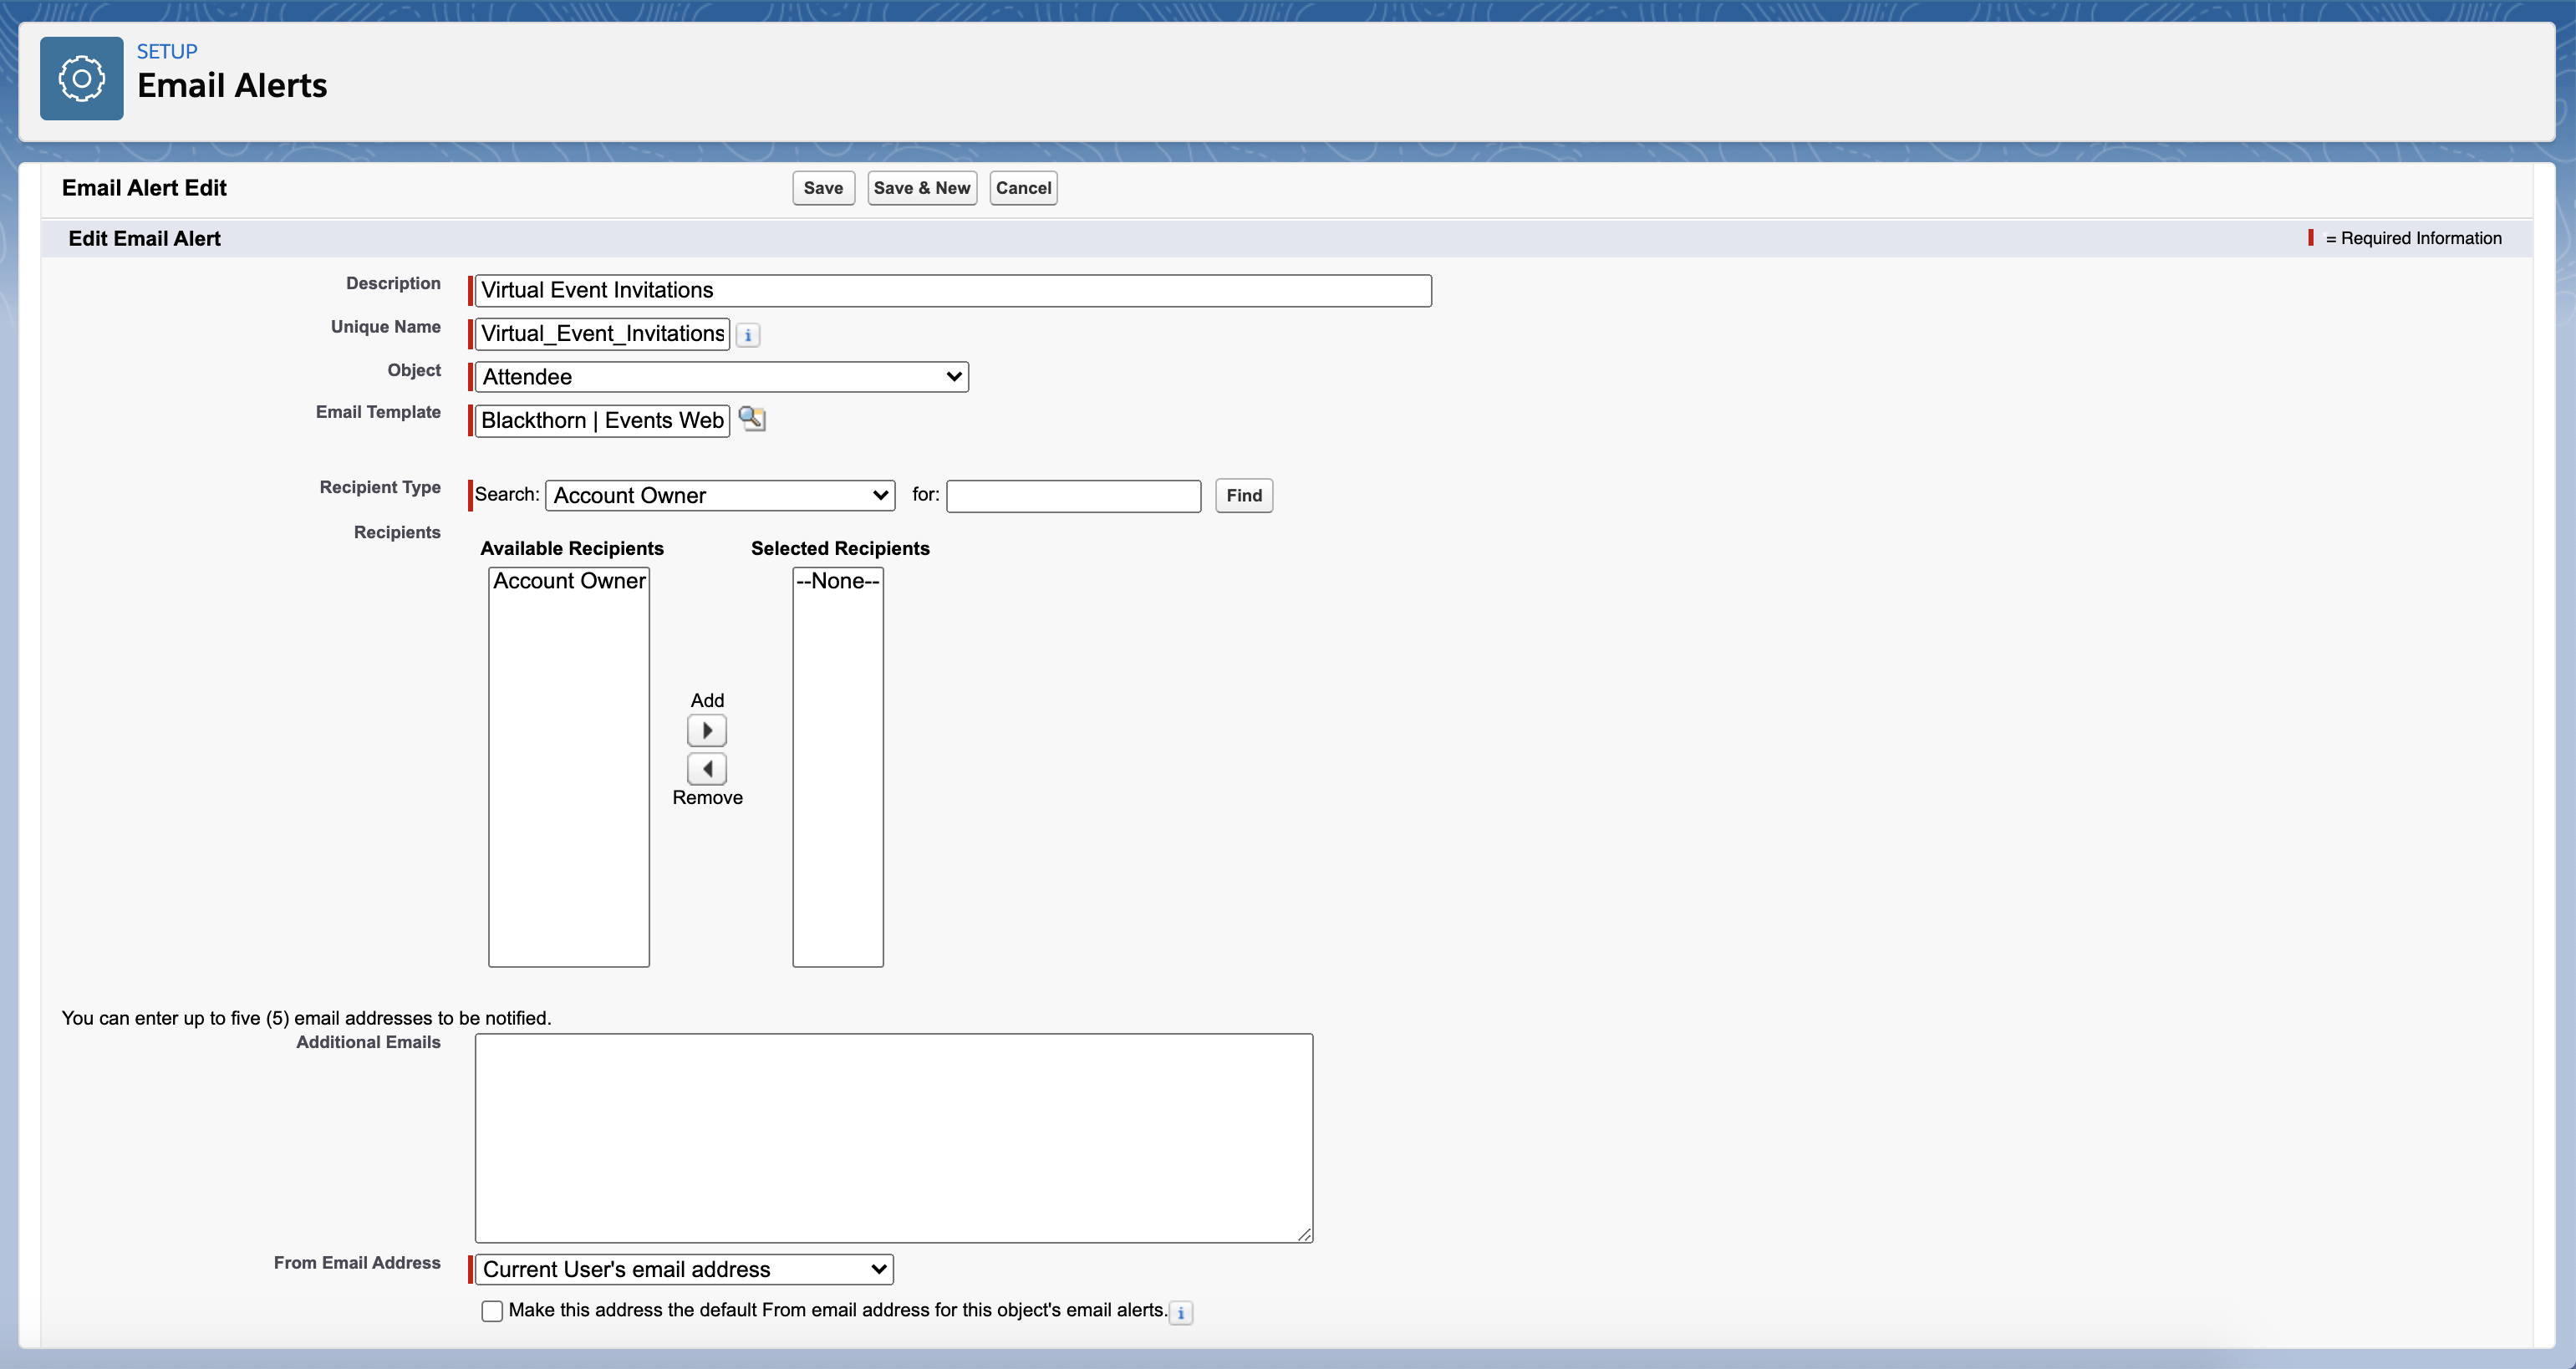
Click New Email Alert.
Define the following fields:
Description: add a friendly name for your Email Alert
Object: choose the Attendee
Email Template: choose the Email Template used in the previous steps
From Email Address = select the Current User's Email Address (This is the user who authorized Blackthorn Events to send emails.)
Create a new process in the Process Builder.
Choose the Attendee object.
Select Only when a record is created.
Define criteria for action group when conditions are met: Set the Event Category (conference360__Category__c) to "Virtual Event". This step only defines the category for Virtual Events. If you need a process to send in-person Event emails, set up a new process for that.
.png)
.png)
Immediate action: Send (custom) Email Alert for Virtual Event confirmation.
.png)
Your Process Builder should now appear similar to the following image:
.png)
Click the Activate button in the top right corner, and you're done!
Now when Attendees register for the webinar, they will receive a confirmation email with the webinar details and a link to join the meeting.
Templates
Below is a list of Email Templates we have built for you.
Webinar Confirmation HTML #1
Email #1 received when an {{variable.ObjectAttendee}} registers for an {{variable.ObjectEvent}}.
Webinar Confirmation Text #1
THANKS FOR JOINING
Your registration is complete.
The Webinar begins on {!conference360__Attendee__c.conference360__Event_Start_Date__c} at {!conference360__Attendee__c.conference360__Event_Start_Time__c}.

{!conference360__Attendee__c.conference360__Event_Description__c}
Webinar Confirmation HTML #2
Email #2 received when an {{variable.ObjectAttendee}} registers for an {{variable.ObjectEvent}}.
Webinar Confirmation Text #2
THANKS FOR JOINING
Your registration is complete.
The Webinar begins on {!conference360__Attendee__c.conference360__Event_Start_Date__c} at {!conference360__Attendee__c.conference360__Event_Start_Time__c}.

{!conference360__Attendee__c.conference360__Event_Description__c}
Webinar Reminder HTML #1
Email #1 received when using the "Send Reminder" function.
Webinar Reminder HTML #2
Email #2 received when using the "Send Reminder" function.
Webinar Reminder Text #2
UPCOMING WEBINAR ALERT
Just a friendly reminder of our upcoming webinar.
The Webinar begins on {!conference360__Attendee__c.conference360__Event_Start_Date__c} at {!conference360__Attendee__c.conference360__Event_Start_Time__c}.

{!conference360__Attendee__c.conference360__Event_Description__c}
Webinar "Sorry We Missed You"
To be sent if an Attendee doesn't show up to the webinar.
Webinar "Sorry We Missed You" Text
Sorry we missed you!

Hi, {!conference360__Attendee__c.conference360__First_Name__c}

We noticed you weren't able to make it to {!conference360__Attendee__c.conference360__Event_Name__c}. We're bummed we missed you, but we've got you covered! An on-demand webinar can be viewed here at your convenience:

WATCH THE REPLAY <LINK>

Thank you,
Blackthorn Email Configuration
Are you trying to configure which Attendee Registration Status should receive certain emails? Well, you've come to the right place. Normally this is only possible through Salesforce workflows, but we've added some flexibility to that. This is configurable on each individual Event record, and templates can be pulled from the Email Template Builder.
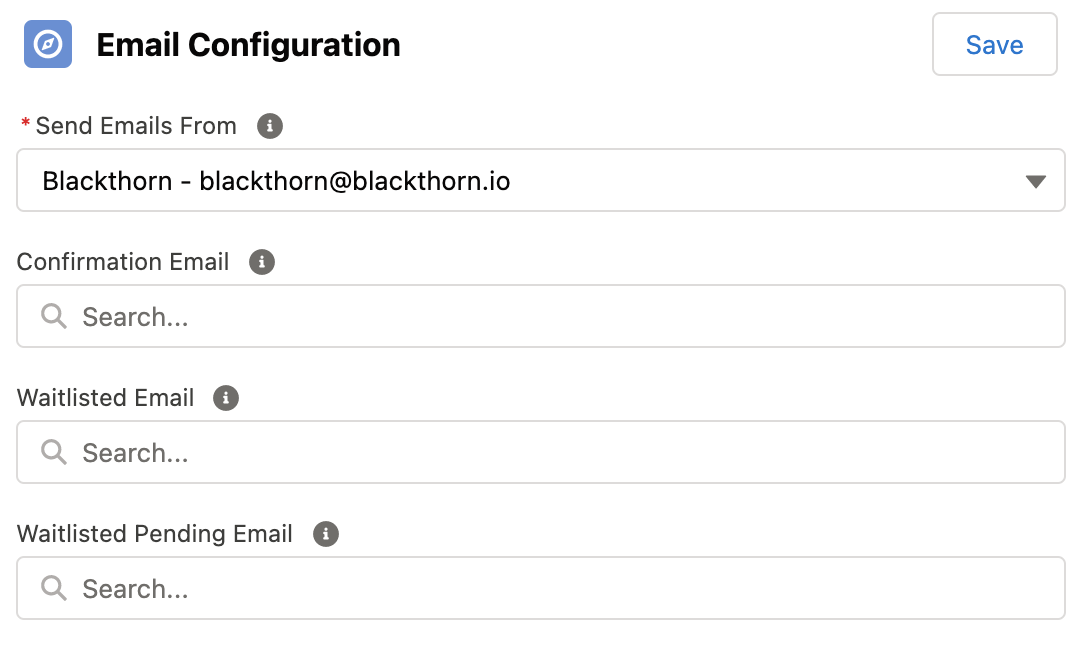
The BT Event Email Config was added with the standard Blackthorn | Events (Organizer) in mind. The component comes with three lookup fields for organizers to search and apply which Email Templates fire with the appropriate Attendee status.
When an Attendee's Registration Status = "Registered", the confirmation email will send.
When an Attendee's Registration Status = "Waitlisted - Pending", the waitlisted email will send.
When an Attendee's Registration Status = "Pending", the waitlisted-pending email will send.
The Send Emails From dropdown field in the Email Configuration component lists verified organization-wide email addresses. The picklist options include the current user, the user who authenticated the Events app, and the “Created By User” or the user who created the Event.
Please note that for an email address to be available in the Send Emails From field in the email component, the email address must be set as an organization-wide email address.
Setting the Send Emails From field in the Email Configuration component to the current user does not change the email sender for after-registration emails sent to Attendees who registered via a webpage. Those emails are sent from the user who authorized the Events app because the checkout process runs in the authorized user's name.
If a logged-in user creates Attendee records manually from the backend or the Attendee Registration Component, all emails will be sent from that user's email because they created the Attendee records. However, when Attendees register via the Event’s webpage, the Attendee records are created in the name of the Blackthorn authenticated user.
Working with Merge Fields
If an Email Template uses merge fields mapped from custom questions on the registration form, recipients will receive emails with blank values. This occurs because custom questions take up to two minutes to process and map, and since the Email component does not have a delay feature, the email is sent instantly upon the creation of the Attendee record.
To prevent this, use delayed custom automation to send emails.
Helpful Tips
Why don't I see the image in the email?
If you don't see an image in the email, use the steps below to troubleshoot the problem.
Image URL
Check the Image URL to make sure the URL is not broken and starts with “http://” or “https://”.
Using Images Stored in Documents
If you are using Documents to store the image, complete the following steps.
Add an image to the Documents tab.
On the Documents home page, open the image by clicking its name.
Right-click the image and get its reusable URL address. When you use the URL, you reference the copy of the image on the Salesforce server.
Paste the URL in the Event Image URL field.
Images Uploaded via Files
The Attendee object includes a formula field that captures the Event's image. This field displays the image in the invite, confirmation, and reminder emails. Unfortunately, Classic Email Templates do not support images uploaded through Files.
To ensure the image is visible, upload the Event image to Documents or customize the Email Template and remove the Attendee Event Image URL (conference360__Event_Image_URL__c) field reference.
How do I attach a file to my Email Template?
Go to Setup.
In the Quick Find box, enter and click “Classic Email Templates.”
Go to the Blackthorn | Events or Blackthorn | Payments folder.
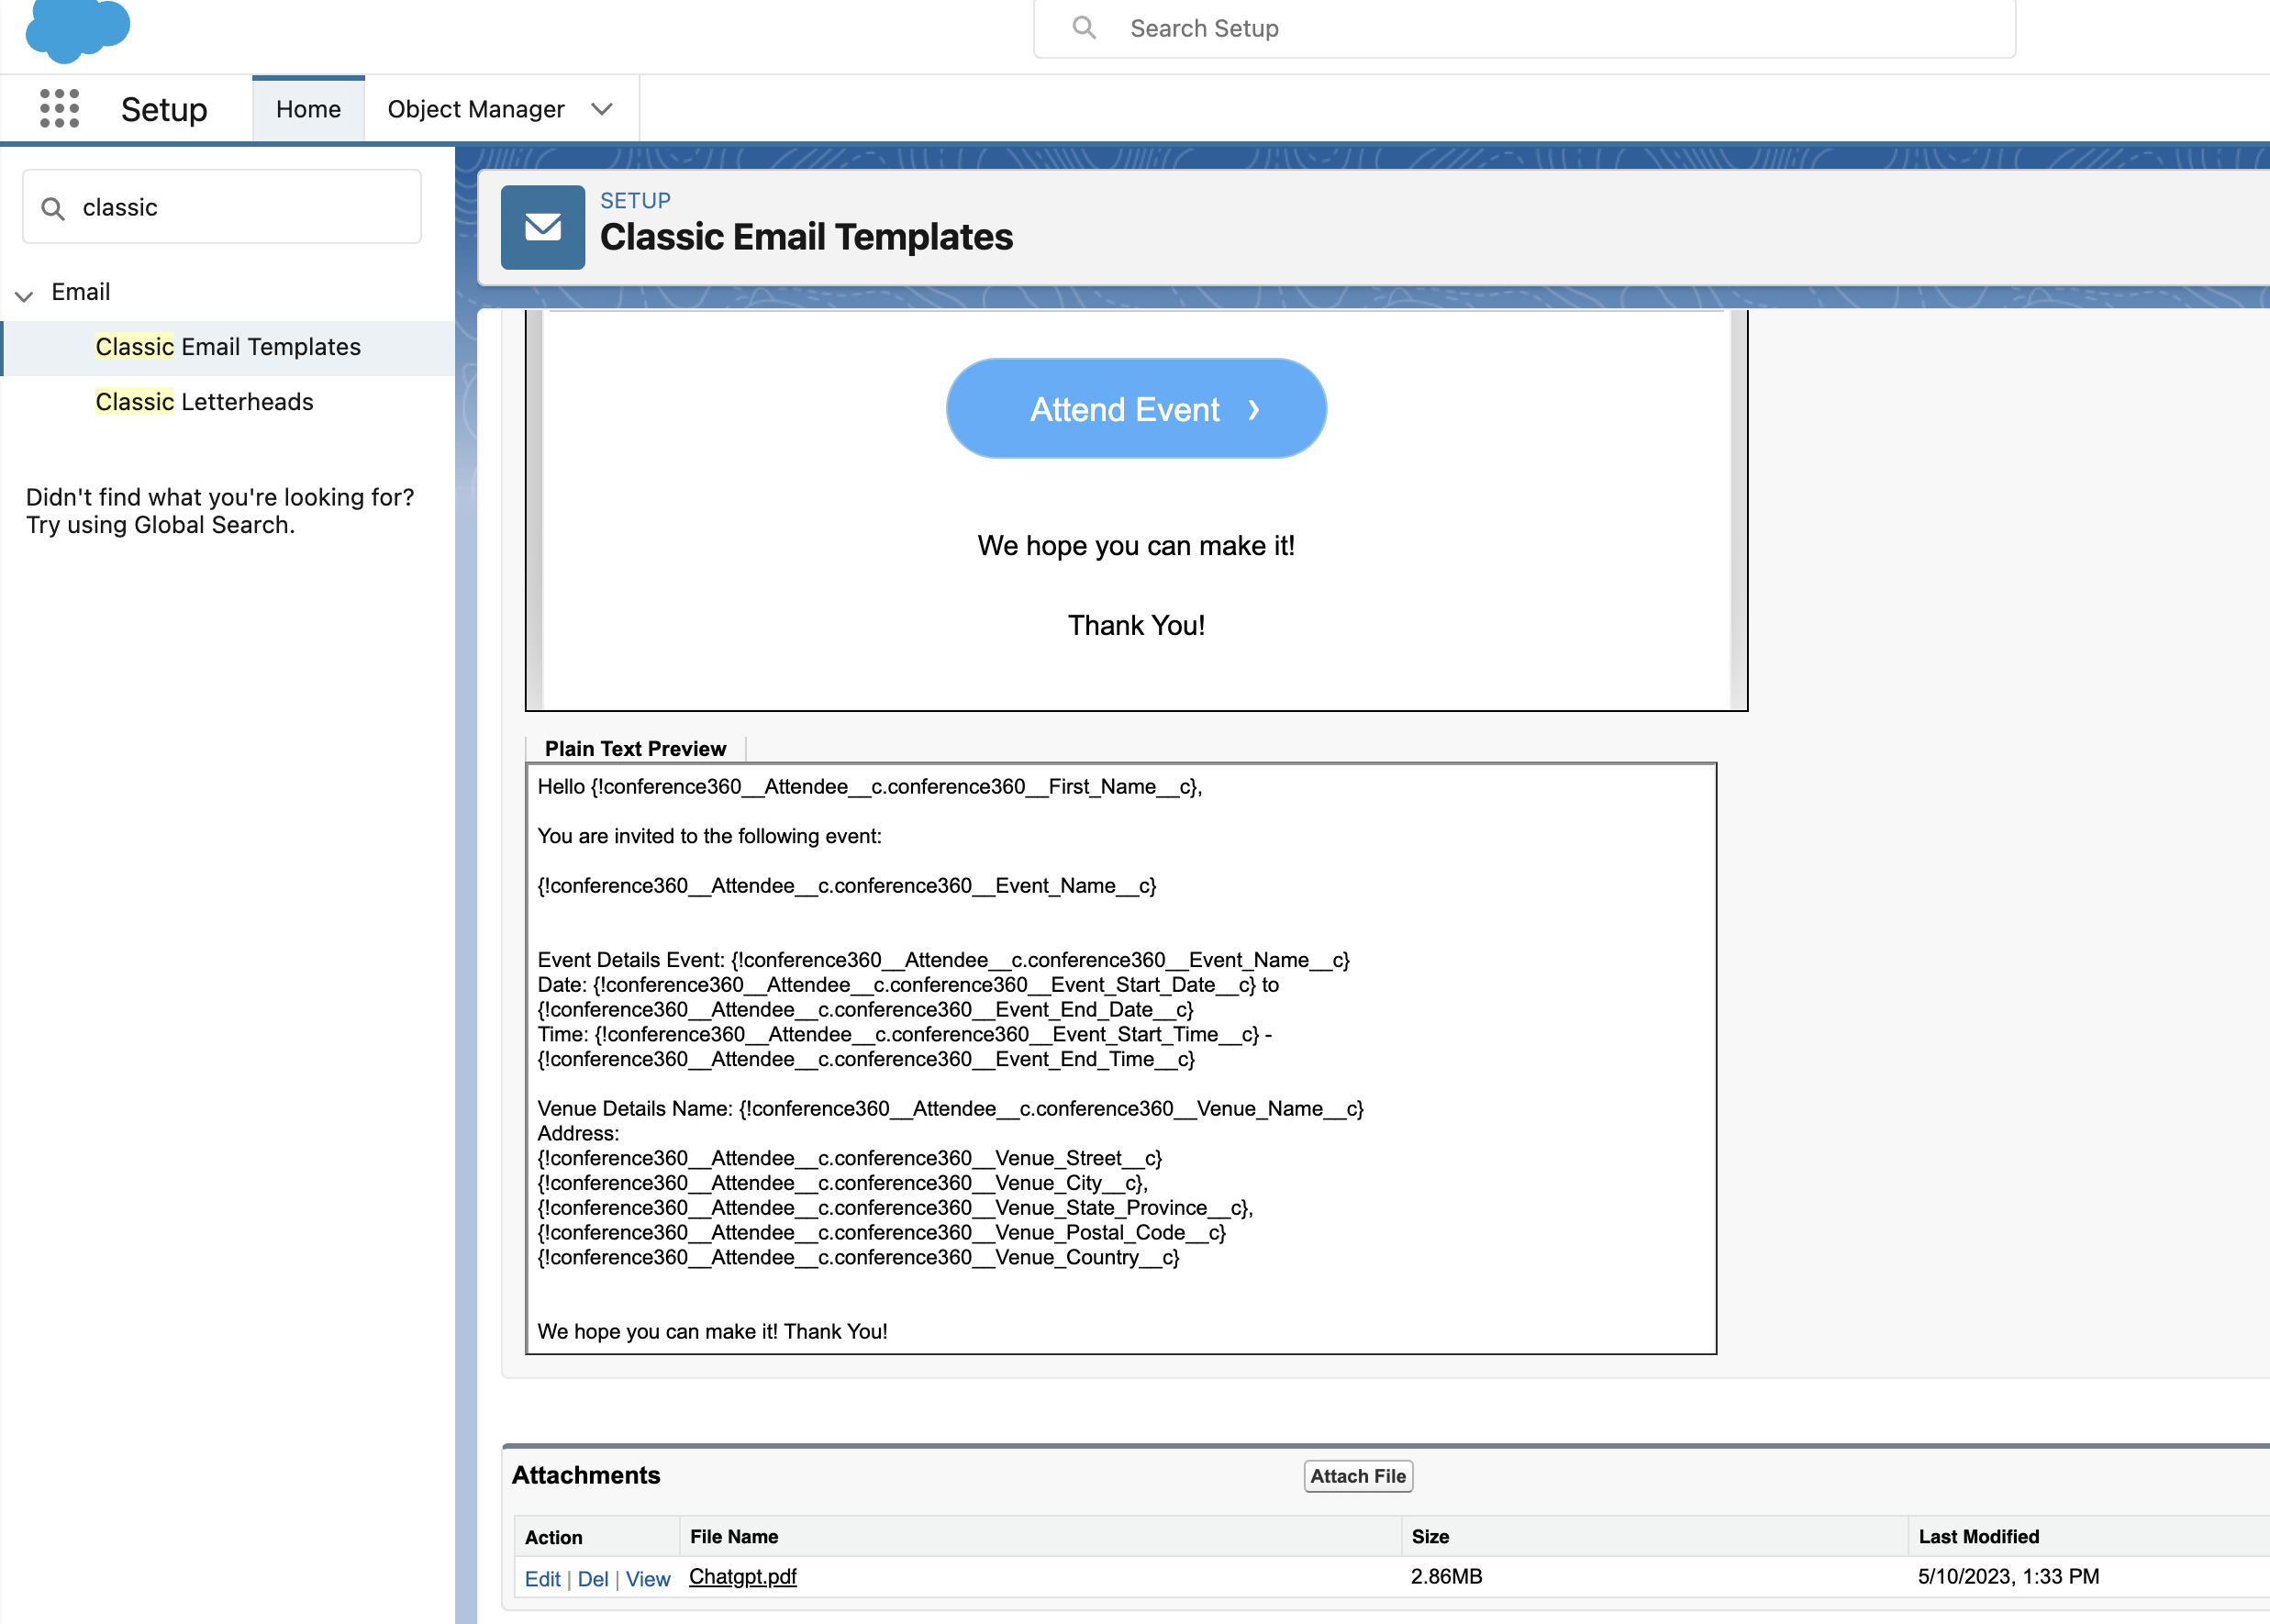
Click the name of the Email Template you need to access. (All Email Templates created in the Email Template Builder are stored as Classic Email Templates too.)
Scroll down to the Attachments section at the bottom of the page.
Click Attach File.
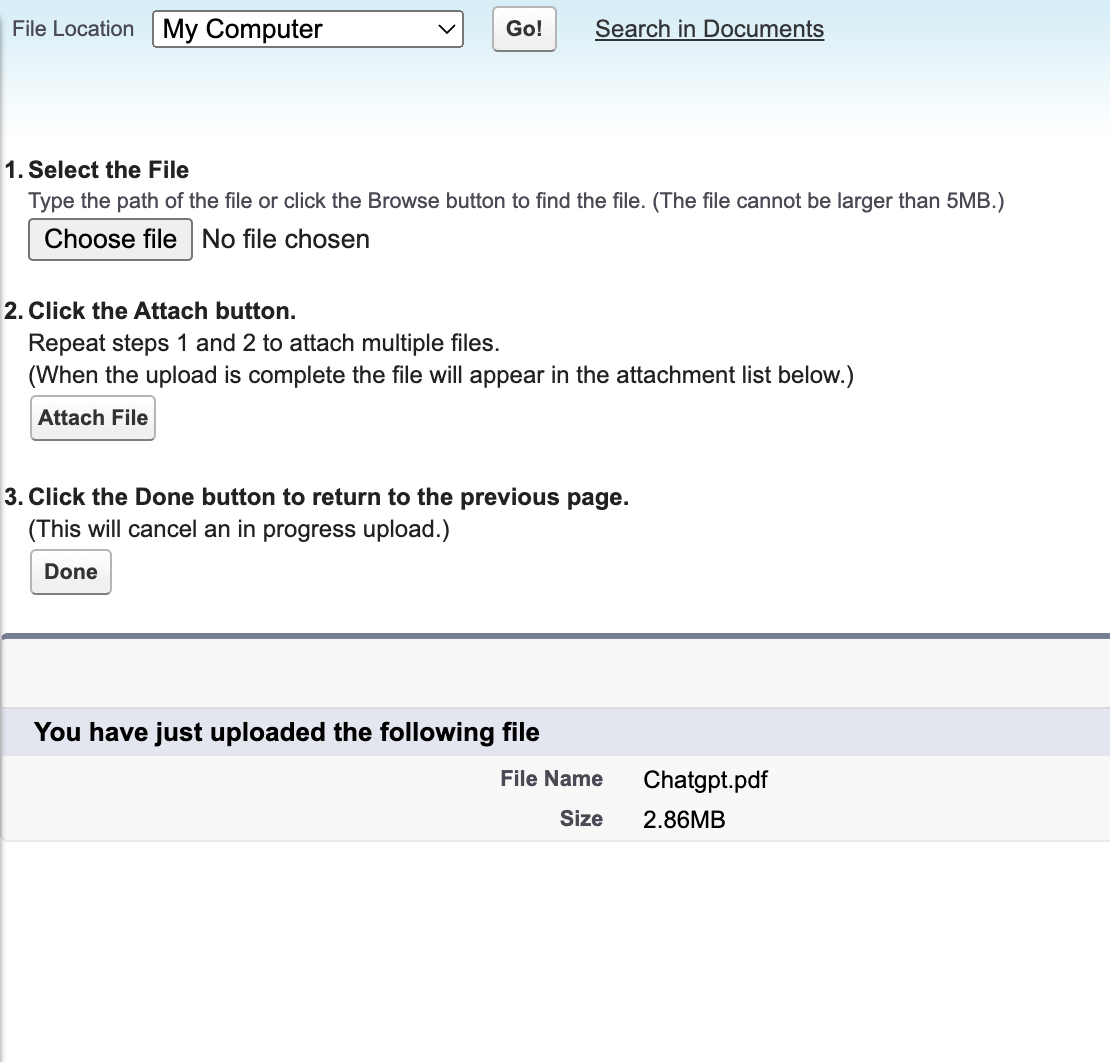
Select the file you want to attach.
The attached file is now visible at the bottom of your Email Template.
For more information about files and Salesforce, see the Using Salesforce Files article.