You can configure Blackthorn Messaging based on how you want the application to perform. To do so, go to the Messaging Administration tab and click the Configuration Settings tab.
Let’s take a look at each option in detail.
General
Enable Campaigns
Enable this option if you intend to use inbound keyword campaigns. If this box is NOT checked then Messaging will not attempt to match inbound messages to a campaign.
Enable Trackable Links
Enable this option if you want all URLs that begin with “http://” or “https://” to be shortened into a trackable link.
Add Messages to Contact on Lead Conversion
When this option is enabled, all messages associated with a Lead will be carried over to the Contact when the Lead is converted.
Message
Inbound Message Settings
Auto-Create Leads
Enable this option if you want a Lead to be created whenever an inbound message is not matched to an existing record.
Post Incoming Messages to Chatter
Enable this option if you want a Chatter post to be made to the SMS Message record owner whenever an incoming text message is received. This is especially helpful on the Salesforce mobile app because the Chatter post will create an alert.
Default Search Objects
When an incoming text message is received and it cannot be matched to an existing conversation between the two phone numbers, Messaging will search all the phone fields in this object to find a matching record.
You can also enter multiple objects in this field, i.e. “Contact, Lead”. Messaging will first attempt to find a Contact that matches this phone number. If one is not found, it will then attempt to find a Lead that matches the phone number.
Outbound Message Settings
Enable Task Trigger
If enabled, an SMS is automatically sent to the person in the Task’s Name field when the Task record is created if the Subject field starts with “Send SMS” and only the Template’s Code is entered in the Comments field.
Attach Outbound Images
Enable this option if you want to save OUTBOUND images as an attachment to your message. This only pertains to single messages. Bulk messages that contain an image will never have the image saved as an attachment.
If this option is enabled, each image attachment will consume file storage space in your Salesforce org.
Consent Popup Frequency
Select either “Once per Recipient,” “Once per Sender,” or "Once per Recipient (Opt-in)" to configure how frequently the SMS consent popup will be displayed to the Salesforce user. The popup cannot be fully disabled due to Messaging’s consent policy. Click here to learn how to change the content of your help/stop consent messages.
SMS Signature
Your SMS Signature will be attached to the initial message for each number until you receive a reply from the recipient. Include your company’s name and opt-out instructions in your signature.
Enable Incoming Message Sound
Complete the following steps to enable the incoming message sound.
- Go to Setup.
- In the Quick Find box, enter and click "Custom Settings".
- Click Manage next to Incoming Message Sound.
- Set Inbox Incoming Message Volume = "True" (checked).
- Set Incoming Message Volume = "True" (checked).
- Click Save.
TO Phone Number Settings
Use the TO Phone Number Settings to configure the following settings for the Account, Campaign, Case, Contact, Lead, Opportunity, and User records.
- Select a phone number field to include as an option in the TO Phone Number dropdown in the Messaging component.
- Select the default phone number field that users will see.
Scheduled Jobs
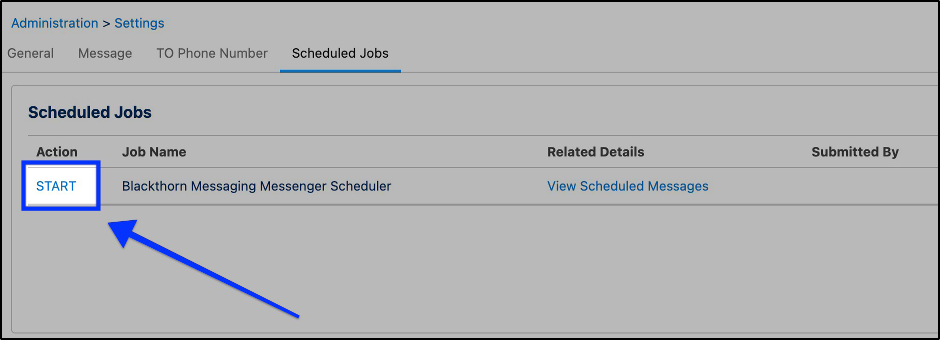
The Scheduled Jobs setting allows Admins to start, stop, and delete scheduled jobs. The START / STOP button was added to control messaging scheduling from the record-level component.

Actions to Perform
- Start: To begin or set out the scheduled job for individual messages.
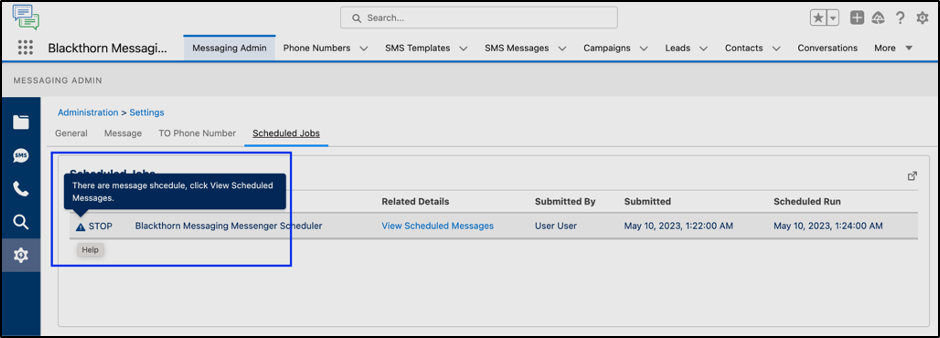
- Stop: Pauses the scheduled job, which ceases all the individual planned messages from sending.
- Delete: Cancels or removes the scheduled bulk SMS from sending. You cannot restart it once you delete the bulk SMS schedule.
Note: The individually scheduled messages will automatically get started/resumed if any user sends an SMS from the Blackthorn Messaging Messenger.
Start a Scheduled Job
An Admin can only schedule a job if that job starts on the Messaging Admin tab. Complete the steps below to start using Scheduled Jobs.
- Go to the Messaging Admin tab.
- Click Configuration Settings in the left-hand navigation bar.
- Click the Scheduled Jobs tab.
- Click START.


Stop a Scheduled Job
If there are pending scheduled jobs in the queue, an Admin cannot stop them. All the currently scheduled jobs must be completed before the process can be stopped.
The Admin will see the warning icon next to the STOP button when there are jobs scheduled.
After the queue is empty and the Admin clicks STOP, they will receive the following confirmation message.
Schedule a Message (RLC)
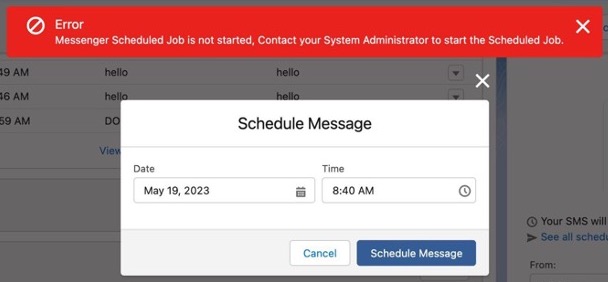
Users will not be able to schedule a message from the record level component (RLC) until an Admin starts the scheduled job in the Messaging Admin configuration settings. The Schedule for Later button will also be disabled.
If a user tries to schedule a message and the scheduled job is not started, they will receive the following error message.
Actions to Perform
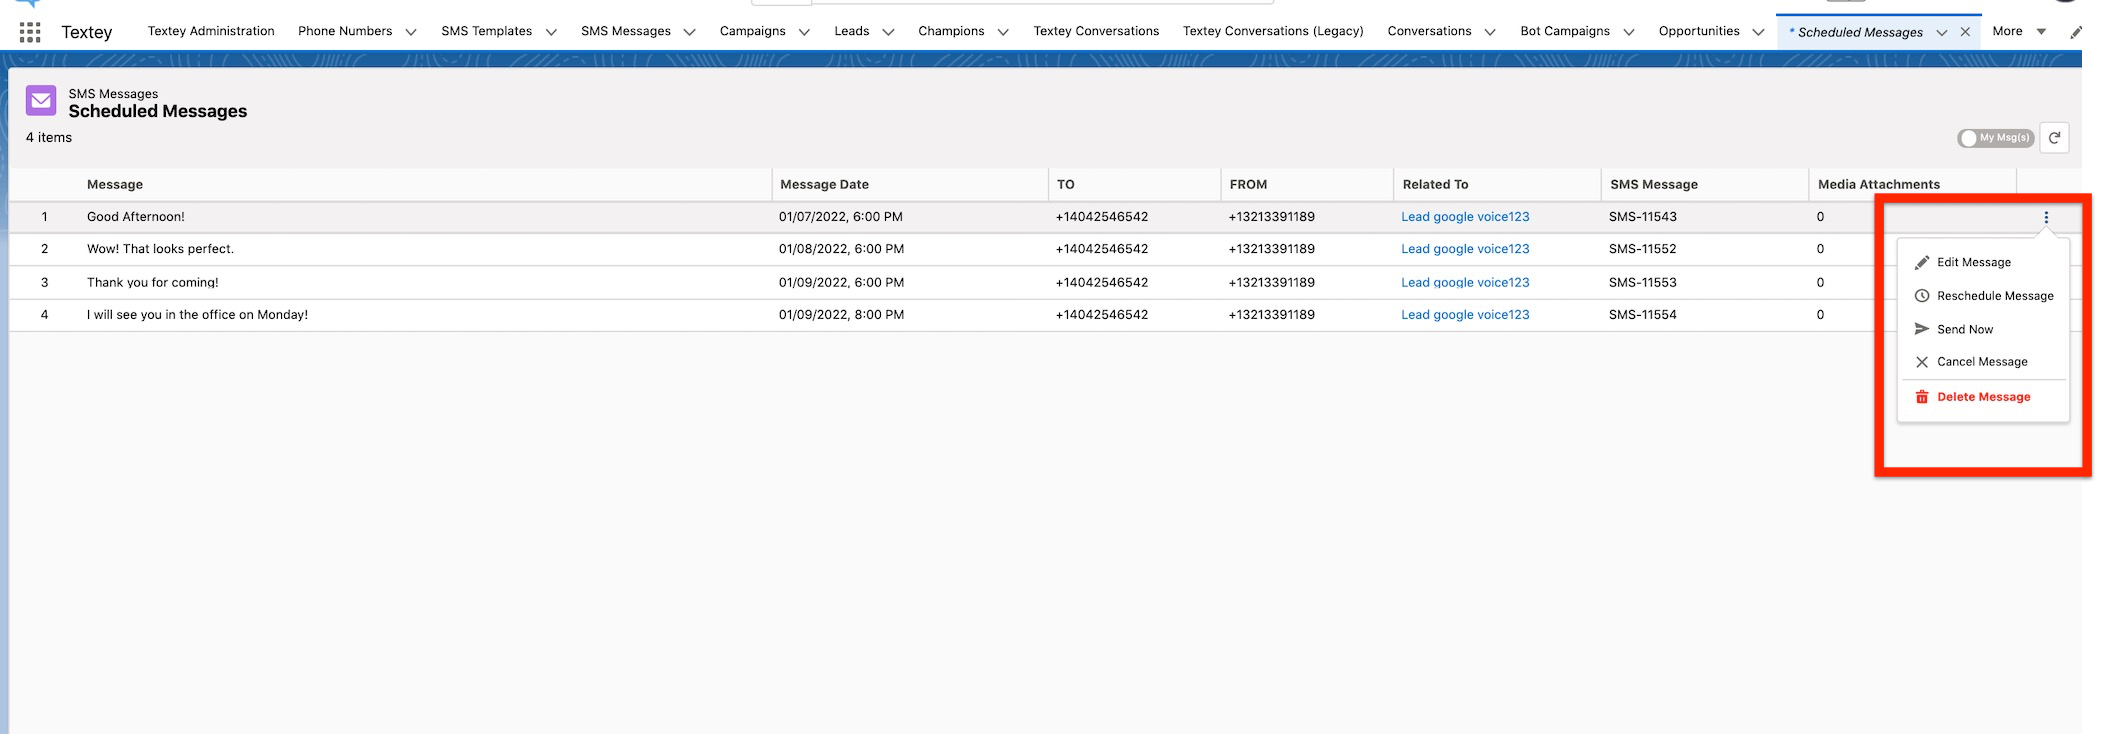
You can separately perform additional actions on messages.
- Edit Message: Change the body of the message
- Reschedule Message: You can schedule the message for another time
- Send Now: Sends the message right away
- Cancel Message: Calls off the message
- Delete Message: Removes the message
