If you were an Authorize.net customer before coming to Blackthorn | Payments, you may want to sync your customers and Payment Methods from Authorize.net into Salesforce. Please refer the documentation below for instructions to migrate the historic customers and Payment Methods into Salesforce.
Overview
With Authorize.net, we support over 20 processors. The list of supported processors is here.
When setting up Authorize.net, you can either use Authorize.net as a processor or use any number of their supported processors. The pricing will vary.
Scope
The Authorize.net Payment Gateway is currently supported with PayLink, DocumentLink, and the Events checkout.
Instructions
If you do not have an Authorize.net account and need one, please fill out this form. If you have a contract with one of the supported 20+ processors and want to use Authorize.net as your Payment Gateway, you'll need an Authorize.net account. Use these account credentials to connect your Payment Gateway following the setup doc below.
If you've had an Authorize.net account for a while (pre 2018) you'll want to ensure that you've enabled the Customer Information Manager. This will ensure you don't run into unexpected errors later. From your authorize.net account goto Tools > Customer Information Manager > Click "Sign up for Customer Information Manager (CIM) Now". Check out this article for more information and screenshots.
Setup
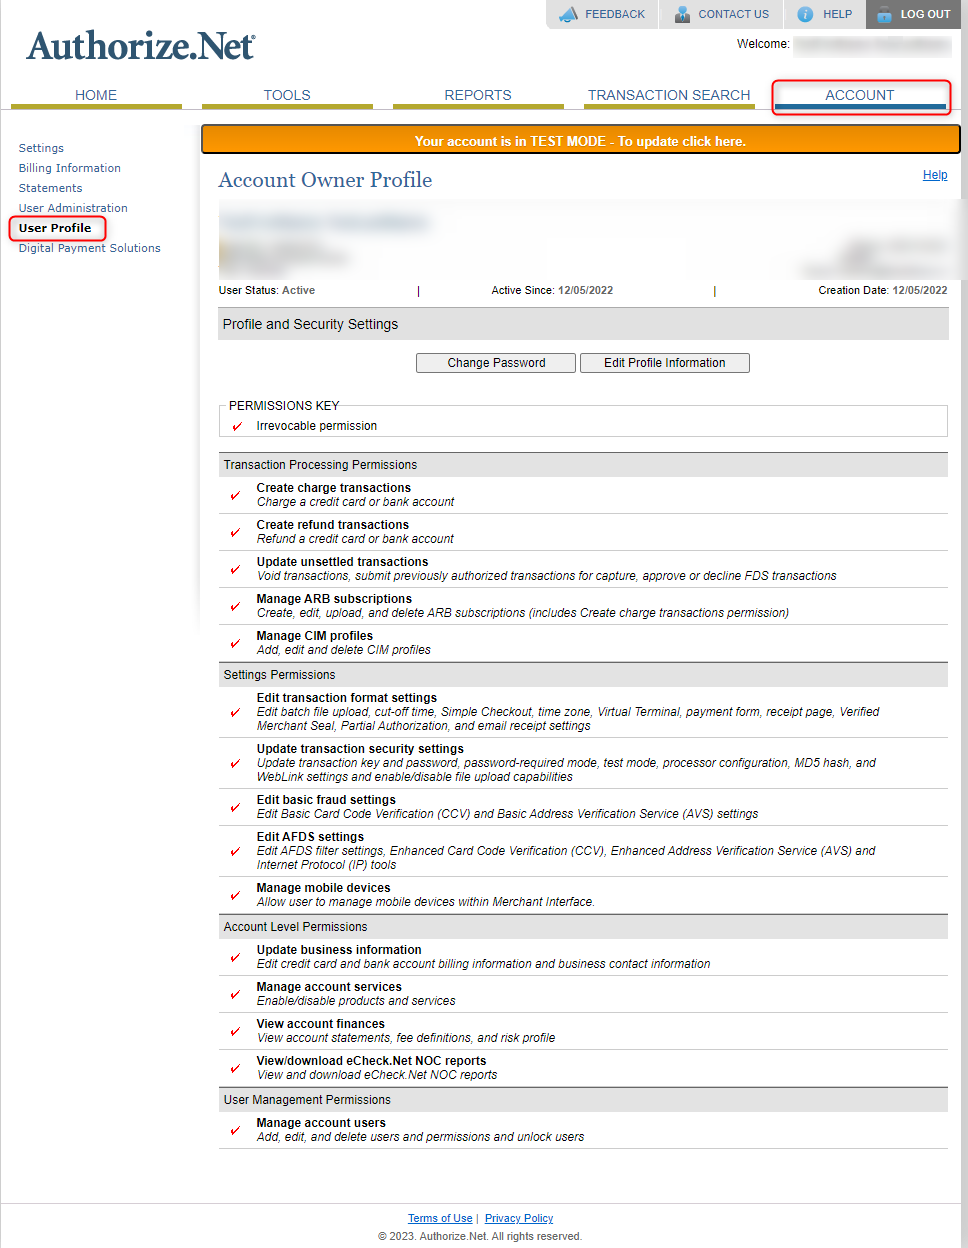
Authorize.net Permission Requirements
The user who connects the payment gateway to Authorize.net must have the following permissions checked on their Account Owner Profile.
- Permissions Key
- Irrevocable permission
- Transaction Processing Permissions
- Create charge transactions
- Create refund transactions
- Update unsettled transactions
- Manage ARB subscriptions
- Manage CIM profiles
- Settings Permissions
- Edit transaction format settings
- Update transaction security settings
- Edit basic fraud settings
- Edit AFDS settings
- Manage mobile devices
- Account Level Permissions
- Update business information
- Manage account services
- View account finances
- View/download eCheck.Net NOC reports
- User Management Permissions
- Manage account users
Create a Payment Gateway
If you are a customer that needs to support multiple currencies through your Authorize.net Payment Gateway you will need to create an Authorize.net gateway for each currency. This is a limitation for Authorize.net.
We do have a validation you can enable to make sure your Transaction record currencies match your Payment Gateway currencies. Check it out here.
To begin, you will need to create a Payment Gateway record to connect to your Authorize.net account. It can be done via the Payment Setup Wizard or the Payment Gateway tab.
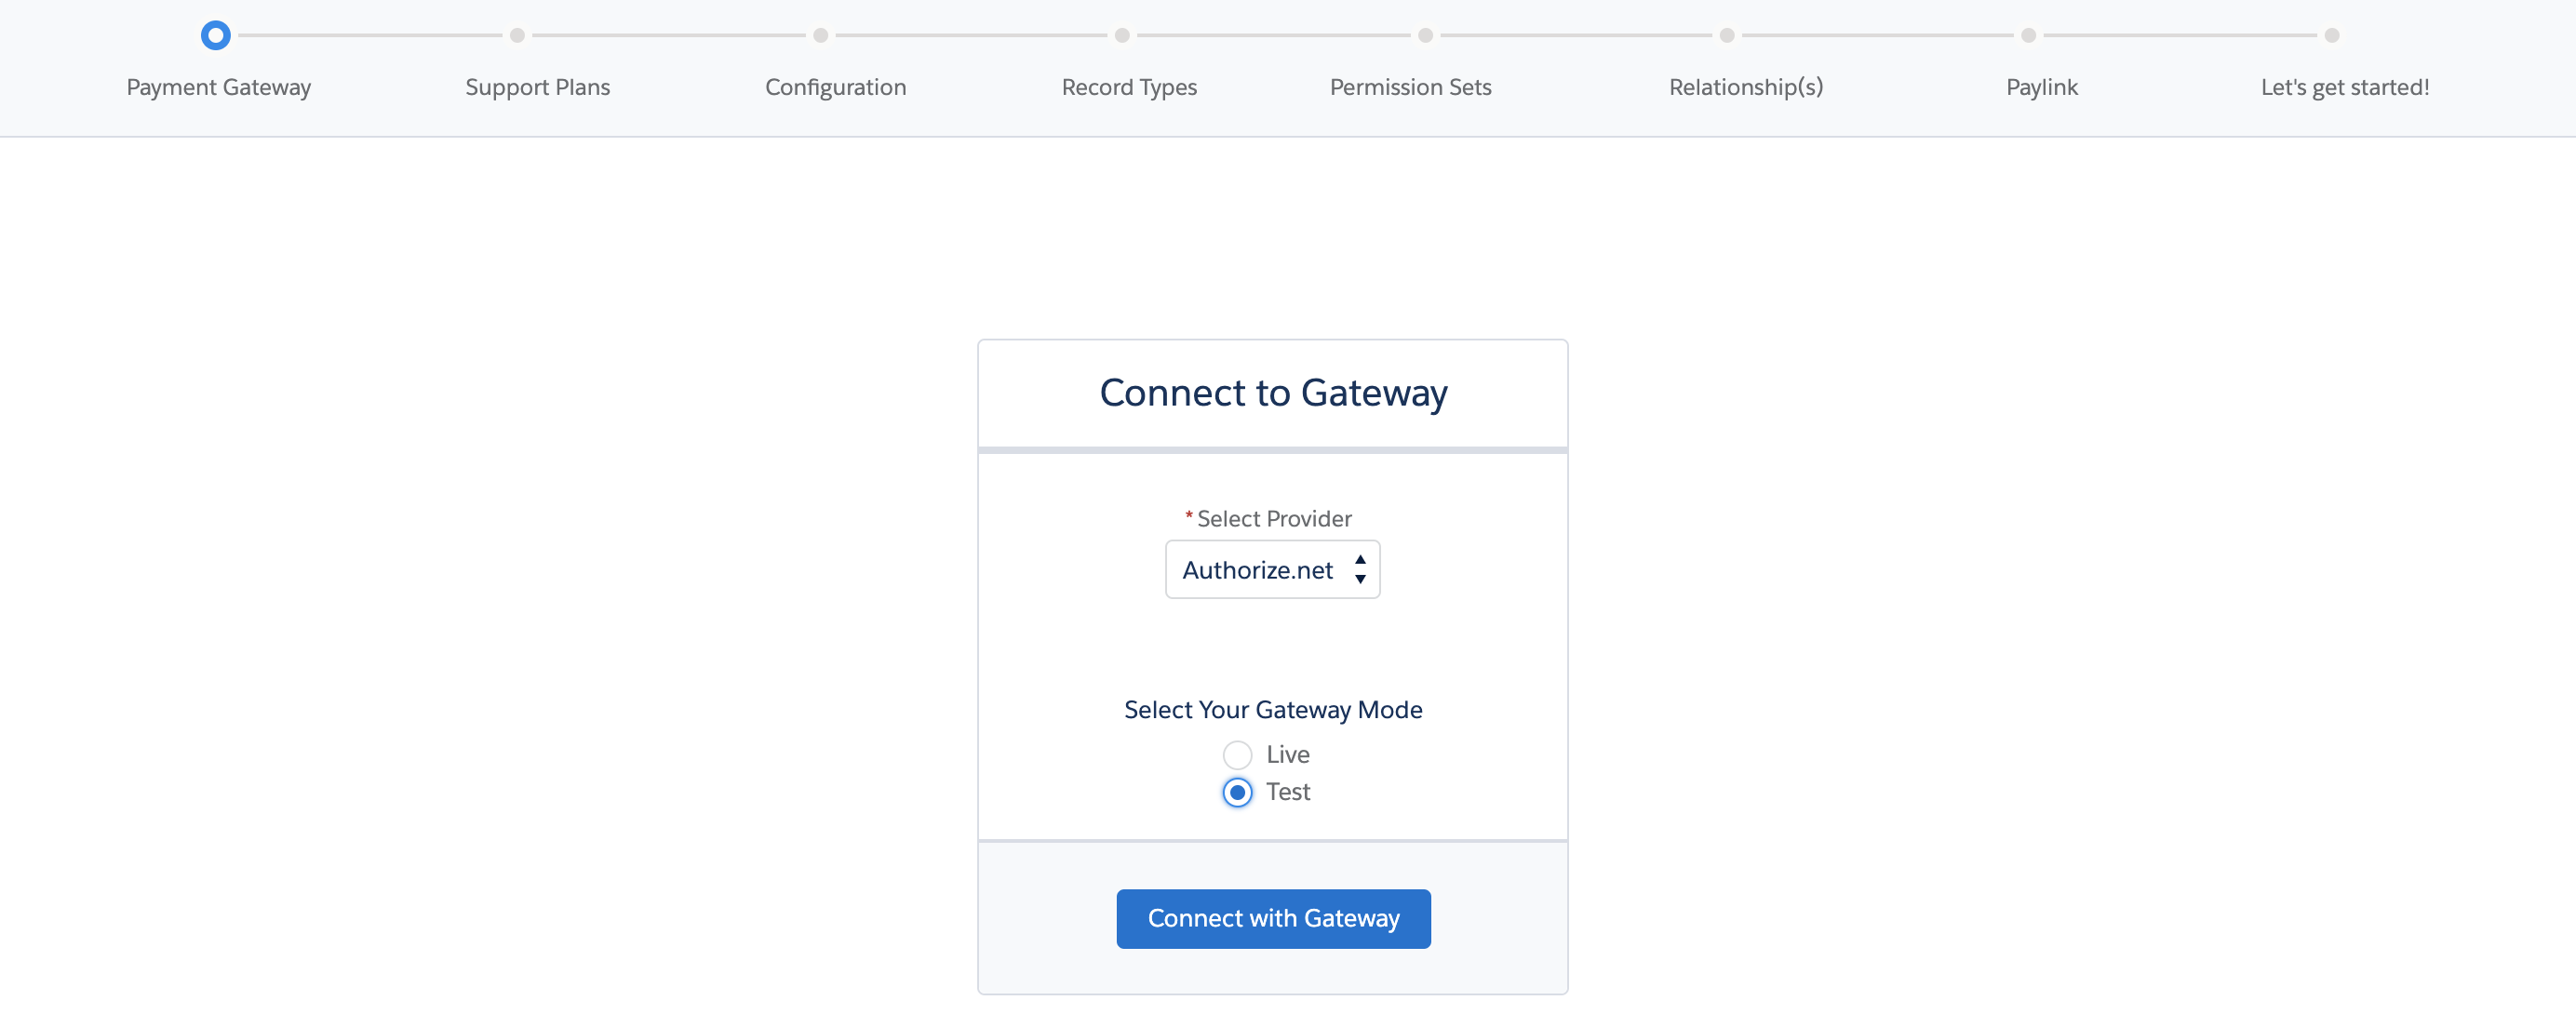
Using the Blackthorn | Payment Setup Wizard
- Navigate to Blackthorn | Payments (Admin) app and click the Blackthorn | Payments Admin tab.
- Set Provider = "Authorize.net".
- Check "Test" if you want to connect to your Authorize.net sandbox.
If you don't have a sandbox account yet, create a sandbox for testing. - Click Connect to Gateway.
- Complete the Payments Setup Wizard flow.
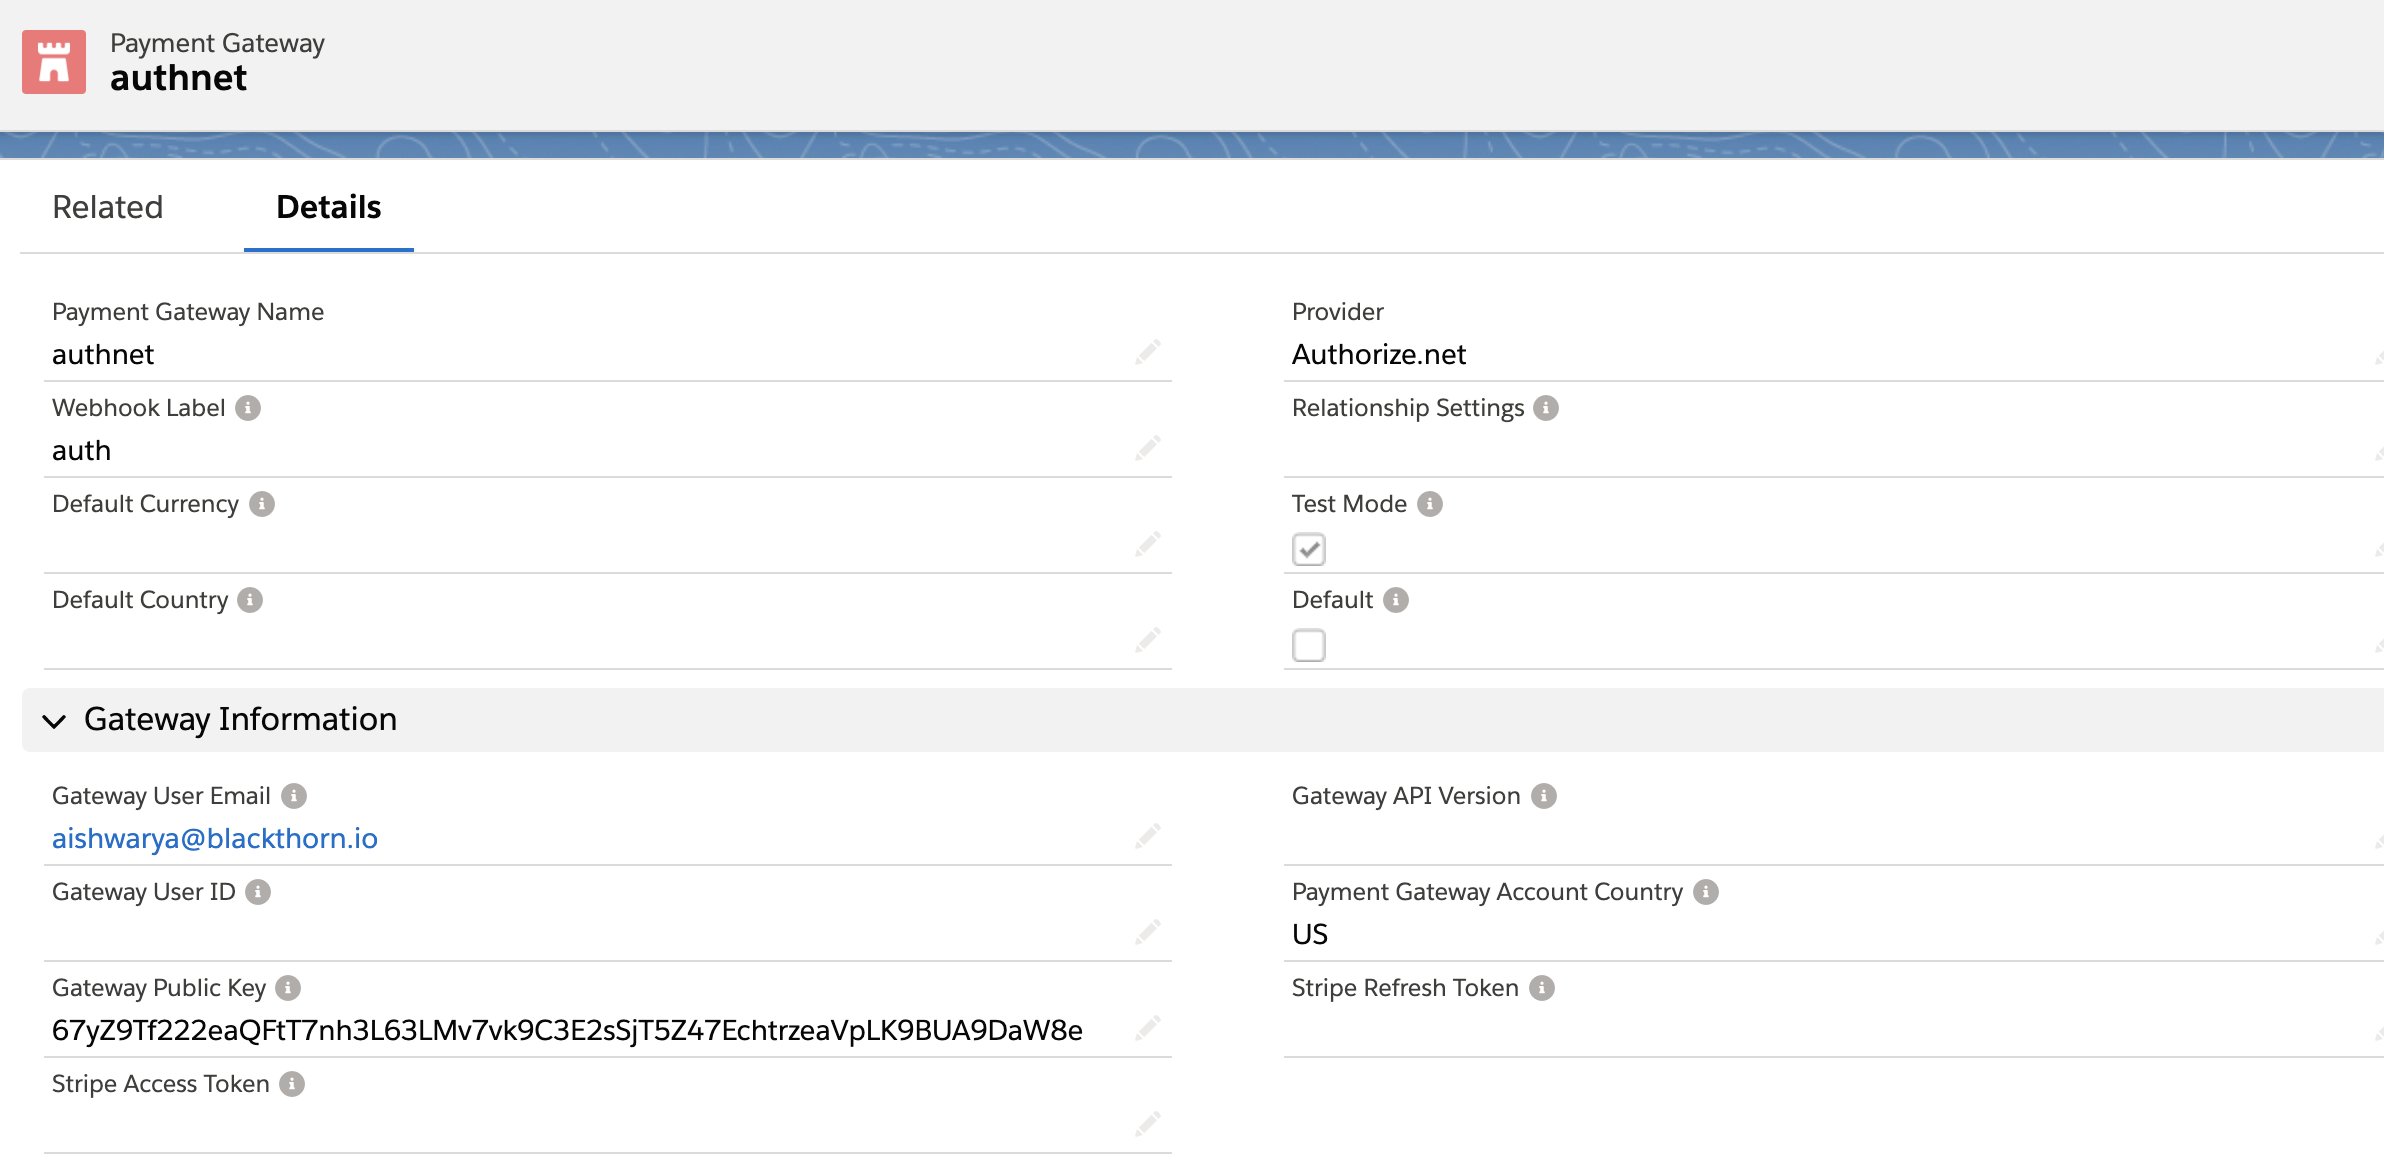
Once the Setup Wizard is completed, you'll notice that the Gateway User Email, Gateway Public Key and Payment Gateway Account Country fields are auto-populated. This means that the Payment Gateway is successfully connected.
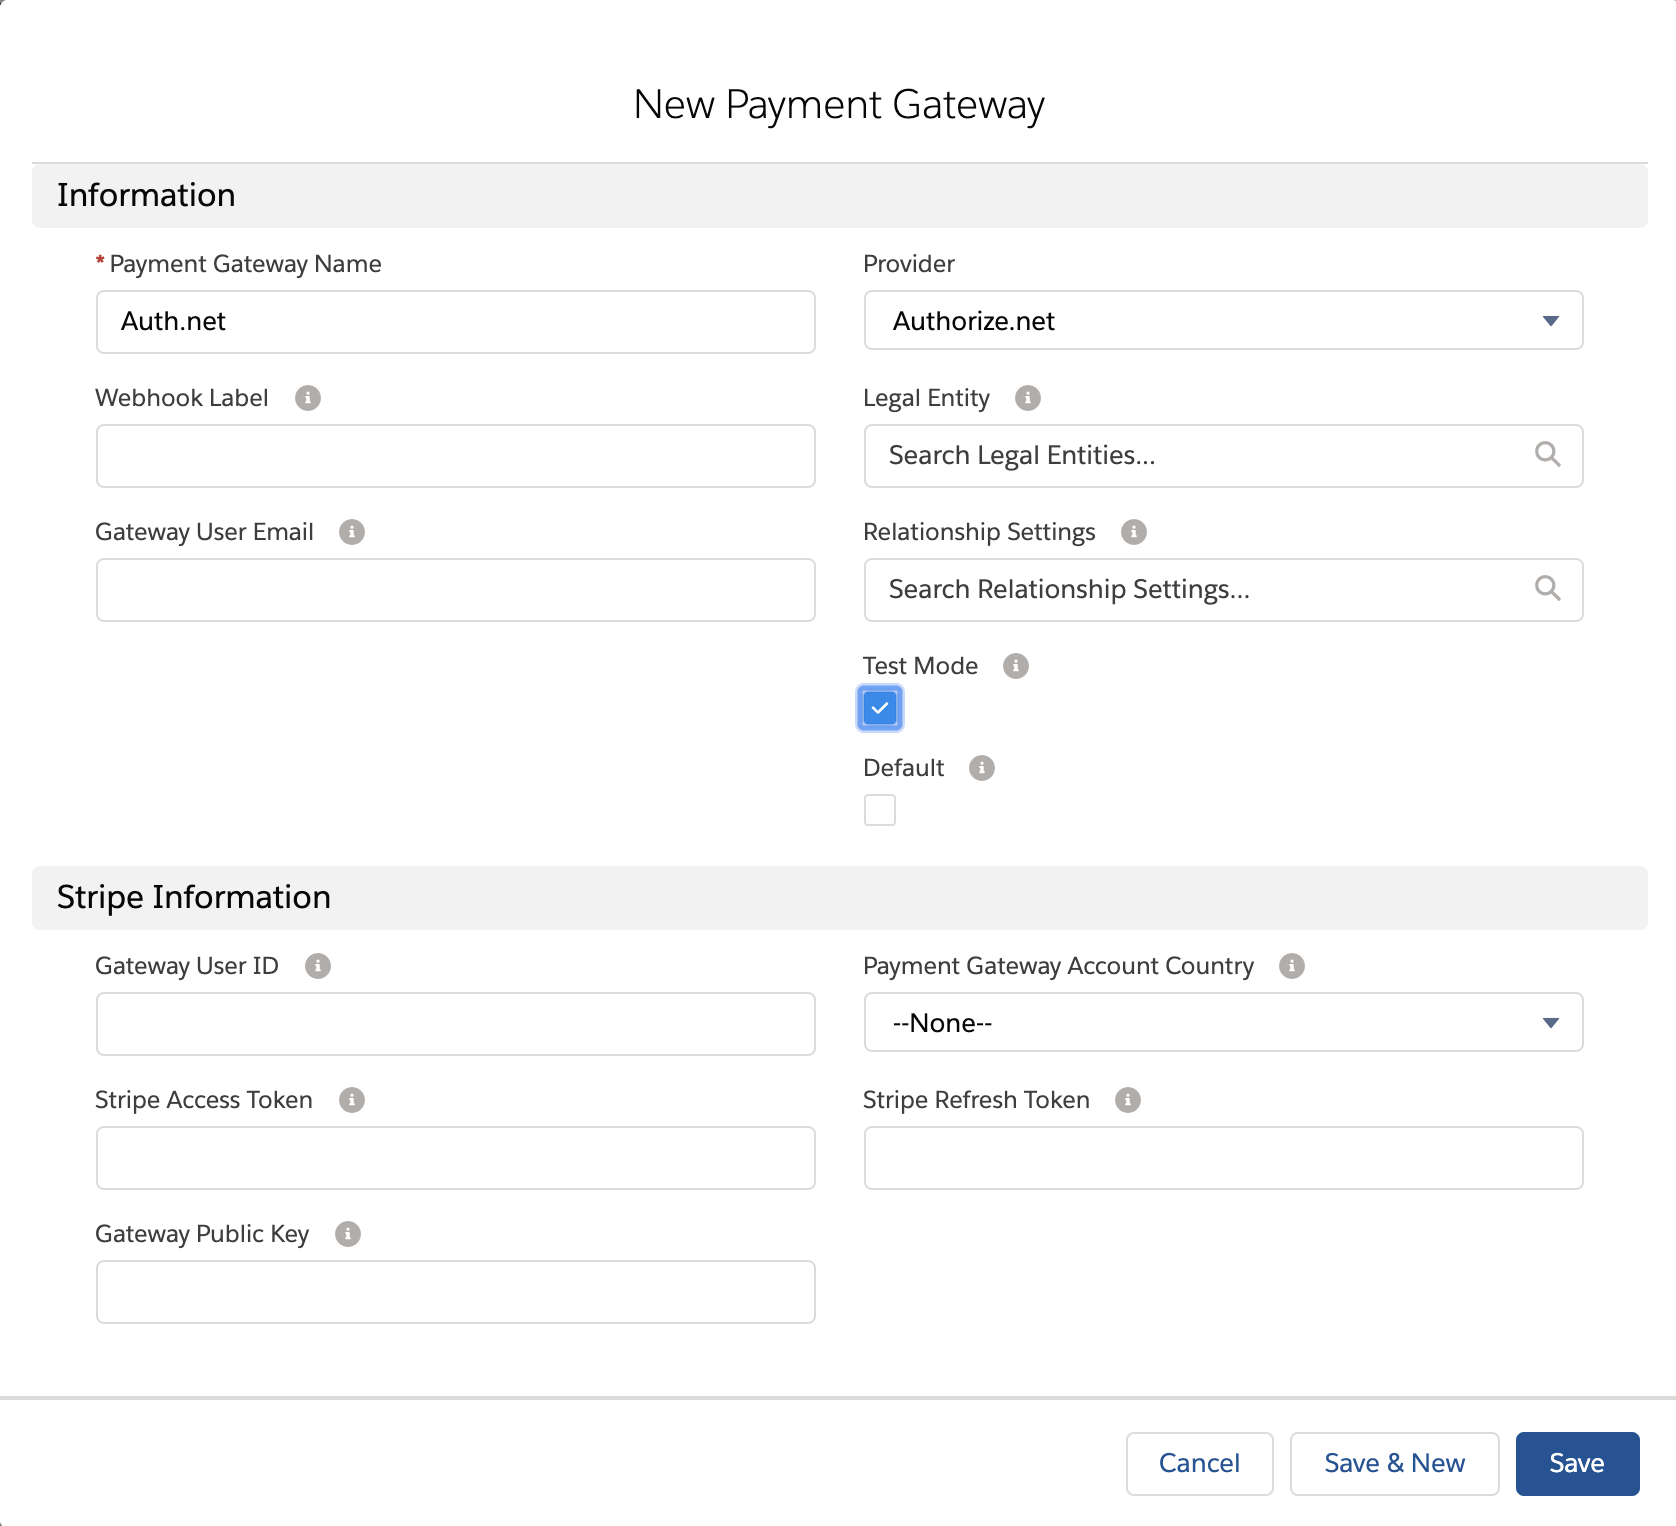
Using the App Launcher
- Navigate to the App Launcher and select Blackthorn | Payments (Admin) app.
- Navigate to the Payment Gateways tab and click New.
- Define the Payment Gateway Name.
- Set Provider = "Authorize.net".
- Check "Test" if you want to connect to your Authorize.net sandbox.If you don't have a sandbox account yet, create a sandbox for testing.
- Provide a Webhook Label, if webhooks are implemented (Optional).
- Provide a valid currency code in Default Currency, a blank Default Currency is considered "USD".
- Check the Enable Authorize.Net CVV Filter field if you want to require users to re-enter their CVV code for the card they are using.
- Click Save.
- Once the record is saved, click Connect to Gateway.
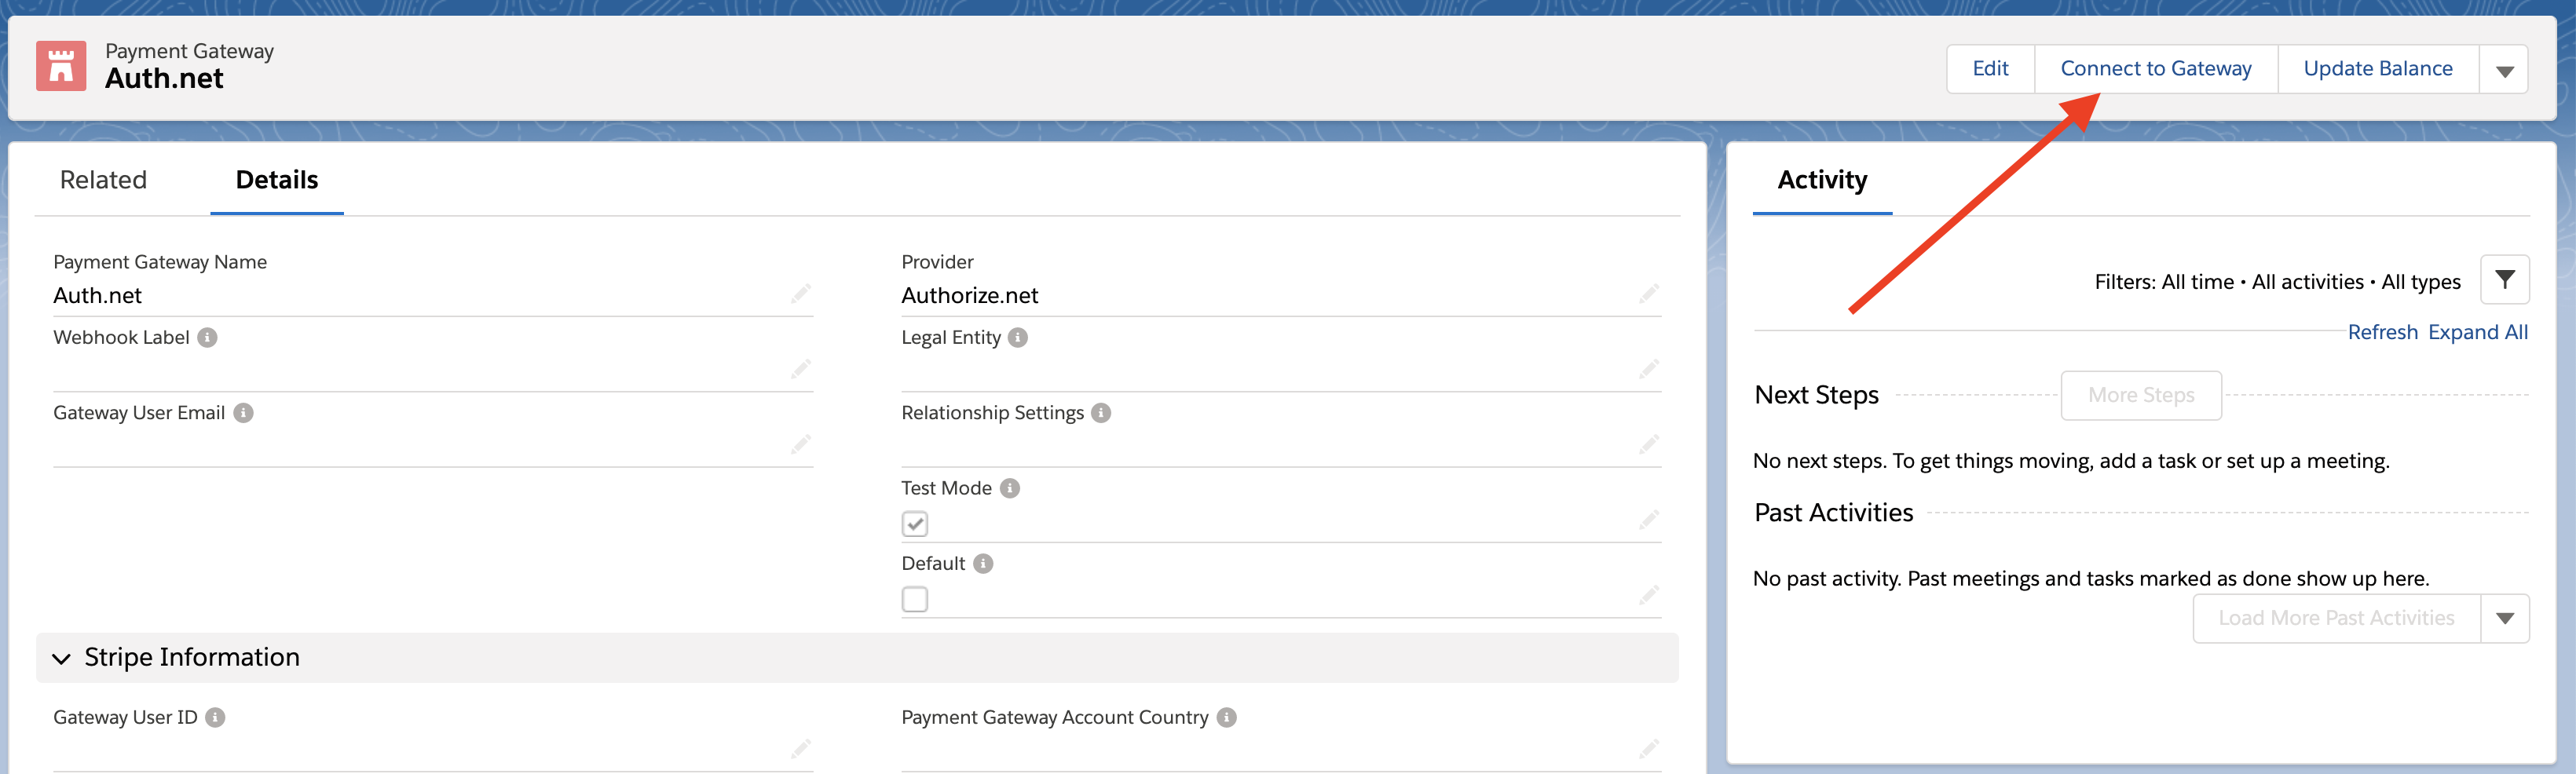
The Gateway User Email, Gateway Public Key and Payment Gateway Account Country will be auto-populated once the gateway is successfully connected.

Define the Gateway User ID
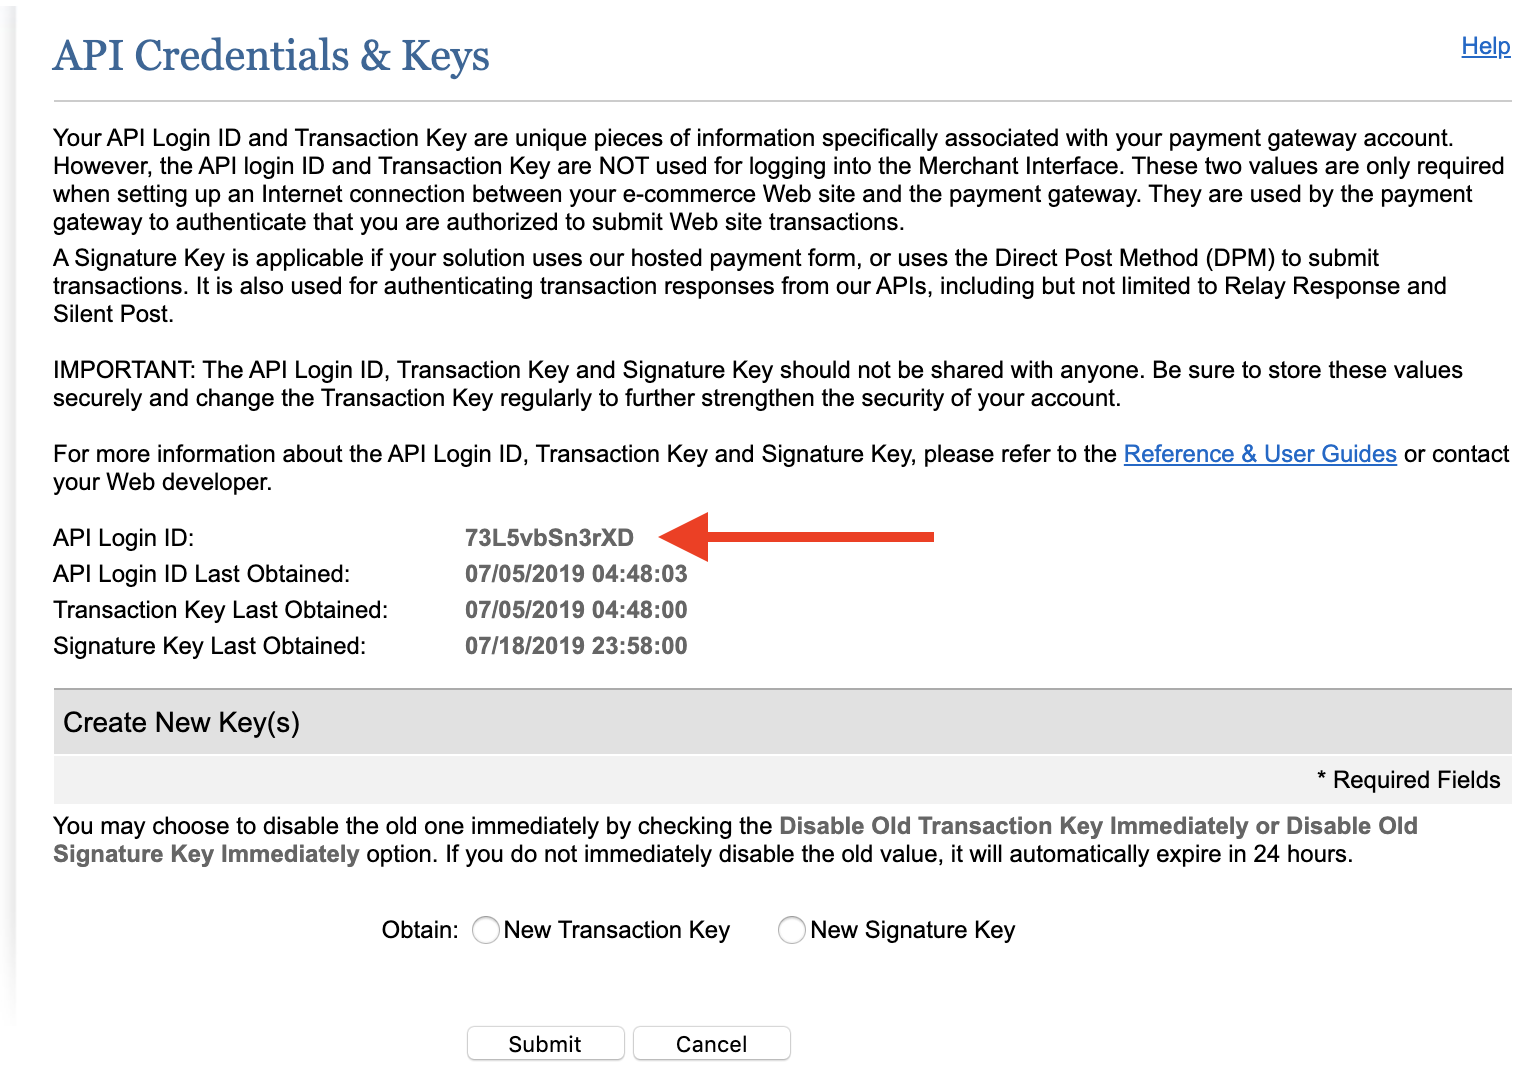
Now that you are connected to your Payment Gateway, you need to manually copy the “API Login ID” from your Authorize.net account and paste it into the Payment Gateway Gateway User ID field.
- Log into your Authorize.net account.
- Click Account and then API Credentials and Keys.
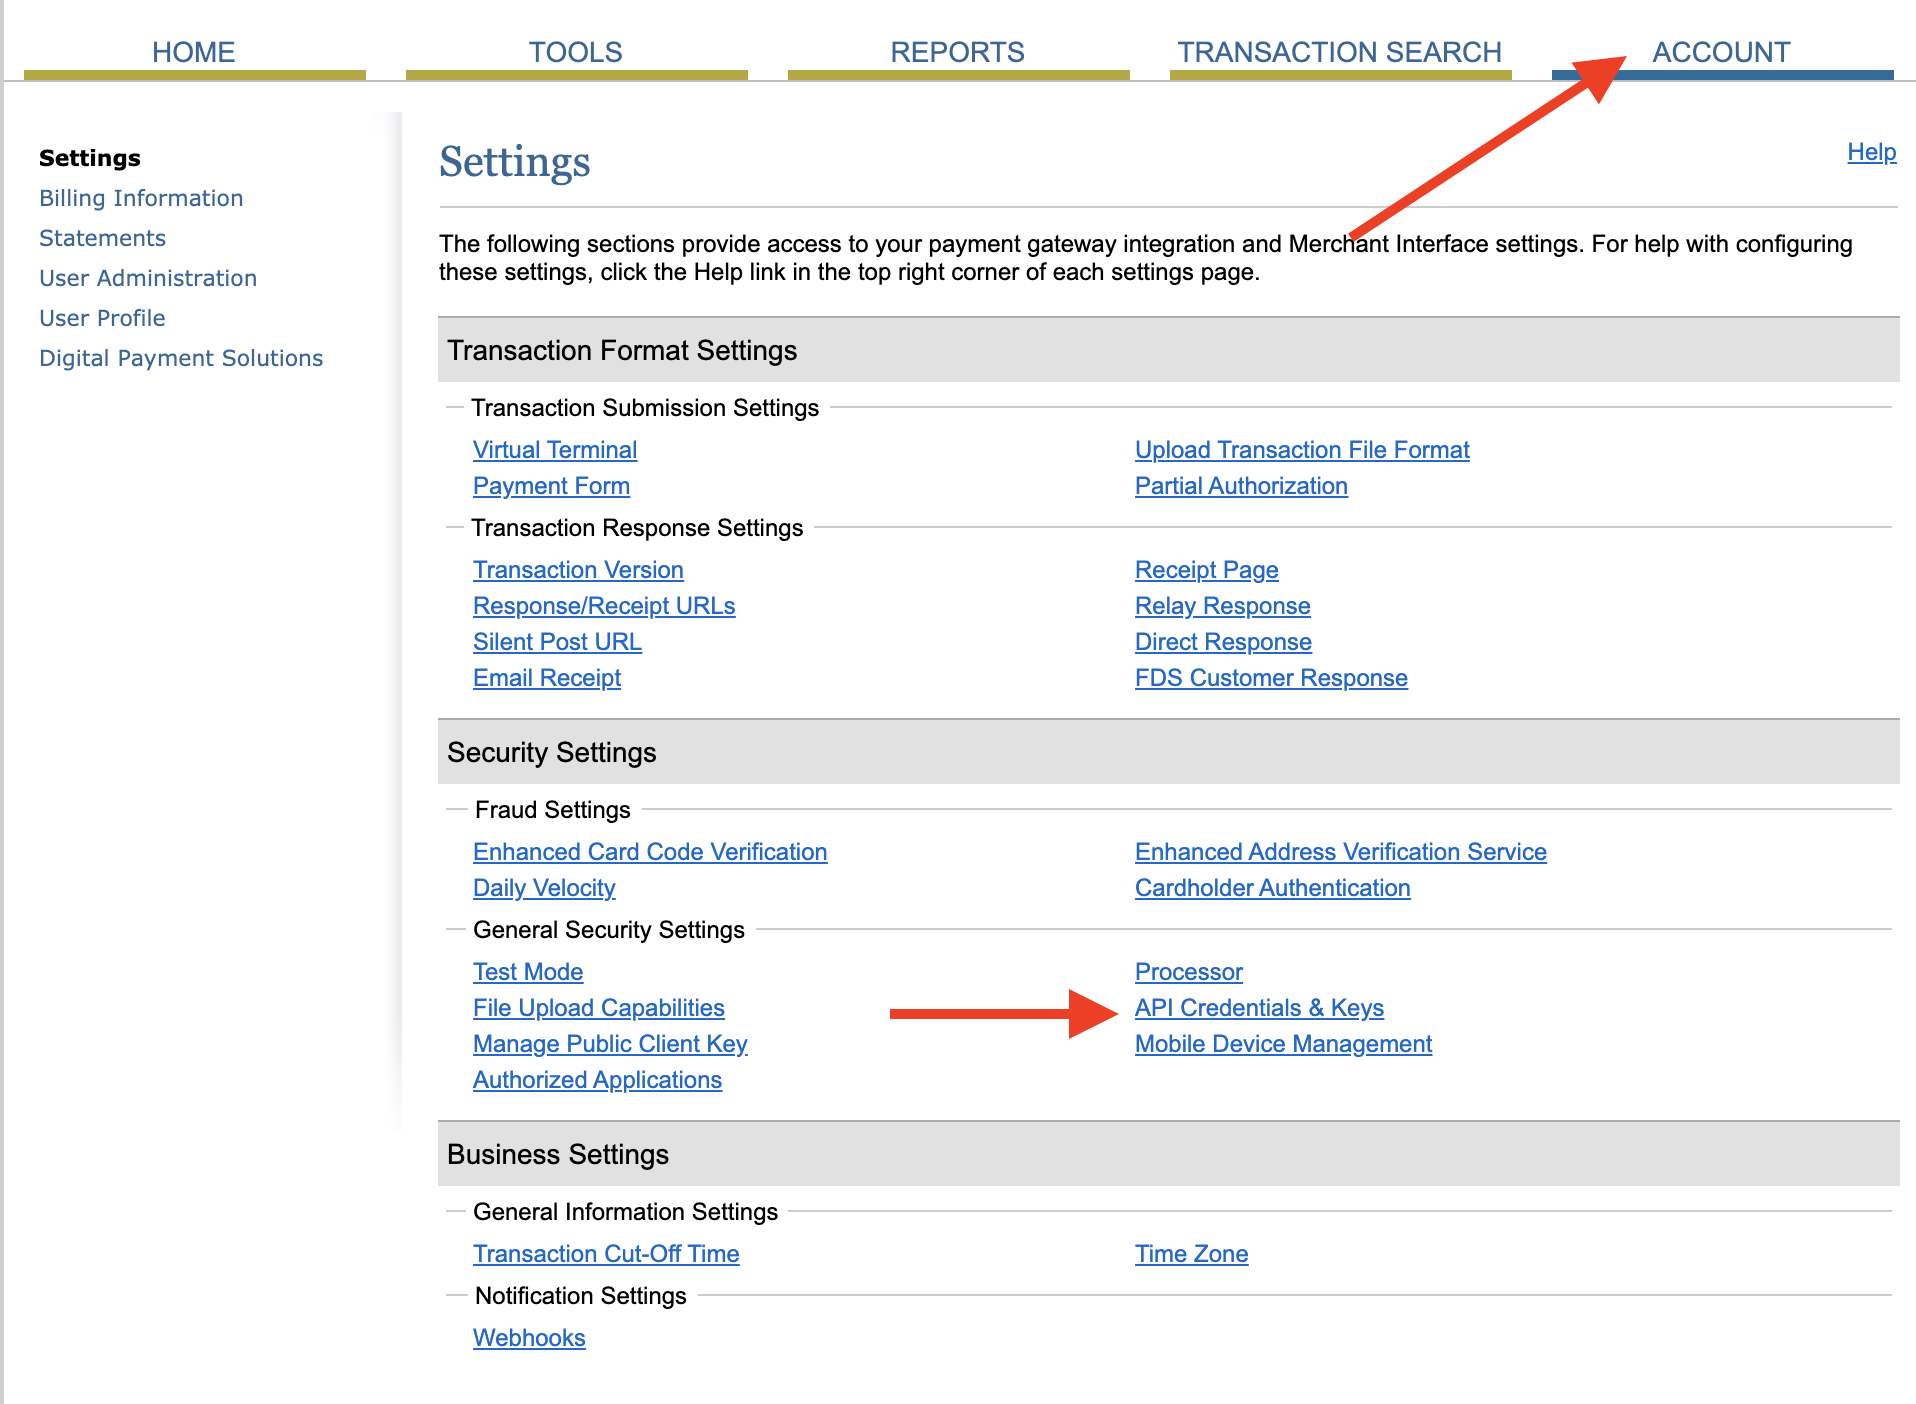
- Copy the “API Login ID”.
- Enter the “API Login ID” in the Gateway User ID field.
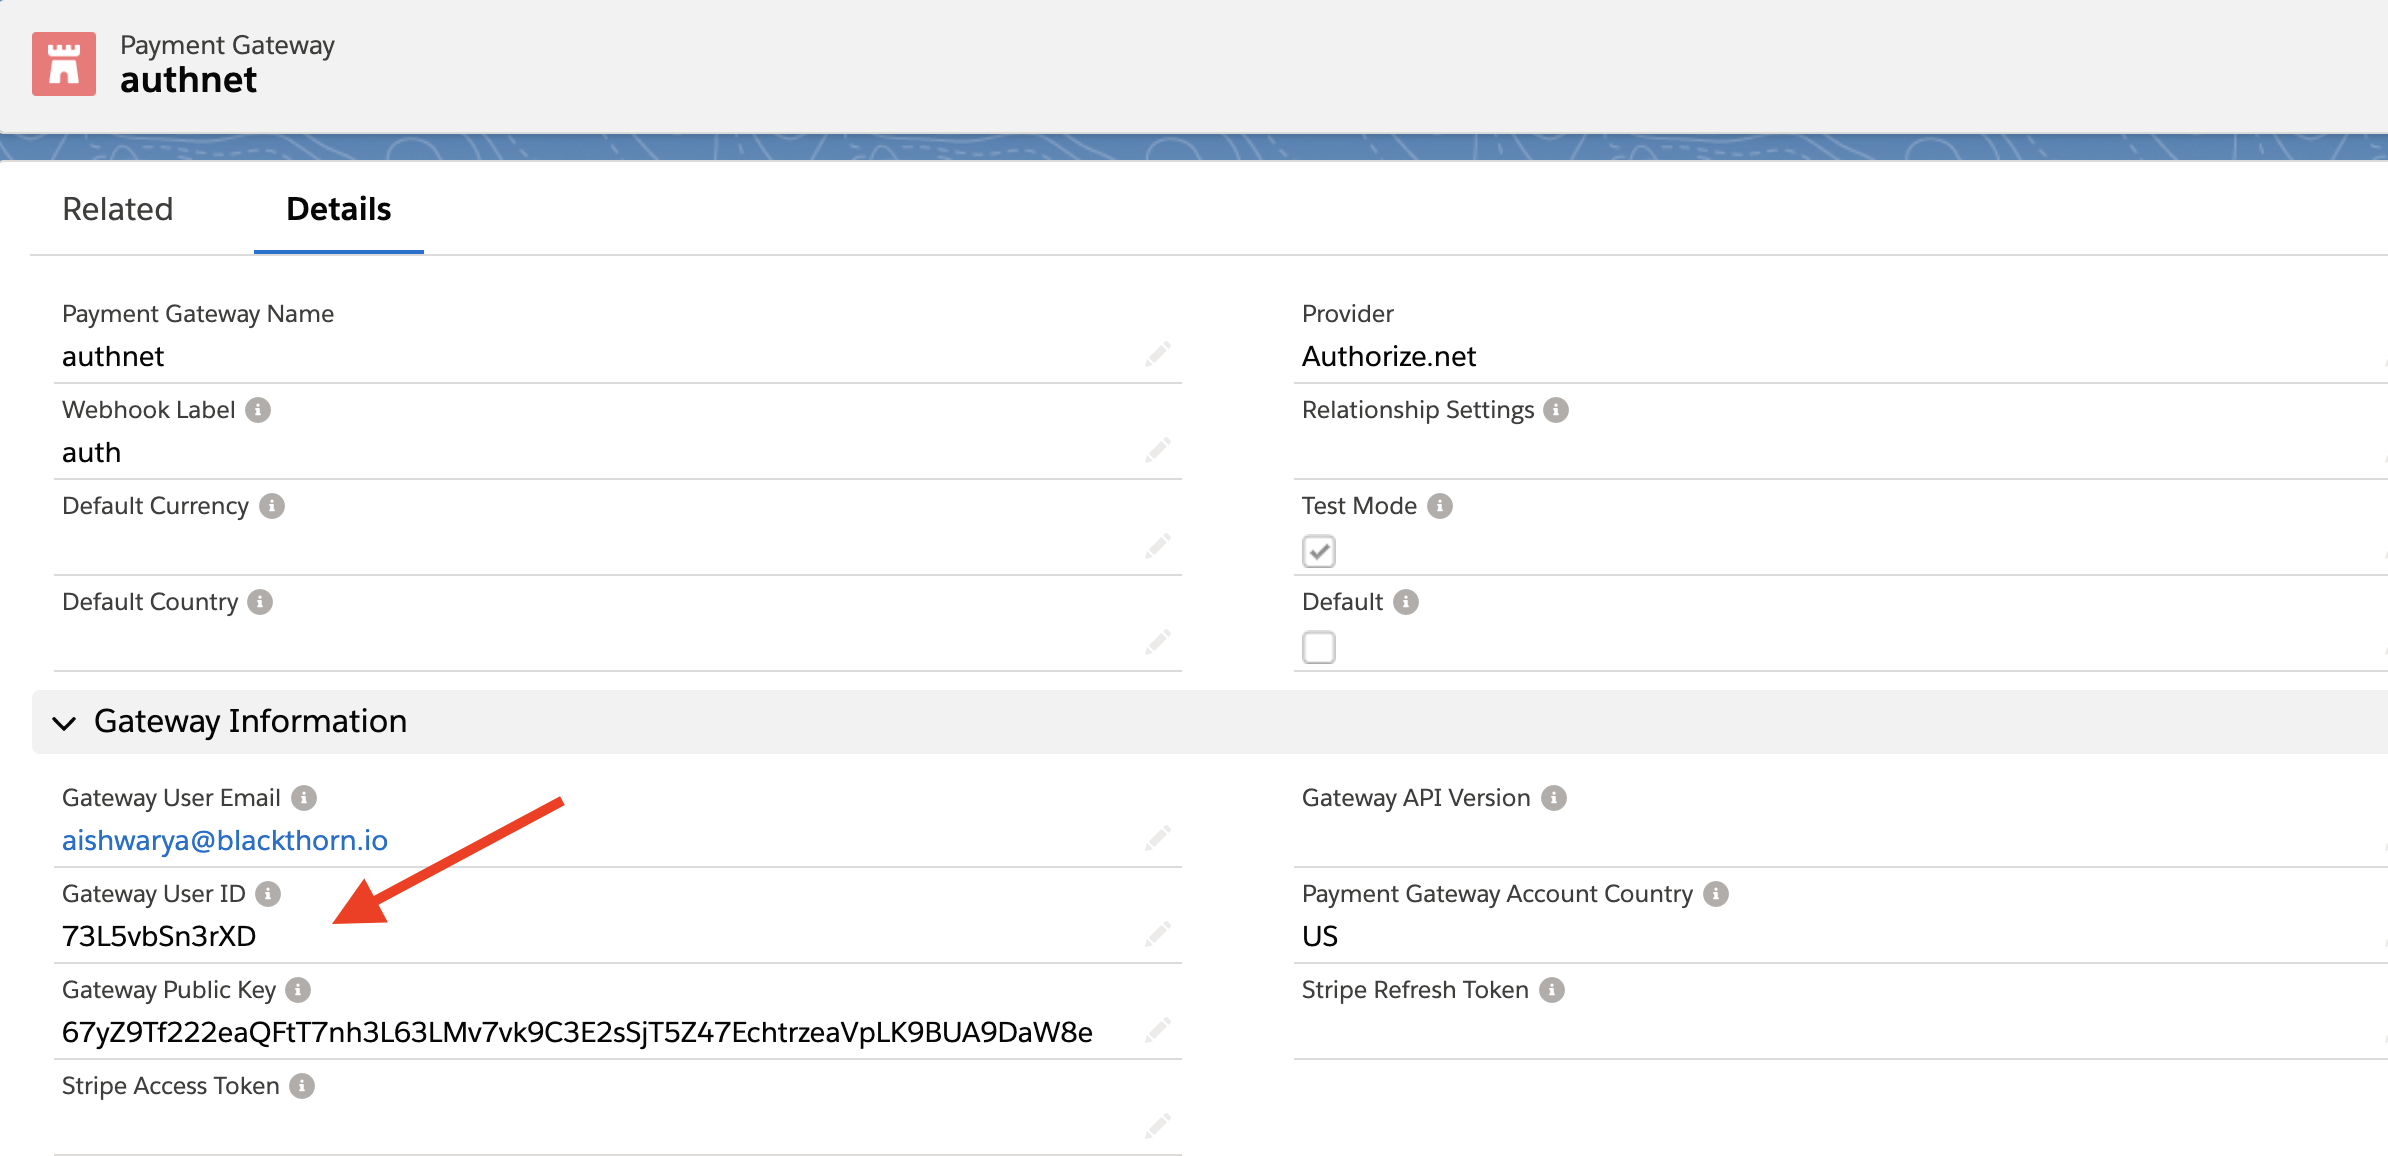
- Click Save.
Add a Payment Method
Follow the instructions below to set up Credit Card and ACH Payment Methods with Authorize.net.
Create a Transaction
- Create a new Transaction record (Charge).
- Set the Payment Method lookup field to an Authorize.net related record.
- Enter an Amount.
- Enter a Description (Optional).
- Set the Invoice Number (Optional) - You will need to add this field to the page layout.
- Click Save.
- Click Capture or Authorize.
Refer to the Charge a Transaction guide for additional information.
Refund a Transaction
Click Refund to refund a captured Transaction or to release an authorized Transaction.
Duplicate Transactions
To prevent incorrect duplicate Transactions when using Authorize.net, a new custom setting labeled “Duplicate window” was added to Blackthorn Pay - Trigger Settings. The new custom setting includes the following functionality.
- The user is UNABLE to capture the duplicate Transaction when
- the Transaction is within the time mentioned in the Duplicate window custom setting
- the Duplicate window = “NULL” in Custom Settings
- The user is ABLE to capture the duplicate Transaction when
- the time is after the time set in the Duplicate window custom setting
- running the Batch Job
Authorize.net Fraud Detection Settings
If the values in a captured Transaction match or exceed the Authorize.net fraud detection settings, the Transaction’s Transaction Status field will update to “On Hold.” The “On Hold” value prevents a reattempt Transaction from being created before the Transaction can be reviewed and approved or declined.
- If an “On Hold” Transaction is voided or declined, the Transaction Status will be updated to “Failed” and no reattempt Transaction will be created.
- If the Transaction is approved, the Transaction Status will be changed to “Completed.”
Transactions that fall outside the Authorize.net fraud detection settings and do not require a review will not have their Transaction Status set to “On Hold.” Instead, a reattempt Transaction will be created.
Transaction Errors
An error code and message are provided in the Error Message and Error Code fields when a Transaction fails.
Review the response codes to find specific details about the Error Code (Response Codes).
To generate a failed Transaction for testing, visit Authorize.net Testing Guide.
Webhooks
Webhooks provide a mechanism where a server-side application (in this case Authorize.net) can notify a client-side application (in this case Payments) when a new event (like customer create, update, delete, charge capture, charge failed, etc) has occurred on the server.
Webhooks automatically send specified data to a destination (endpoint) from database events.
Follow our instruction guide here for setting up webhooks in Authorize.net.
Create a Customer in the Authorize.net Portal
If you have created a Customer Profile in Authorize.net, webhooks can update Salesforce and add the new Payment Gateway Customer record and Payment Method record.
Considerations:
- Payment Profile information will used to populate the Payment Method record.
- Customer Profile in Authorize.net does not contain many fields. In order to populate the Payment Gateway Customer record, fields from the Payment Profile may be used.
- Example: Authorize.net Payment Profile Name = Payment Gateway Customer Name.
Visa Checkout (Optional)
Get the Visa Key from Authorize.net
- Login in your Authorize.net account.
- Click Account tab > Digital Payment Solutions.
- Click Signup next to "Visa Checkout".
- Capture the "Visa Key" from the Visa Checkout API Key section.
Create a Salesforce Site (if not yet created)
- Register with a site domain in Salesforce. Setup > Search for Sites > Sites > Register with a unique Domain > New.
- Fill in the required information.
- Set any page to Active Site Home Page = "True".
- Click Save.
- Capture the URL and Path. Ex. https://myurl-developer-edition.na91.force.com/mypath
The client-side HTML will call start () function to init (payload). You have to use the "Visa Key" in the HTML. The same value will be stored in the Gateway Public Key field on the Payment Gateway.
Migrate Payment Methods and Customers
If you were an Authorize.net customer before coming to Blackthorn Payments, you may want to sync your Authorize.net customers (Customer Profile), Payment Methods (Payment Profiles), and Transactions from Authorize.net into Salesforce.
This guide will help you understand our object model so you can easily sync the information using the Data Loader tool.
- Create a Payment Gateway in Salesforce and connect to your Authorize.net account.
- Export customers and cards information from Authorize.net gateway into an excel document. Please convert to CSV type file.
- We have two objects in Salesforce - Payment Gateway Customers and Payment Methods where this information will be mapped. Prepare an excel spreadsheet with this customer information mapping to respective fields on the Payment Gateway Customer/Payment Method.
- In Salesforce, go to Custom Settings > Blackthorn | Payment Triggers > Edit > Disable all triggers.
- Contact Blackthorn Support to disable CVV and Postal Code checks. (If you have information about the postal code, we can skip disabling this for you.)
- Download the CSV file and import into the Payment Gateway Customer in Salesforce using the Data Loader.
- Export the Payment Gateway Customer list from Salesforce and locate the record ID. Map the record ID in your Excel spreadsheet to Payment Gateway Customer lookup field on the Payment Method before importing.
- Import the Payment Methods into Salesforce.
- Visit Custom Settings to “Enable all triggers”.
Customer Field Map
| Salesforce Field Name | Authorize.net Label |
|---|---|
| Payment Gateway Customer | Payment Profile |
| Name | First Name + Last Name |
| Customer ID | Customer Profile ID |
| Description | Description |
| Billing City (Optional) | City |
| Company | Company |
| Postal Code(optional) | ZipPostal Code |
| Billing Street 1 (Optional) | Address |
| Billing State (Optional) | StateProvince |
| Billing Country | Country |
| Phone | Phone |
Payment Field Map
| Salesforce Field Name | Authorize.net Label |
|---|---|
| Payment Method | Payment Profile |
| Holder’s Name | First Name + Last Name |
| Email (Optional) | |
| Card ID | Payment Profile ID |
| Customer ID | Customer Profile ID |
| Record Type(Card/ACH) | Payment Type (CreditCard/Bank Account) |
| Street(Optional) | Address |
| City(Optional) | City |
| State (Optional) | StateProvince |
| Country (Optional) | Country |
| Last 4 Digits | CardNumber (last 4 digits) |
| Payment Gateway (lookup) | Hardcode the PG id |
| Payment Gateway Customer(lookup) | Fetch id from SF |
| Payment Method Status | Valid |
Alternative Migrating Method
To link the Contacts and/or Accounts to the Payment Gateway Customer or Payment Method records, complete the following steps.
- Create a report in Salesforce for Contacts with the First Name, Last Name, Email, and Record ID fields.
- Export them to a CSV file.
- Create and export a report of all Payment Gateway Customer records with Name, Email and Record ID fields.
- In Sheet B, create a new column "Contact" and add the formula to match the contacts to the Payment Gateway Customer via email.
- Download to CSV then import them back into Salesforce with size 1.
- Once the Contact lookup is set on the Payment Gateway Customer, it will auto-update the related Account as well as update all associated Payment Methods with the set Contact and Account.
If you want a Contact record created, you can create a Process Builder to create a Salesforce Contact when the Authorize.net Customer record is created in Salesforce.
This sync process is only to migrate your records from that moment backwards. Syncing Authorize.net with Salesforce going forward can be done through webhooks, but you should not be originating records outside of Salesforce.
Testing data
Find the testing information for Authorize.net here.
Troubleshooting
If you have received an error with Authorize.net or have a question, please view our Troubleshooting page. If you still have Authorize.net questions, please contact Blackthorn Support. We're happy to help!